
Astro
Coffee Guide
Read this before your first Milky Way shoot. Plan it, shoot it, edit it — the complete beginner field guide for Australian conditions.
Season & Direction
The single thing most beginners get wrong — and why Northern Hemisphere guides will send you in the wrong direction, literally.
The Milky Way core is visible from Australia roughly February through October. If you've been watching overseas creators, their season, direction and timing will not match what you see from here.
Jul–Oct: core sets in the west / south-west, earlier in the evening.
| Month | Direction | Notes |
|---|---|---|
| Jan | Pre-dawn | Short window, core sits low. Possible, not ideal. |
| Feb | East | Season opens. Late night into pre-dawn. |
| Mar–Apr | East | Prime east-rising season. Strong foreground options. |
| May–Jun | East → North | Good core height. Evening into late night. |
| Jul–Aug | North → West | Core more vertical then flips. Early evening. |
| Sep–Oct | West | Short closing window. Shoot early. |
| Nov–Dec | — | Off season. Core not at usable altitude. |
Use PhotoPills to confirm the exact angle for your location, date and time. The direction is only half of it — the angle of the core changes the entire composition.

PhotoPills top-down view showing the Milky Way arc and direction — plan this before you leave home.
Planning Your Shoot
Moon phase, dark skies, and the planning stack that separates a wasted drive from a clean night.
Moon phase is the biggest variable. Even a quarter moon washes out the dust lane detail you're chasing. Aim for new moon ± 3–4 days. A thin crescent is acceptable if it rises after your main shooting window.
Wait for astronomical twilight. Don't start because it looks dark. Wait until the sun is 18° below the horizon — PhotoPills gives you the exact local time. Before that, residual light flattens the core and your files will look soft and muddy.
Dark sky beats gear. A mid-range camera at Bortle 3–4 will outperform a flagship at Bortle 6+. Use the light pollution map to find where the darkness actually starts, then drive there.
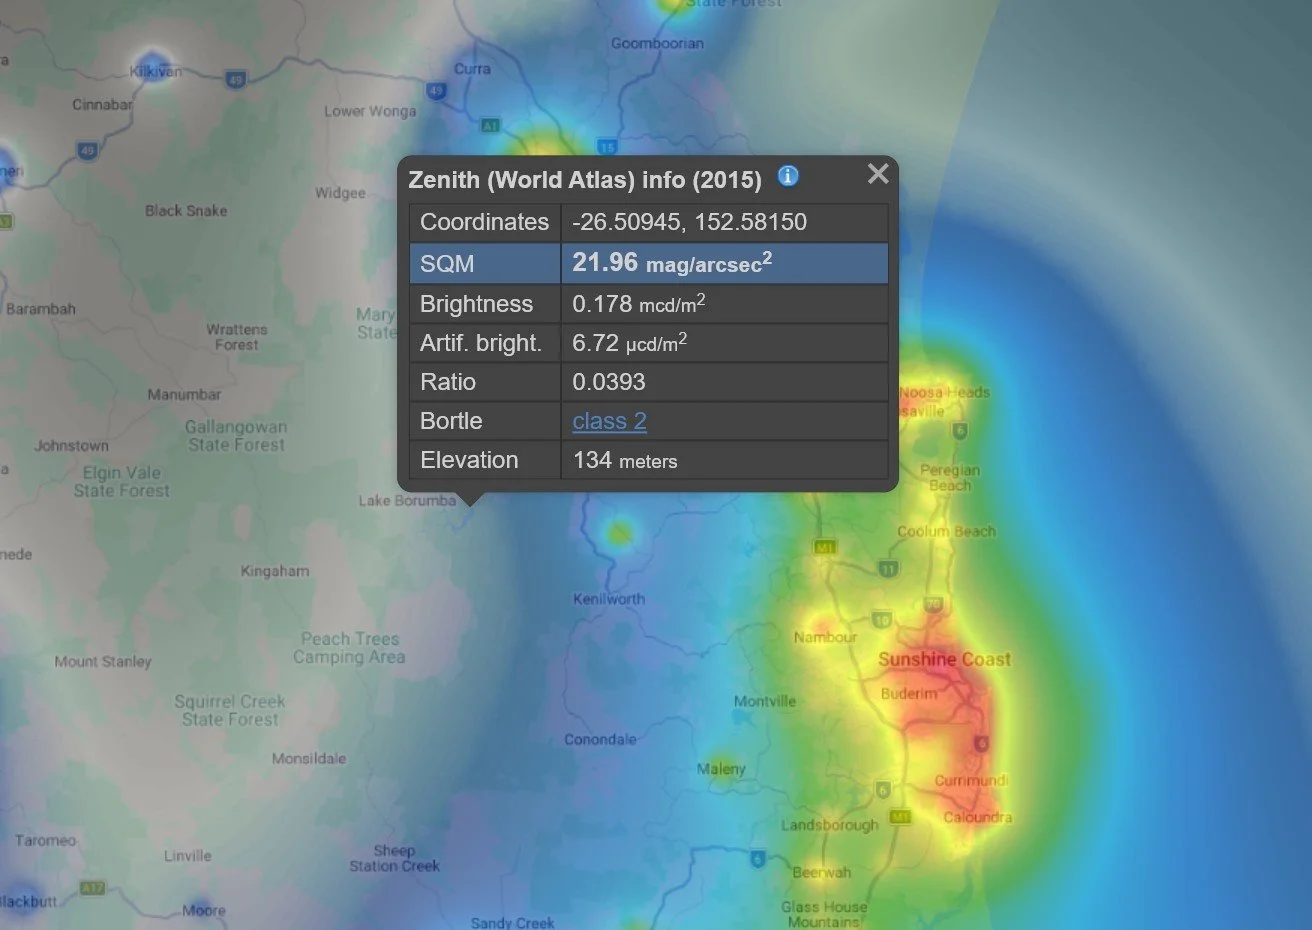
lightpollutionmap.info — Borumba Dam sits at Bortle 2 (dark blue) while the Sunshine Coast runs red/orange. The inland drive is the biggest single image-quality upgrade you can make.
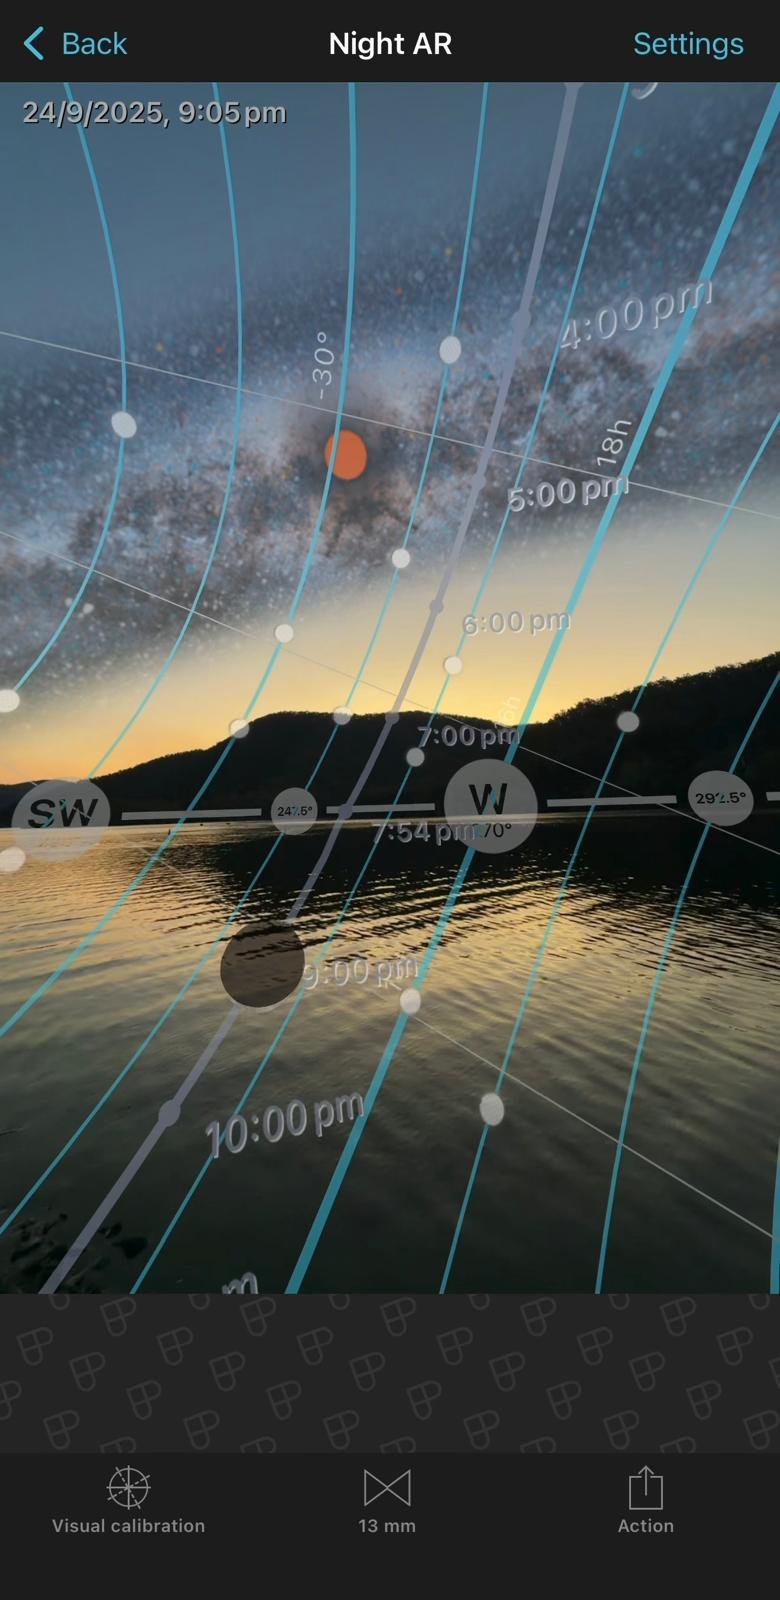
PhotoPills Night AR overlaid on the real scene at Borumba Dam at dusk — confirm a composition before the sky goes fully dark.
Camera Settings
Your starting point by scenario — then refine from there based on what your histogram and a 100% star check actually show.
| Scenario | Aperture | Shutter | ISO |
|---|---|---|---|
| Full-frame · dark sky (≤Bortle 4) | f/2–2.8 | 15–20s | 3200 |
| Full-frame · coastal / suburban (Bortle 5–6) | f/2–2.8 | 10–15s | 2000–3200 |
| APS-C · dark sky · no tracker | f/2–2.8 | 10–15s | 3200–6400 |
| Tracked sky (separate foreground) | f/2.8–4 | 60–180s | 800–1600 |
| Foreground blend / twilight | f/8–11 | Varies | 64–400 |
Adjust order: shutter (within NPF limit) → ISO → aperture. Don't chase a brighter exposure by pushing shutter past the trailing limit.
Shoot RAW. Non-negotiable. Every white balance and exposure decision becomes reversible. A JPEG at this stage costs you the whole file.
The NPF Rule
Why the 500 rule is wrong for modern cameras — and how to get the right shutter speed in 10 seconds.
Accounts for focal length, aperture, and your camera's resolution. Accurate on modern high-megapixel bodies.
Too long for high-res sensors. PhotoPills itself says: "Classic rule. It fails with most recent cameras."
At 14mm f/2.8 on a Nikon Z7 II, the 500 rule gives you 36 seconds — more than double the NPF result of 15.47s. On a 45MP sensor that difference shows up as visible star trails at 100% zoom. Use PhotoPills Spot Stars, enter your focal length and aperture, and use that result as your starting shutter. Then confirm at 100% on the rear screen.


PhotoPills Spot Stars — Nikon Z7 II, 14mm, f/2.8. NPF result: 15.47s. The 500 rule gives 36s. Use 0° declination — the difference to 30° is under 2.5 seconds and won't affect your result in the field.
Focus in the Dark
Blurry stars are the most common failure in workshop files. Not noise, not white balance. Focus. Here's the method that works every time.
-
1
Switch to Manual Focus + Live View Turn autofocus off completely. You need full control and magnified live view on the rear screen.
-
2
Find the brightest star or planet Jupiter, Venus or a bright star makes this far easier than a dim point. Bigger target = easier to refine.
-
3
Magnify live view to 5–10× Use your camera's magnify button — not optical zoom. The star becomes a blob you can actually work with.
-
4
Rotate slowly toward infinity Go slowly until the blob shrinks to the smallest, sharpest point possible. Overshoot slightly then come back.
-
5
Take a test shot and check at 100% Zoom into a centre star and a corner. Centre sharp, corners slightly softer = normal for fast wide-angle lenses. Centre soft = refocus.
-
6
Secure the ring A small piece of gaffer tape across the focus ring prevents accidental movement during reframing or bumps.
-
7
Recheck after any movement Temperature drops cause lenses to expand and contract. Recheck every time you change location — don't assume it's still sharp.
| What you see | Cause | Fix |
|---|---|---|
| Stars fat / bloated | Focus slightly off, or thin haze | Redo live view focus. Check Clear Outside for high cloud. |
| Stars with tails / streaks | Shutter too long | Reduce shutter and recheck NPF result. |
| Focus was sharp, now drifted | Lens expanded/contracted in cold | Recheck focus after ~10 min on location. |
| Corners messy, centre sharp | Lens coma wide open | Stop down ⅓–⅔ stop and raise ISO slightly. |
10-Minute Field Workflow
Screenshot this. Run through it every time you arrive — experienced shooters forget steps too when it's cold and dark.
5-Minute Edit
The order matters. Do these steps in sequence and you won't paint yourself into a corner.


Borumba Dam — same RAW file, same night. WB correction, exposure lift, contrast, selective dehaze on the core, AI Denoise. No compositing, no sky replacement.
5 SEQ Locations Worth Knowing
Within 2 hours of Brisbane. Two genuine Bortle 2 sites, three coastal options that reward careful technique.
One of the best dark-sky locations within reach of Brisbane. Twin peaks give you a foreground that feels like a destination. Watch for: lodge light spill if you shoot too low — move higher. Settings: twilight FG f/11 · 1/20s · ISO 64 · 14mm. Sky tracked f/4 · 3min · ISO 800.
Same darkness as Barney with a completely different image — water, reflections, open horizon. Watch for: wind above ~10 km/h kills reflections. Check Windy before you commit. Dew is common — bring a lens warmer. Settings: sky tracked f/4 · 3min · ISO 800. FG f/2.8 · 3min · ISO 3200.
The practical choice when you have work the next day. Glass House Mountains on the horizon. Not the darkest, but rewards careful technique. Watch for: wind on the exposed platform — hook your bag under the tripod. Settings: FG ISO 800 · f/1.4 · 30s · 50mm. Sky tracked f/4 · 3min · ISO 800.
The cleanest accessible spot in SEQ for the Milky Way rising over the ocean. Watch for: salt spray on onshore winds above ~15 km/h. Offshore pressure nights only. Settings: FG ISO 64 · f/11 · 30s · 14mm. Sky tracked f/4 · 3min · ISO 800.
Not the darkest — but the lighthouse makes it one of the most recognisable astro foregrounds in SEQ. Watch for: lighthouse beam blowing highlights. Check histogram after every frame. Settings: FG ISO 3200 · f/2.8 · 13s · 14mm. Sky tracked f/4 · 3min · ISO 800.
Mistakes I See in Workshops
Real field failures — not theory from forums.