Antelope Canyon (Upper)
Antelope Canyon Photography Guide:
My 2018 Experience +
What’s Changed in 2026
I photographed Antelope Canyon back when dedicated tripod-friendly photo tours still existed in the main canyons. This guide keeps that first-hand experience, then gives you the honest update: what photographers could do then, what has changed now, where the beam window still matters, and how to pair it with Horseshoe Bend while you’re in Page.
Antelope Canyon was one of those locations that sat on my bucket list for years. I was living in Utah at the time, so Page was drivable, but I deliberately held off until I could line up the right season and the right light. I originally aimed for May and June 2018 because I wanted the classic midday beams, then got rained out twice and had to rebook for July. That change ended up working, and I came away with some of my favourite sandstone images I’ve ever made.
The reason this guide still matters is that the experience I had is no longer the normal experience a photographer can expect in the main Upper and Lower canyons. Back then, a dedicated photography group, a tripod and enough time to work exposures properly changed everything. In 2026, that old approach is no longer the standard in Upper and Lower, so a good guide needs to do two things at once: preserve what the location was like for serious shooters, and tell you honestly what is actually possible now.
So that’s what this page does. It keeps the first-hand field experience, the images and the lessons that still matter, then adds the 2026 reality check: what changed, where the remaining tripod-friendly options are, what beam months are still worth targeting, and why Horseshoe Bend is still the obvious extra stop while you’re based in Page.
Then vs Now
This is the part most old blog posts skip. The location is still incredible, but the access model for photographers changed hard. If you keep the page honest here, it becomes more useful and more trustworthy.
I visited when dedicated photo-tour style access in the main canyons still allowed slower tripod work, careful bracketing, and enough breathing room to actually build a frame. That is why my images lean heavily on low ISO, stopped-down apertures, long exposures and clean beam compositions with the crowd held back.
Upper and Lower Antelope Canyon are still guided-access only, but the old mainstream tripod-era workflow is no longer the normal path. Upper runs as a sightseeing-style guided tour with clear-bag rules and no tripods; Lower also bans bags and tripods. If you want the closest current equivalent to the old photography experience, Canyon X is the main one to look at.
Upper Antelope Canyon now
- Guided tour only, not self-guided.
- Sightseeing tour runs about 90–100 minutes start to finish.
- Only clear bags are allowed.
- Tripods and monopods are not allowed on the standard tour.
Lower Antelope Canyon now
- Guided access only.
- Bags, backpacks and camera bags are not permitted.
- Tripods and monopods are not permitted.
- The current deluxe format is a smaller, longer tour rather than an old-school photo tour.
If you’re going to Upper or Lower today, treat them as handheld, fast-moving slot canyon experiences. If you want the look of old beam-era tripod work, you’re now basically looking at Canyon X or a more specialised alternative rather than the old mainstream Upper/Lower setup.
The Images
Lead with the beam work, then let the page breathe with a mix of structure, glow and quieter sandstone detail. Horseshoe Bend comes later as the Page bonus, not the main event.


How I Shot It in 2018
This section is worth keeping because it explains why older Antelope Canyon images have a look that’s much harder to recreate in the main canyons now. Frame this as legacy fieldcraft, not as a promise that today’s Upper/Lower visitor can still shoot the same way.
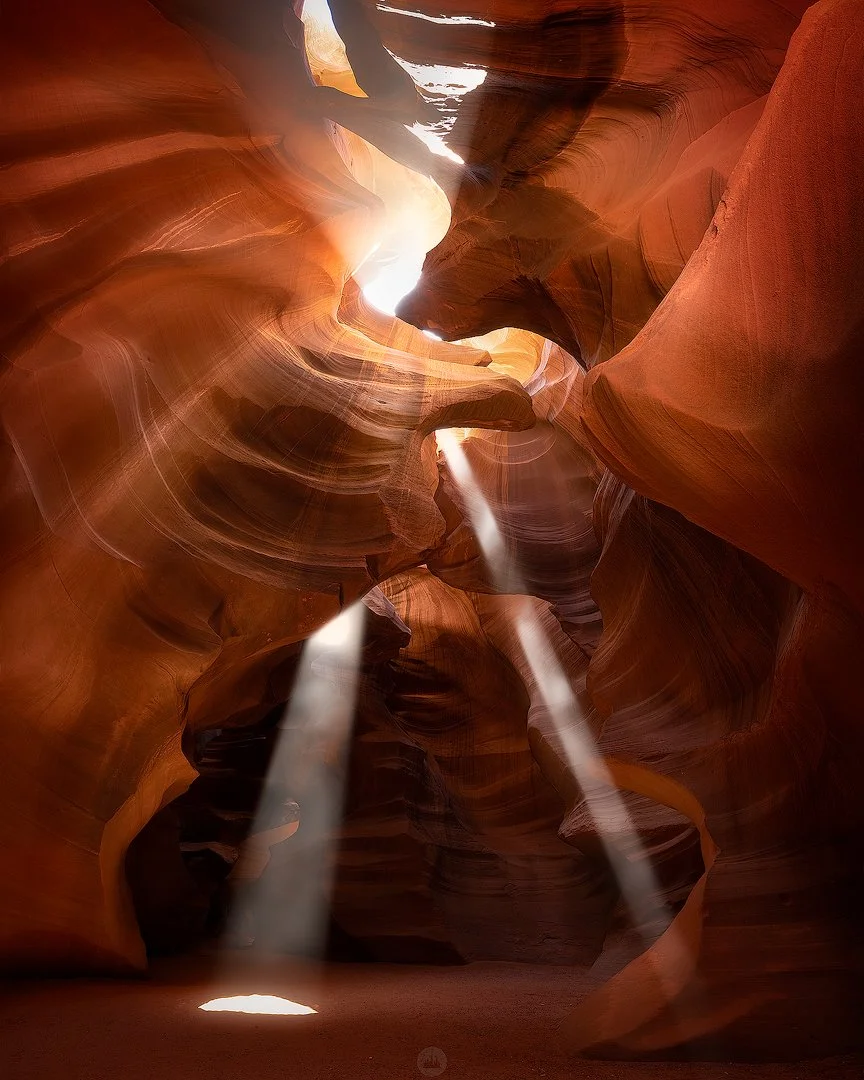
Beam scenes
For the obvious beam compositions, the main problem was highlight control. The beam itself could blow instantly while the surrounding canyon stayed deep in shadow. My approach was to expose carefully for the light ray and bracket multiple frames so I had something clean to blend later rather than relying on one compromise exposure.
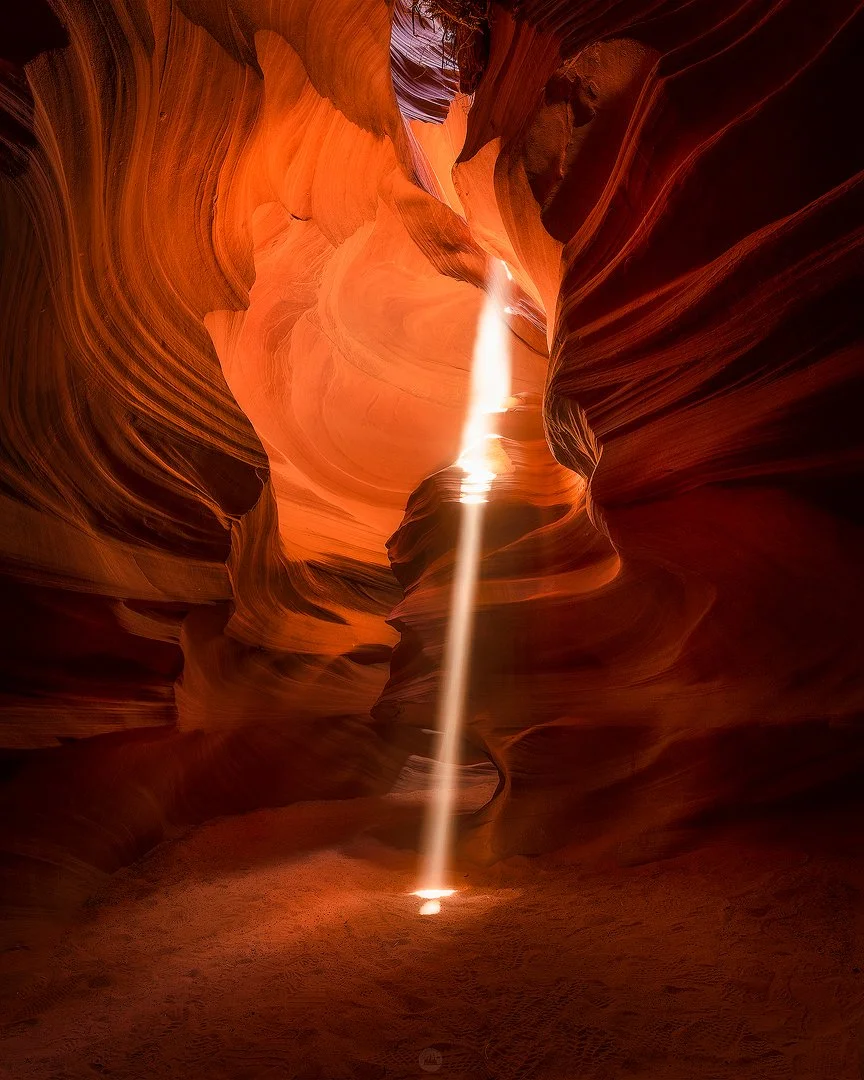
Dark sculptural sections
In darker pockets of the canyon, especially where the image depended more on reflected warmth and shape than direct beam light, longer exposures made all the difference. That let me keep ISO low, keep texture clean and let the sandstone glow carry the frame without forcing noise into the shadows.
Tripod and pacing
That old photo-tour format mattered because a full-size tripod plus a short window without people moving through the scene gave you real control. You could square up the composition, lock the frame and work methodically instead of trying to snatch a handheld file in a moving queue.
Bracketing mindset
I often worked in the range of five to seven frames where needed, especially when the beam was bright and the surrounding walls fell away fast into shadow. The goal wasn’t overkill. It was just enough flexibility to protect the brightest sand patch and still recover the canyon depth later in the edit.
Tell readers straight: many of the older Antelope Canyon images you see online, including mine, were made in a format that gave photographers more time and allowed tripod-based long exposures. That doesn’t make them impossible to appreciate now, but it does change what a current visitor should expect from Upper and Lower.
How to Shoot It Now
This is the practical section readers are really searching for. Keep it useful, modern and honest: old low-ISO tripod logic for the main canyons is no longer the default. Handheld discipline matters more now unless you book a location that still supports tripod-friendly photography.
| Location | Current reality | How to approach it |
|---|---|---|
| Upper Antelope | Guided sightseeing access, clear bags only, no tripod on the standard tour. | Expose for the beam highlights first, accept higher ISO, keep the camera ready and work fast when you get a clean pause. |
| Lower Antelope | Guided access, bags and tripods not permitted, narrower and more physically involved. | Think handheld structure, shape and glow. Prioritise shutter speed and timing over perfection. |
| Canyon X | Photo tour still available, longer duration, tripod and one camera bag allowed. | This is the closest current equivalent to the old slow, deliberate tripod workflow for most photographers. |
| Horseshoe Bend | Different subject entirely, but easy Page add-on with no tour required. | Use it as a sunrise, sunset or blue-hour second location to round out the trip with a wider landscape frame. |
Upper / Lower handheld strategy
- Meter off the beam or brightest patch of sand first.
- Use stabilisation if your body or lens has it.
- Raise ISO without guilt when the shadows are too deep.
- Keep compositions simple enough to execute quickly.
Modern starting point
- Start with a wide zoom or wide prime and don’t change lenses inside if you can avoid it.
- In the main canyons now, think more in the zone of workable handheld exposures than long tripod work.
- Use short brackets only if the pace and guide spacing actually allow it.
- Protect highlights first; deep shadow lift is easier to manage than blown beam detail.
If you want images that look like the old long-exposure beam-era work, the best move is not to force that expectation onto Upper or Lower. Aim that expectation at Canyon X instead, then treat Upper and Lower as faster handheld canyon experiences with better timing and better technique rather than a tripod exercise.
Beam Months and Timing
Your old May, June and July instinct was broadly right. The cleaner version now is to separate the official Upper guidance from the official Canyon X guidance, because they do not describe the beam window in exactly the same way.
Upper Antelope Canyon
The official Upper operator says the classic beams show on clear, sunny days and are associated with the midday tour window, with beam season running roughly from April through September. Early April and the shoulder edges are weaker and shorter-lived than the peak.
Antelope Canyon X
The official Canyon X guidance points to clear sunny conditions, a popular visit window around 10:30 am to 1:00 pm, and says May through early August is a good span for catching light beams there.
If you’re chasing beams, target clear sunny days and a late-morning to midday visit. For Upper Antelope Canyon, think broadly April to September. For Canyon X, think more tightly around May to early August. My own successful trip landed in July after earlier weather disruptions in May and June.
While You’re in Page: Horseshoe Bend
Yes, this deserves a section. Not because the Antelope page needs filler, but because Horseshoe Bend is genuinely the obvious second stop while you’re based in Page. It’s iconic, it photographs well in different light, and it gives readers a practical same-trip bonus without needing another guided canyon booking.
Why it fits the article
It is close enough to be a natural add-on, visually different enough to keep the article interesting, and simple enough for readers to add before or after a canyon tour. It also broadens the search intent of the page without turning it into a random roundup.
What matters on location
The walk is short but exposed. There is very little shade, no water on the trail, and much of the rim remains exposed beyond the formal viewing platform. It is a place to take seriously even though it’s easy to access.
Best photo approach
Use it for sunrise, sunset or blue hour rather than harsh midday if you want shape and depth in the canyon walls. A slightly longer lens can tidy the bend and reduce empty foreground. A wider lens works if the sky is doing something genuinely worth keeping.
Practical notes
- Parking at the trailhead is paid.
- National park passes do not cover the trailhead parking lot.
- Drones are not allowed on NPS-administered land there unless specifically approved.
- Take water, sturdy footwear and heat seriously.
This section should stay fairly tight inside the Antelope article. Later, you can spin Horseshoe Bend into its own standalone photography guide and internally link both pages together. That gives you cleaner topical focus on both URLs instead of stuffing everything into one giant post.
Other Canyons Around Page Worth Knowing About
Keep this section useful, not bloated. The article is still about Antelope Canyon first. This is just enough context to help serious photographers understand the nearby options without turning the page into a directory.
Antelope Canyon X
The main current recommendation for photographers who still want a slower, tripod-friendly experience. The official photo tour is three hours and allows a tripod plus one camera bag, which is why it gets mentioned so often now.
Cardiac Canyon
More advanced and more physically demanding. Official Navajo Nation guidance describes it as strenuous and suited to advanced to intermediate hikers. Mention it as a serious option, not the default option.
East Waterholes
Worth knowing mostly because access splits: the upper part is guided-tour only, while the lower part requires a backcountry permit. Good to mention, but not something to overcomplicate this page with.
How to keep this section clean
One paragraph per option is enough. This is not the place for an operator matrix, pricing chart or giant comparison. The article wins by staying focused and credible, not by trying to be every Page guide at once.
FAQ
Want More Location Guides Like This?
Join my newsletter for photography articles, field-tested location advice, editing walkthroughs and workshop updates. No filler, just practical content that helps you plan better and come home with stronger files.
Photography guides, workflow tips and workshop updates