Mastering Milky Way Photography: Comprehensive Tips and Gear Recommendations
1. Unlocking the Milky Way’s Secrets
Understanding the Milky Way's position and movements across the night sky is the first step in astrophotography. Its visibility varies throughout the year, with different sections coming into view at different times. Here's a more technical breakdown of how to locate the Milky Way from Australia:
Seasonal Movement:
The Milky Way's core, which is the most visually dense and interesting part to photograph, becomes visible in the east around February in Australia. This period is known as the 'early season'. As we progress towards mid-year, the core rises higher into the sky, appearing vertical, and then eventually flips over, lying parallel to the horizon. It's essential to plan your photography outings based on this progression for capturing the most striking images.
Apps to Assist:
Leverage technology to navigate the night sky effectively. Apps like PhotoPills and SkyGuide are powerful tools in your astrophotography arsenal.
PhotoPills: This app is a comprehensive planner for astrophotography, providing critical data like moon phases, rise and set directions, and visibility timings. Its Virtual Reality (VR) option is a game-changer for location scouting. It allows you to virtually overlay the Milky Way onto the landscape from your planned shooting spot, helping to pre-visualise your compositions.
SkyGuide: Another great tool for identifying celestial bodies. It's intuitive and user-friendly, making it easier for beginners to understand the night sky's layout.
Understanding Light Pollution:
The level of detail you can capture of the Milky Way greatly depends on the darkness of your sky, primarily affected by light pollution. Websites such as "Light Pollution Map" can help you find dark sky locations with less light pollution, increasing the chances of a clear, detailed Milky Way shot.
Planning Your Shoot:
A well-planned shoot increases the chances of a successful outing. Check the weather forecast to ensure clear skies. Use the New Moon phase, or a moonset before Milky Way rise time, for the darkest skies. Plan your composition during daylight to avoid fumbling in the dark and use apps like PhotoPills to visualise the Milky Way's position at your planned shooting time.
As you become more familiar with these tips, finding the Milky Way will become second nature. The next step is to master capturing it with your camera, which we'll cover in our next point.

2. Mastering Focus in the Dark
One of the most challenging aspects of night sky photography is nailing focus. In the dark, your camera's autofocus may struggle, leading to blurry or less sharp images. Here's a more detailed, technical guide on how to achieve crisp focus in astrophotography:
Manual Focus:
It's recommended to switch to manual focus mode when photographing the night sky. This gives you complete control over your focus and allows for precision.
Focus on a Bright Star:
Firstly, find a bright star in your viewfinder or live view screen. Turn your focus ring to the “infinity” (∞) symbol as a starting point, which should make the star appear reasonably sharp. Now, use your camera's live view digital zoom feature (not optical zoom, your focal length should remain unchanged) to magnify the view of the star.
Adjust Until Sharp:
Slowly adjust the focus ring while observing the star on your live view screen. The goal is to make the star as small and as round as possible. This indicates that the star, and therefore the rest of the night sky, is in focus.
Lock Your Focus:
Once you've achieved sharp focus, it's important not to accidentally move the focus ring. Some lenses have a focus lock feature which can be helpful, or you can use a piece of gaffer tape to secure the position.
Focus on Foreground:
If you plan to include a foreground element in your composition, such as a tree, rock, or mountain, you may want to focus-stack your images. This involves taking one image focused on the stars, and another image focused on your foreground subject, then blending them together in post-processing to achieve sharpness throughout the frame. Use a bright torch to illuminate the foreground for focusing.
Confirm with Test Shots:
Always take a test shot after you think you've got the focus right. Zoom in on the image preview to double-check the stars are sharp. If not, make slight adjustments and repeat.
Remember the Conditions:
Every night is different, so what worked last time might not work this time. Humidity, temperature, and other factors can affect how your lens focuses, so it's important to always test and adjust each time you're out.
Achieving sharp focus under a starlit sky can feel like a magic trick, but with these tips and a little practice, you'll be able to consistently capture the intricate details of the Milky Way with precision.

3. Cutting Down Noise
Digital noise can be a nemesis for any photographer, particularly in low-light conditions like night sky photography. This graininess can obscure the fine details of the Milky Way. Here's a more detailed and technical guide to reducing noise in your astrophotography:
Understanding Digital Noise:
Digital noise is random variation of brightness or colour information in images. It is primarily produced by the sensor and circuitry of a digital camera during exposure, and is exacerbated in low-light conditions and at higher ISO settings.
Shoot at Lower ISO:
Lower ISO settings generally produce less noise, but also make your camera less sensitive to light. This trade-off is why we often need to increase ISO for night photography. However, using a fast lens (with a large aperture, such as f/2.8 or f/1.4) and longer exposures can compensate for the reduced light sensitivity, allowing you to capture more light without significantly increasing noise.
Long Exposure Noise Reduction:
Many digital cameras have a feature called Long Exposure Noise Reduction (LE NR) or similar. This setting takes two photos every time you press the shutter: one regular photo, and one with the shutter closed. The camera then subtracts the noise in the second "black frame" from the first photo. However, using this feature doubles the time it takes to make each exposure, which may not be ideal in some scenarios.
Stacking Images:
An effective method of reducing noise in post-processing is to stack multiple exposures of the same scene. This technique involves capturing a sequence of images, typically between 5 to 20, which are then overlaid and averaged out in stacking software such as Sequator, Starry Landscape Stacker, or Adobe Photoshop. This process increases the signal-to-noise ratio, enhancing the details captured in each shot and decreasing random noise.
Use a Star Tracker:
A star tracker is a device that compensates for the Earth's rotation by slowly moving your camera to match the apparent motion of the stars. This allows for longer exposures without star trailing, and thus lower ISO settings, which reduces digital noise. A recommended model is the SkyWatcher Star Adventurer.
Blue Hour Blends:
Another technique to consider is blending your Milky Way shot with a 'blue hour' shot of your foreground. This method involves photographing the foreground during the blue hour when there's more natural light available, then capturing the stars when fully dark. The two images can then be blended together in post-processing, resulting in a well-lit, less noisy image.
Reducing noise in your Milky Way photos can dramatically improve their quality. By adopting these techniques, you can reveal the stunning details of our galaxy with clarity and precision.

4. Overcoming Light Pollution
Light pollution can be one of the most significant challenges for astrophotography. It's the excessive or misdirected artificial light produced by human settlements that brightens the night sky and obscures your view of the stars. Here's a more detailed and technical guide on how to overcome light pollution in your astrophotography:
Understand Light Pollution:
Firstly, it's essential to understand what light pollution is and how it affects your photography. It's the brightening of the night sky caused by street lights and other man-made sources, which interferes with astronomical observation. This pollution not only impacts the visibility of celestial objects but also affects the contrast and colours in your night sky photos.
Choose the Right Location:
Location selection can be the biggest difference-maker. If possible, get as far away from urban areas as you can. National parks, rural areas, and high altitudes are often good choices. Websites and apps such as the "Light Pollution Map" can help you find areas with lower light pollution.
Shoot during New Moon Phases:
The moon can contribute significantly to light pollution. If possible, plan your shoots during the new moon phase, when the moon is not visible in the night sky, to minimise additional light interference.
Use a Light Pollution Filter:
Light pollution filters are specially designed to block out certain wavelengths of light commonly produced by street lights, while allowing other wavelengths to pass through. A recommended option is the NiSi Natural Night Filter. These filters can help to reduce the effects of light pollution, improving contrast and colour balance.
Correct in Post-processing:
Despite your best efforts, some light pollution may still make it into your photos. You can mitigate this by using image-editing software like Adobe Lightroom or Photoshop. Techniques include adjusting the colour balance to counteract the orange/yellow hue of light pollution, and using graduated filters or adjustment brushes to selectively reduce brightness and enhance contrast in the sky.
Consider Foreground Lighting:
In certain situations, light pollution can be used creatively. The glow on the horizon can add depth to your images when used correctly, particularly if it illuminates an interesting foreground.
Combatting light pollution might feel like a daunting task but using these tips, you can increase your chances of capturing breathtaking, clear images of the Milky Way, even from locations with some degree of light pollution.

5. Fine-Tuning Your Camera Settings
Astrophotography can seem like a daunting task due to the specific camera settings needed for capturing those impressive star-filled shots. Here, we will delve into a more comprehensive guide to fine-tuning your camera settings for Milky Way photography:
Understand the Exposure Triangle:
The Exposure Triangle - aperture, shutter speed, and ISO - is fundamental to photography, and astrophotography is no exception. For Milky Way photography, you typically need a wide aperture (small f-number) to capture as much light as possible, a long shutter speed to allow enough light in, and a higher ISO to increase the sensor's sensitivity to light.
Setting the Aperture:
Wide apertures are generally best for astrophotography, as they allow the most light to reach your camera's sensor. A lens that opens to f/2.8 or even f/1.4 would be ideal.
Choosing the Right Shutter Speed:
The goal is to choose a shutter speed that's long enough to capture sufficient light from the stars, but not so long that it causes visible star trails. A common rule of thumb is the "500 Rule" - divide 500 by your lens's focal length to determine the longest exposure time before star trailing becomes noticeable. However, this rule is a guideline, and experimenting is key.
ISO Settings:
You'll typically use higher ISO settings for Milky Way photography than in other situations, often somewhere between 1600 and 6400. The exact setting will depend on your camera, as different models have different levels of noise at high ISOs.
Manual Focusing:
Lastly, manually focusing your lens at infinity will ensure that the stars appear sharp in your photos. Live view can help with this, as it allows you to digitally zoom in on a bright star and adjust your focus until the star is as small and sharp as possible.

6. Bonus Tip: The Right Gear Matters
Astrophotography is one of those areas of photography where having the right gear can make a significant difference in the quality of your photos.
The Right Camera:
A camera with a large sensor and good high-ISO performance is ideal for astrophotography. Full-frame cameras are often recommended, but many modern APS-C cameras also do a great job.
Fast, Wide-Angle Lens:
A fast, wide-angle lens is crucial for capturing as much of the night sky as possible. A lens with a wide maximum aperture (f/2.8 or better) and a focal length of between 14mm and 24mm is usually ideal.
Sturdy Tripod:
Long exposure times mean a sturdy, reliable tripod is essential. It needs to hold your camera still for several seconds or even minutes at a time. The Sirui Pro Tripod R-2214X Carbon Fiber Professional Tripod is a solid option.
Star Tracker:
A star tracker can be a game changer for astrophotography. By slowly moving your camera to match the apparent motion of the stars, it allows for longer exposures without the stars becoming streaky.
Remote Shutter Release:
A remote shutter release or intervalometer can be beneficial. This device allows you to take photos without physically touching your camera, reducing the risk of camera shake.
Quality Light Pollution Filter:
If you frequently shoot in locations with light pollution, a quality filter like the NiSi Natural Night filter can help reduce the effects of unwanted artificial light.
Choosing the right gear for astrophotography can make your experience smoother and more enjoyable, allowing you to focus more on the art and less on technical difficulties.
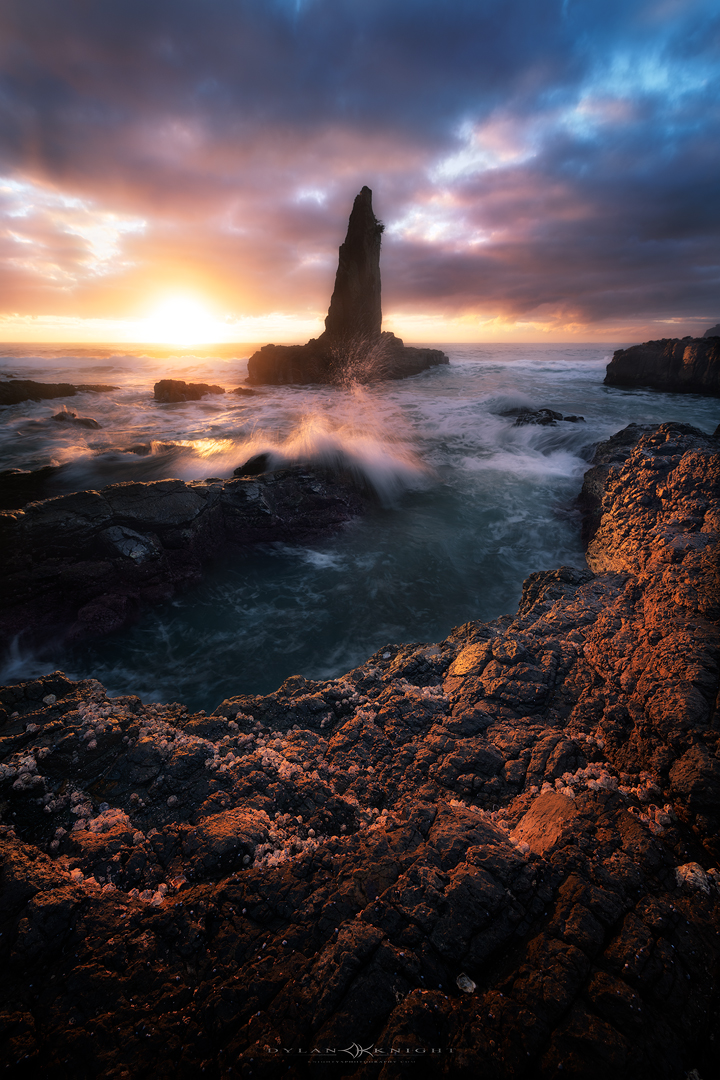
5 Tips for Shooting Seascapes
Weather
I think one of the most important things when it comes to shooting seascapes is the weather. The coastlines get smashed with all sorts of weather and it’s a good idea to keep a close watch on it. I love a moody or colourful scene when shooting, but you’re always taking a chance. Depending on what conditions you’re looking for, I suggest going out in all different types of weather.
Partly cloudy conditions can reward you with lots of gaps on the horizon for the sun to light up the clouds with some colour and give you lots of dynamic range.
Alternatively, you can roll the dice by going out when it’s raining or mostly cloudy and that’s when the sky absolutely blows up. The only downfall is it’s usually a rare occurrence. There will usually be fewer people too which can be a great relaxing experience!

Tripod
Having a stable, well-built tripod really makes a difference—especially when shooting anything in the water or in windy conditions. I have been using the Sirui Pro Tripod R-2214X Carbon Fiber Professional Tripod for the last 3 years paired with the K-20II Ball Head. Having a sturdy tripod is important so you can reduce camera shake and prevent losing your camera to the elements. I recently purchased my first professional tripod from Sirui, and I can tell you now, it makes a huge difference. My experience so far is all positive and will have a proper in-depth review coming out at a later date.
Filters
Filters are really important to get the right exposure dialled in. Before sunrise and after sunset you can get away without using them for long exposures, but when the light gets too strong, you’re going to need some! If you’re shooting anything with a reflective surface, I would use a CPL (polarising filter) to cut through the glare and reveal more detail while increasing the colours slightly. Neutral Density filters act like sunglasses and allow you to use a longer shutter speed. There are many different filters but I mostly use the 3, 6, and 10 stop ND filters.
I’m a huge fan of NiSi Filters and have been using them for the last couple of years. I’ve tried a few different companies, but none of them come close to the build quality. I would highly recommend them to anyone who is in the market for them.
Settings
Settings used for seascapes is left to the individual’s needs and wants, so I’ll pick a few variations to break them down.
Action shots
I would recommend anywhere from 1/500-1/1000 shutter speed to freeze the motion. This can be used for things like waves crashing into cliffs, or capturing unique shapes caused by backwash.
Detail motion
This is probably one of my favourites and that’s where the shutter speed is considered a long exposure but you can still capture all the details. This usually ranges from about 1/5 of a second to 2 seconds long. This can be great when trying to get leading line shapes of receding water on rocks or the beach.
Misty look
If you’re striving for this effect, you can do this before sunrise, after sunset, or throw on a 10 stop and leave the shutter open for a few seconds to 30 seconds plus. This will turn the water into a misty cloud-like effect and can be really ethereal.
Tide
Checking the tide chart could be an important factor when it comes to seascape photography, as the water level can completely change the scene. There could be an interesting rock as a foreground element that catches the waves as it flows back out to sea creating a visually pleasing pattern at low tide. At high tide, it could be completely submerged and not visible. This can also be important when shooting different locations that can be cut off and you could end up stranded on the other side with no way of getting back unless you had a dry bag for your camera gear! This could turn into a really dangerous shoot if you got the conditions wrong!

I run private and group workshops along the South Coast of NSW where I can personally teach you how to take your seascape photography to the next level. I hope you enjoyed the blog and would love to see you out there in the near future! Thank you!
Antelope Canyon (Upper)
Antelope Canyon Photography Guide:
My 2018 Experience +
What’s Changed in 2026
I photographed Antelope Canyon back when dedicated tripod-friendly photo tours still existed in the main canyons. This guide keeps that first-hand experience, then gives you the honest update: what photographers could do then, what has changed now, where the beam window still matters, and how to pair it with Horseshoe Bend while you’re in Page.
Antelope Canyon was one of those locations that sat on my bucket list for years. I was living in Utah at the time, so Page was drivable, but I deliberately held off until I could line up the right season and the right light. I originally aimed for May and June 2018 because I wanted the classic midday beams, then got rained out twice and had to rebook for July. That change ended up working, and I came away with some of my favourite sandstone images I’ve ever made.
The reason this guide still matters is that the experience I had is no longer the normal experience a photographer can expect in the main Upper and Lower canyons. Back then, a dedicated photography group, a tripod and enough time to work exposures properly changed everything. In 2026, that old approach is no longer the standard in Upper and Lower, so a good guide needs to do two things at once: preserve what the location was like for serious shooters, and tell you honestly what is actually possible now.
So that’s what this page does. It keeps the first-hand field experience, the images and the lessons that still matter, then adds the 2026 reality check: what changed, where the remaining tripod-friendly options are, what beam months are still worth targeting, and why Horseshoe Bend is still the obvious extra stop while you’re based in Page.
Then vs Now
This is the part most old blog posts skip. The location is still incredible, but the access model for photographers changed hard. If you keep the page honest here, it becomes more useful and more trustworthy.
I visited when dedicated photo-tour style access in the main canyons still allowed slower tripod work, careful bracketing, and enough breathing room to actually build a frame. That is why my images lean heavily on low ISO, stopped-down apertures, long exposures and clean beam compositions with the crowd held back.
Upper and Lower Antelope Canyon are still guided-access only, but the old mainstream tripod-era workflow is no longer the normal path. Upper runs as a sightseeing-style guided tour with clear-bag rules and no tripods; Lower also bans bags and tripods. If you want the closest current equivalent to the old photography experience, Canyon X is the main one to look at.
Upper Antelope Canyon now
- Guided tour only, not self-guided.
- Sightseeing tour runs about 90–100 minutes start to finish.
- Only clear bags are allowed.
- Tripods and monopods are not allowed on the standard tour.
Lower Antelope Canyon now
- Guided access only.
- Bags, backpacks and camera bags are not permitted.
- Tripods and monopods are not permitted.
- The current deluxe format is a smaller, longer tour rather than an old-school photo tour.
If you’re going to Upper or Lower today, treat them as handheld, fast-moving slot canyon experiences. If you want the look of old beam-era tripod work, you’re now basically looking at Canyon X or a more specialised alternative rather than the old mainstream Upper/Lower setup.
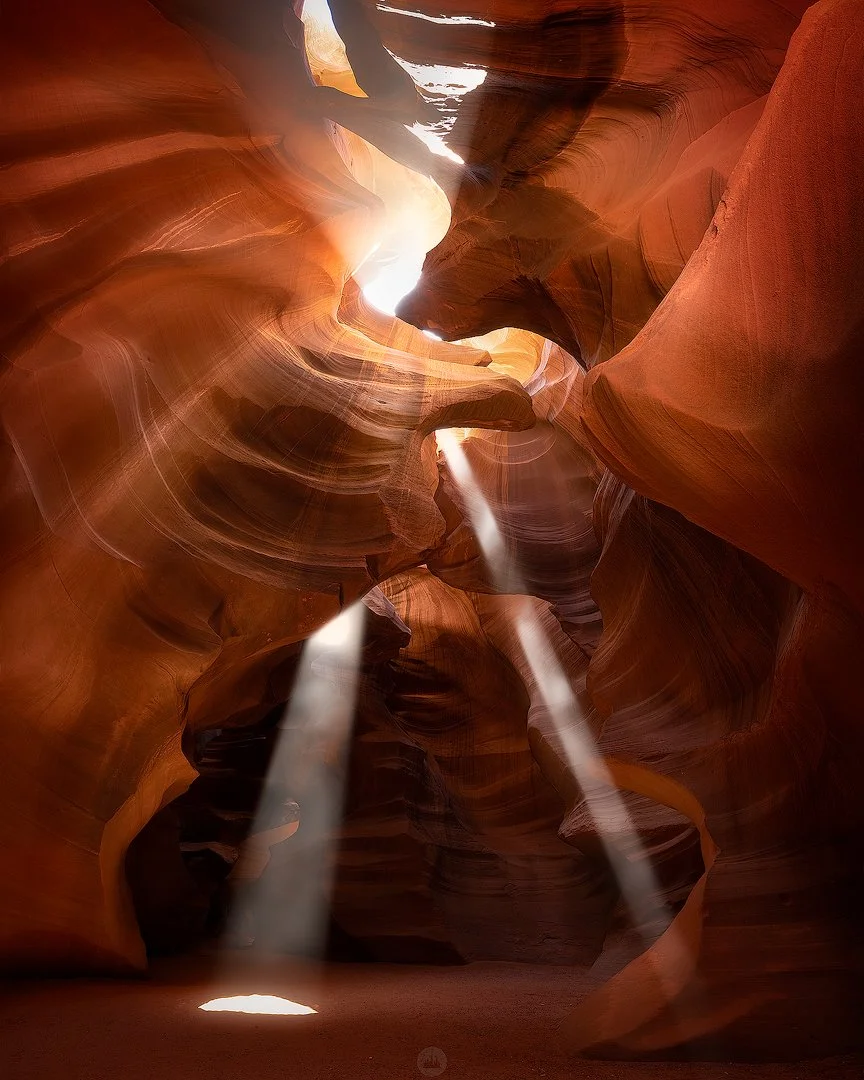
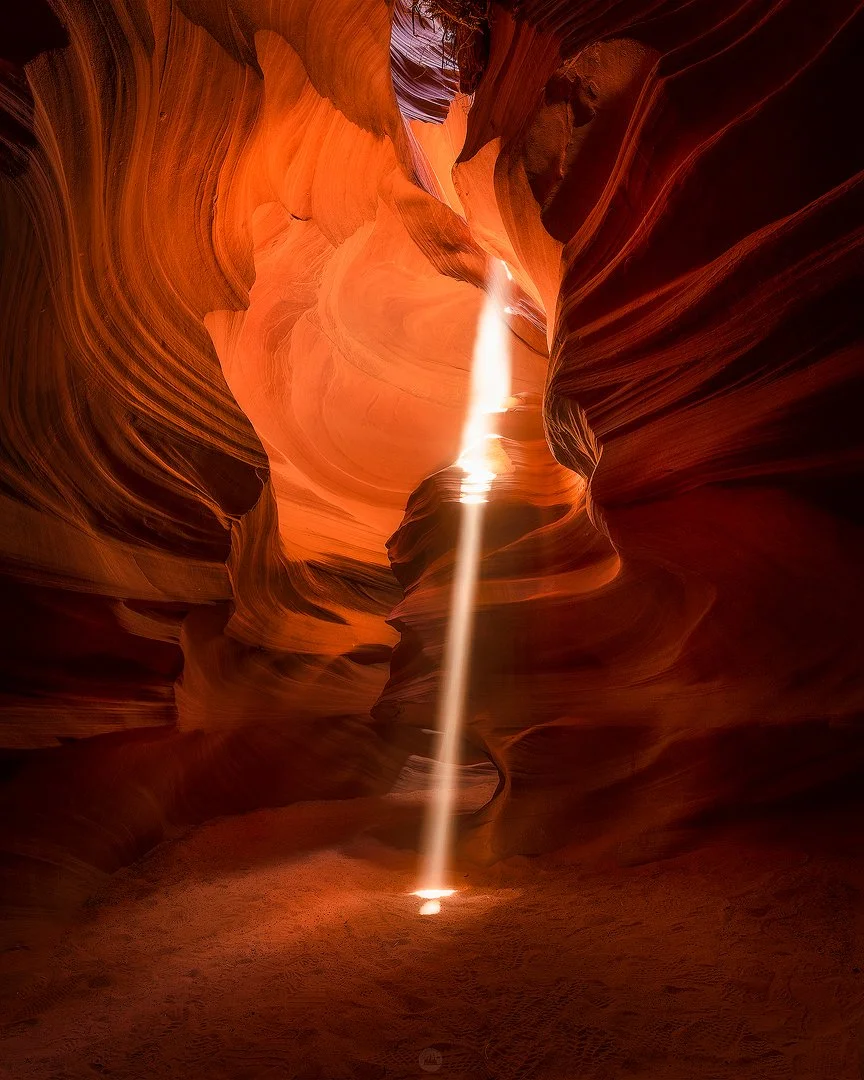
The Images
Lead with the beam work, then let the page breathe with a mix of structure, glow and quieter sandstone detail. Horseshoe Bend comes later as the Page bonus, not the main event.


How I Shot It in 2018
This section is worth keeping because it explains why older Antelope Canyon images have a look that’s much harder to recreate in the main canyons now. Frame this as legacy fieldcraft, not as a promise that today’s Upper/Lower visitor can still shoot the same way.
Beam scenes
For the obvious beam compositions, the main problem was highlight control. The beam itself could blow instantly while the surrounding canyon stayed deep in shadow. My approach was to expose carefully for the light ray and bracket multiple frames so I had something clean to blend later rather than relying on one compromise exposure.
Dark sculptural sections
In darker pockets of the canyon, especially where the image depended more on reflected warmth and shape than direct beam light, longer exposures made all the difference. That let me keep ISO low, keep texture clean and let the sandstone glow carry the frame without forcing noise into the shadows.
Tripod and pacing
That old photo-tour format mattered because a full-size tripod plus a short window without people moving through the scene gave you real control. You could square up the composition, lock the frame and work methodically instead of trying to snatch a handheld file in a moving queue.
Bracketing mindset
I often worked in the range of five to seven frames where needed, especially when the beam was bright and the surrounding walls fell away fast into shadow. The goal wasn’t overkill. It was just enough flexibility to protect the brightest sand patch and still recover the canyon depth later in the edit.
Tell readers straight: many of the older Antelope Canyon images you see online, including mine, were made in a format that gave photographers more time and allowed tripod-based long exposures. That doesn’t make them impossible to appreciate now, but it does change what a current visitor should expect from Upper and Lower.
How to Shoot It Now
This is the practical section readers are really searching for. Keep it useful, modern and honest: old low-ISO tripod logic for the main canyons is no longer the default. Handheld discipline matters more now unless you book a location that still supports tripod-friendly photography.
| Location | Current reality | How to approach it |
|---|---|---|
| Upper Antelope | Guided sightseeing access, clear bags only, no tripod on the standard tour. | Expose for the beam highlights first, accept higher ISO, keep the camera ready and work fast when you get a clean pause. |
| Lower Antelope | Guided access, bags and tripods not permitted, narrower and more physically involved. | Think handheld structure, shape and glow. Prioritise shutter speed and timing over perfection. |
| Canyon X | Photo tour still available, longer duration, tripod and one camera bag allowed. | This is the closest current equivalent to the old slow, deliberate tripod workflow for most photographers. |
| Horseshoe Bend | Different subject entirely, but easy Page add-on with no tour required. | Use it as a sunrise, sunset or blue-hour second location to round out the trip with a wider landscape frame. |
Upper / Lower handheld strategy
- Meter off the beam or brightest patch of sand first.
- Use stabilisation if your body or lens has it.
- Raise ISO without guilt when the shadows are too deep.
- Keep compositions simple enough to execute quickly.
Modern starting point
- Start with a wide zoom or wide prime and don’t change lenses inside if you can avoid it.
- In the main canyons now, think more in the zone of workable handheld exposures than long tripod work.
- Use short brackets only if the pace and guide spacing actually allow it.
- Protect highlights first; deep shadow lift is easier to manage than blown beam detail.
If you want images that look like the old long-exposure beam-era work, the best move is not to force that expectation onto Upper or Lower. Aim that expectation at Canyon X instead, then treat Upper and Lower as faster handheld canyon experiences with better timing and better technique rather than a tripod exercise.
Beam Months and Timing
Your old May, June and July instinct was broadly right. The cleaner version now is to separate the official Upper guidance from the official Canyon X guidance, because they do not describe the beam window in exactly the same way.
Upper Antelope Canyon
The official Upper operator says the classic beams show on clear, sunny days and are associated with the midday tour window, with beam season running roughly from April through September. Early April and the shoulder edges are weaker and shorter-lived than the peak.
Antelope Canyon X
The official Canyon X guidance points to clear sunny conditions, a popular visit window around 10:30 am to 1:00 pm, and says May through early August is a good span for catching light beams there.
If you’re chasing beams, target clear sunny days and a late-morning to midday visit. For Upper Antelope Canyon, think broadly April to September. For Canyon X, think more tightly around May to early August. My own successful trip landed in July after earlier weather disruptions in May and June.
While You’re in Page: Horseshoe Bend
Yes, this deserves a section. Not because the Antelope page needs filler, but because Horseshoe Bend is genuinely the obvious second stop while you’re based in Page. It’s iconic, it photographs well in different light, and it gives readers a practical same-trip bonus without needing another guided canyon booking.
Why it fits the article
It is close enough to be a natural add-on, visually different enough to keep the article interesting, and simple enough for readers to add before or after a canyon tour. It also broadens the search intent of the page without turning it into a random roundup.
What matters on location
The walk is short but exposed. There is very little shade, no water on the trail, and much of the rim remains exposed beyond the formal viewing platform. It is a place to take seriously even though it’s easy to access.
Best photo approach
Use it for sunrise, sunset or blue hour rather than harsh midday if you want shape and depth in the canyon walls. A slightly longer lens can tidy the bend and reduce empty foreground. A wider lens works if the sky is doing something genuinely worth keeping.
Practical notes
- Parking at the trailhead is paid.
- National park passes do not cover the trailhead parking lot.
- Drones are not allowed on NPS-administered land there unless specifically approved.
- Take water, sturdy footwear and heat seriously.
This section should stay fairly tight inside the Antelope article. Later, you can spin Horseshoe Bend into its own standalone photography guide and internally link both pages together. That gives you cleaner topical focus on both URLs instead of stuffing everything into one giant post.
Other Canyons Around Page Worth Knowing About
Keep this section useful, not bloated. The article is still about Antelope Canyon first. This is just enough context to help serious photographers understand the nearby options without turning the page into a directory.
Antelope Canyon X
The main current recommendation for photographers who still want a slower, tripod-friendly experience. The official photo tour is three hours and allows a tripod plus one camera bag, which is why it gets mentioned so often now.
Cardiac Canyon
More advanced and more physically demanding. Official Navajo Nation guidance describes it as strenuous and suited to advanced to intermediate hikers. Mention it as a serious option, not the default option.
East Waterholes
Worth knowing mostly because access splits: the upper part is guided-tour only, while the lower part requires a backcountry permit. Good to mention, but not something to overcomplicate this page with.
How to keep this section clean
One paragraph per option is enough. This is not the place for an operator matrix, pricing chart or giant comparison. The article wins by staying focused and credible, not by trying to be every Page guide at once.
FAQ
Want More Location Guides Like This?
Join my newsletter for photography articles, field-tested location advice, editing walkthroughs and workshop updates. No filler, just practical content that helps you plan better and come home with stronger files.
Photography guides, workflow tips and workshop updates
Winter In Southern Utah
Day One
On a spontaneous decision, I decided to go down to southern Utah for a photography trip. There was reports of a snow storm that hit the day before and another coming while I was down there. This trip was a little different to most because of the unique weather.
I arrived to a location that I had been wanting to visit for a long time and I was finally there. I got that burst of excitement as I pulled up in my car, got out and started looking around for comps prior to sunset. The weather forecast was to be clear that night and I was pleased because I wanted to shoot a part of the Milky Way that is only visible for a few months of the year. Shooting in these conditions is very difficult but also unique which is why I had the motivation for the trip. As the sun dipped below the horizon, the sky blew up with the light catching the high clouds. I frantically tried to get myself a few different images while the color lasted. By the end of the sunset shoot, I could not feel my hands and could hardly take anymore photos because it was so cold. As I waited for complete darkness, I warmed up in the car and made dinner. I set up my tripod, aligned my tracker to Polaris and was all set for some astro photography in some of the darkest skies in America.

I got a few photos of Pleiades (the Seven Sisters) as I was waiting for Orion to pop up and get into alignment for a shot I had in mind. After getting all my tracked shots, I made my way down to the cliff face where there was a platform I could stand on to take my self-portrait. I set my camera timer and ran down and out to the platform where I stood still for thirty seconds (it felt like a lifetime). As I was standing there I think I got some vertigo, started to feel light headed and that I was dreaming because it was so surreal. After my camera had finished, I return to it to take a series of images to stack for noise reduction. Jumping into my car for a good nights sleep was amazing, minus the cold.

Day Two
I woke up extremely cold and checked the temperature in my car and it said 9F/-13C. There was some incredible ice formations that covered the inside of the car windows. I was so cold I couldn’t stand sticking around for sunrise so I started the car and drove off looking for somewhere to shoot while I got warm. I came across this unique butte and had to pull over. I took a few shots and different compositions until the sun rose enough for me to get the drone out for some potentially cool photos.

Was lucky enough to get some amazing color for sunrise.

Here's a little video of me getting my drone out for the second time. Took some photos of this spot and did some video. I always forget to use my drone when I'm out taking photos but I want to start doing some more!
I headed to Moab to check-in to a hotel because it was just too cold without the appropriate gear. I can tell you now, that shower was bliss! I later caught up with a good friend Joshua Snow (j.snow_photo) where we went and shot the Delicate Arch. Got some nice golden light for sunset. In the morning we shot Dead Horse but we got skunked, so returned for sunset where the clouds broke up enough for the sun and light to come through.

Incredible conditions for an extremely well-known location.
The next day, I returned home to go back to work and get ready for school - reality sucks sometimes. It was an eventful trip and one that I won’t ever forget. If you’ve made it to this point, thank you very much for reading and I hope you enjoyed the blog!