DWARF Mini Orion Nebula: A 24-Hour HDR Mosaic of M42
DWARF Mini Orion Nebula:
A 24-Hour HDR Mosaic of M42
How far can a 30 mm smart telescope be pushed on Orion? This project combines a three-panel mosaic with dedicated 1 s, 5 s, 15 s and 30 s HDR core exposures to preserve the Trapezium while still revealing the faint dust surrounding M42.
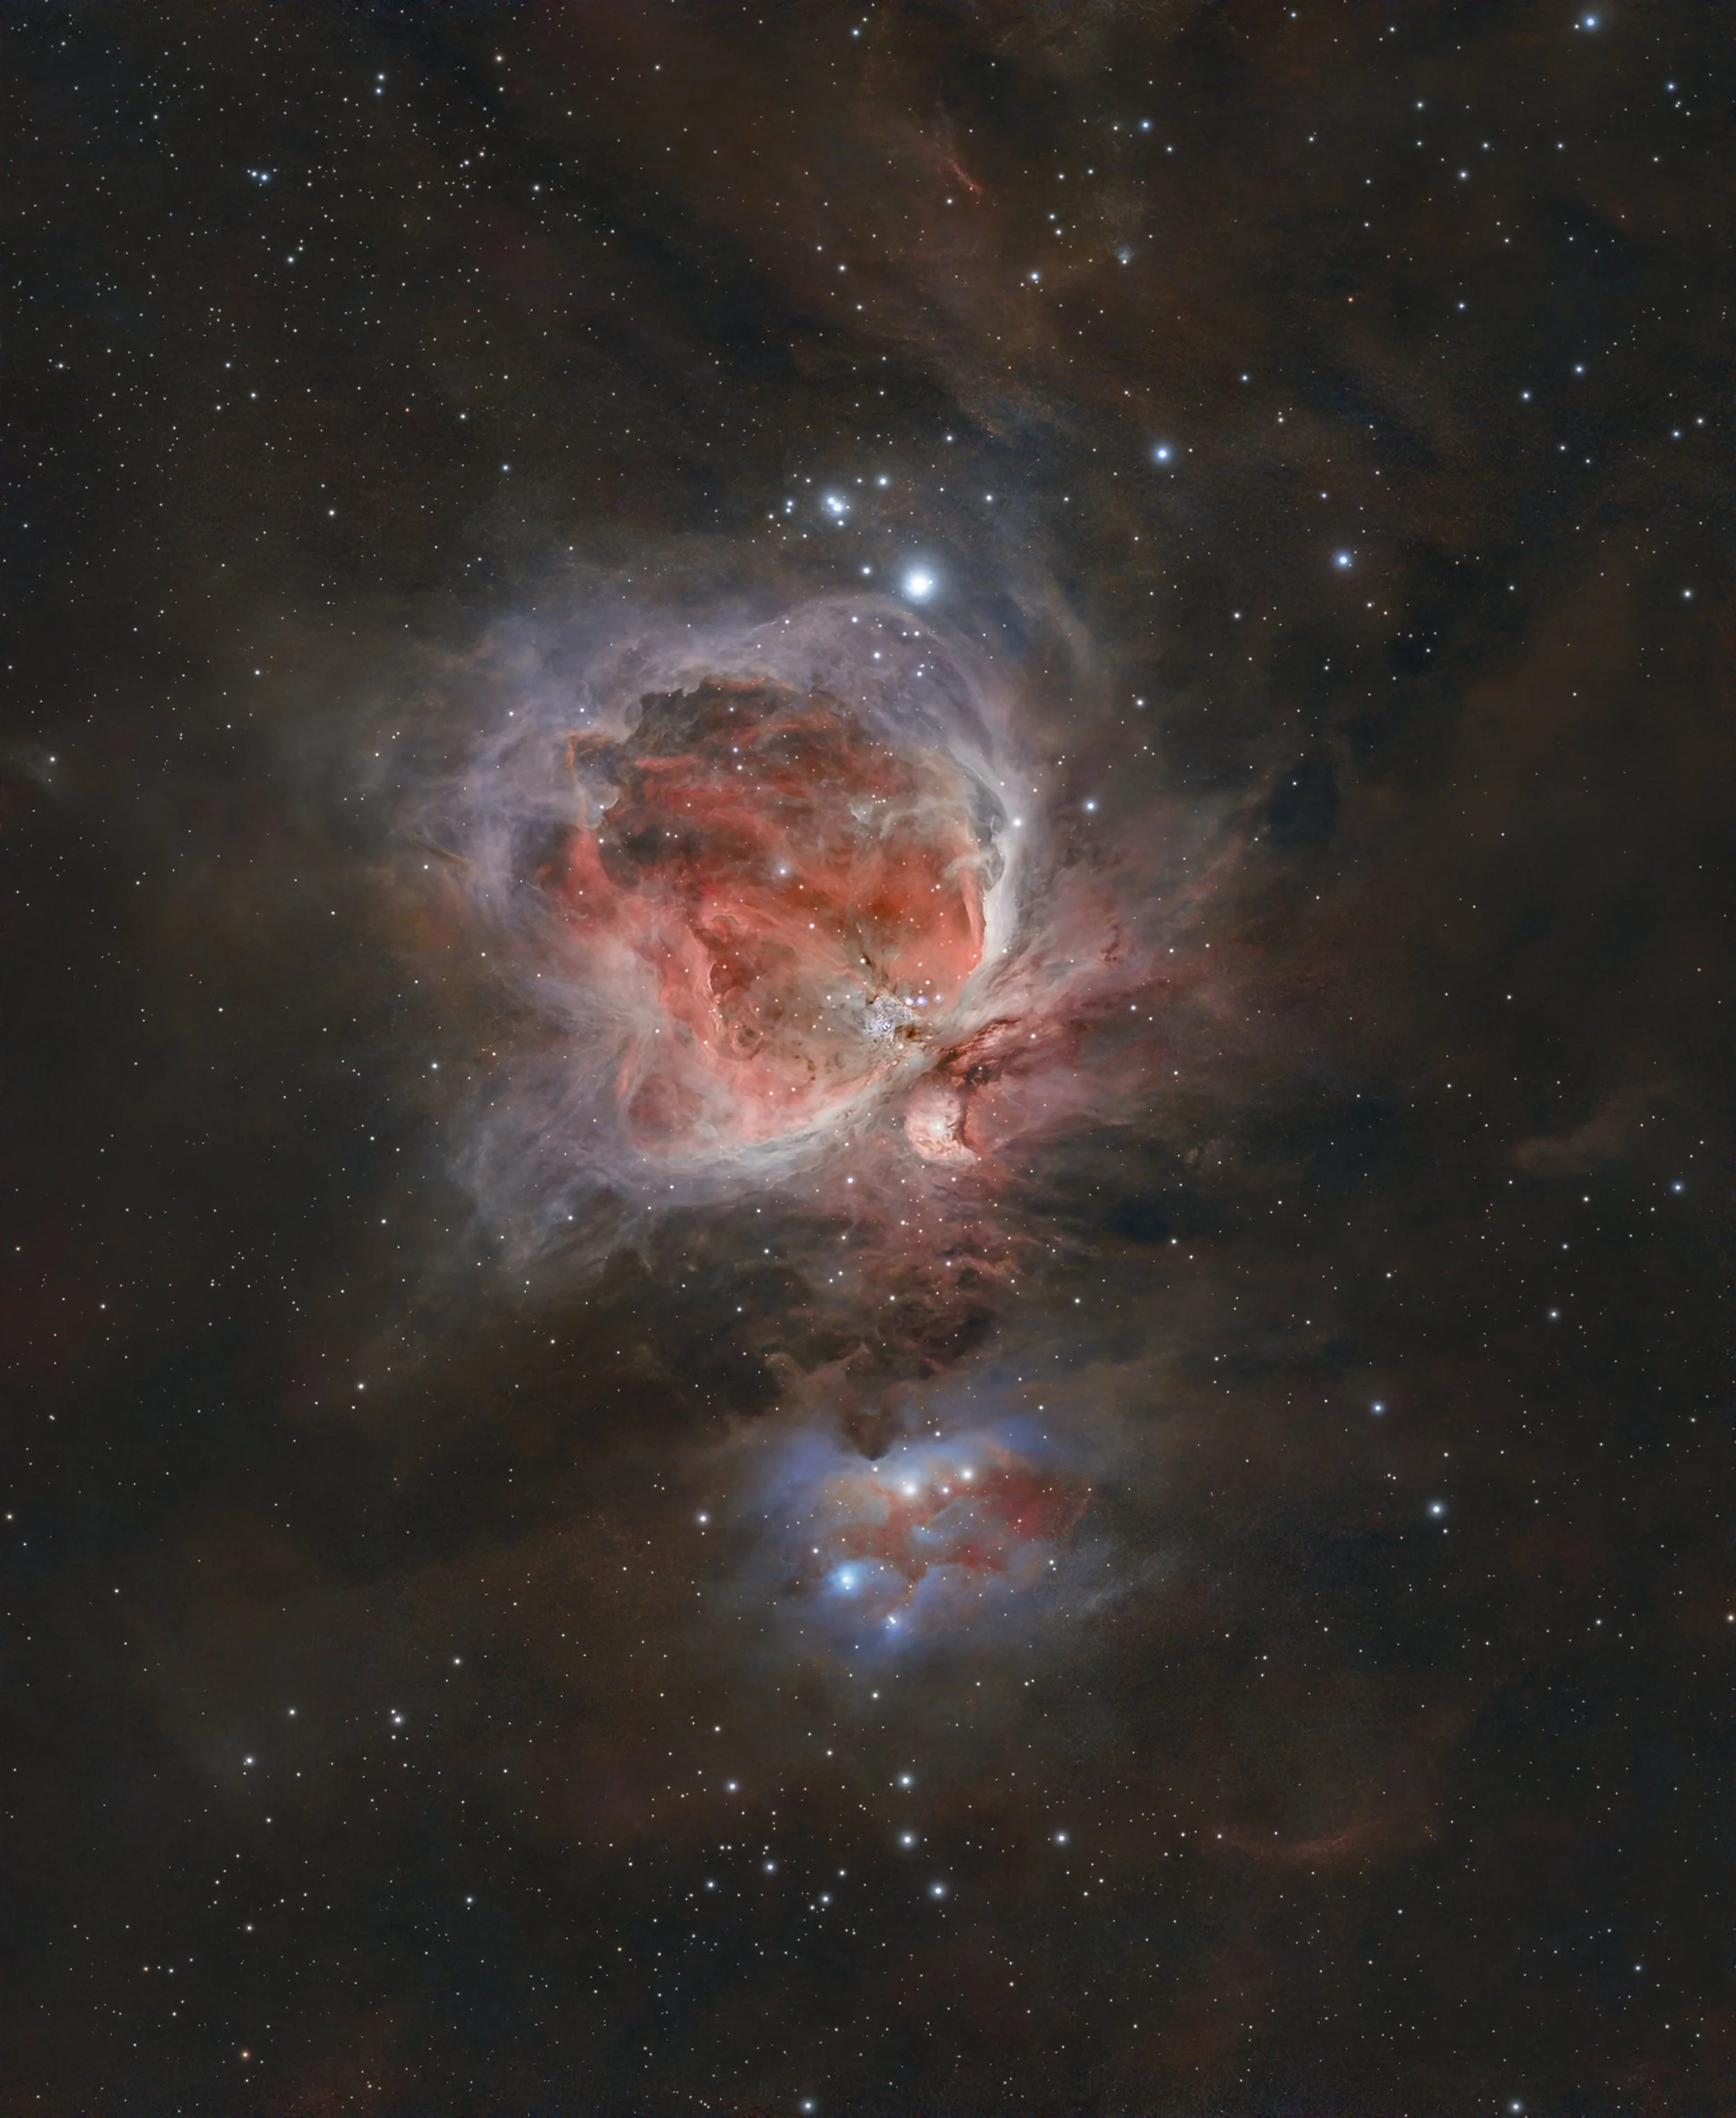
How much detail can a 30 mm DWARF Mini actually capture in the Orion Nebula? I spent 24 hours and 25 minutes finding out.
M42 has always been one of my favourite objects in the night sky. Before getting into smart telescopes, I had wanted to properly photograph deep-sky objects for years but had never owned a telescope or pushed far enough into the hobby to produce the sort of images I had in my head.
When I started using the DWARF Mini, Orion quickly became one of the projects I wanted to take seriously. Not a quick automatic stack straight from the telescope. I wanted to find out how far I could actually push this tiny telescope if I treated the project more like conventional deep-sky astrophotography.
The final result became a three-panel mosaic with almost 24 hours of deep integration, followed by a separate HDR capture of the core using 1-second, 5-second, 15-second and 30-second exposures.
The complete project contains 1,625 accepted subframes and 24 hours, 25 minutes and 4 seconds of accepted exposure.
And the most difficult part was not capturing the faint dust. It was keeping the centre of Orion from disappearing into a white blob.
Telescope: DWARF Mini · Mode: EQ · Filter: Hα/OIII Duo-Band · Gain: 60. The final mosaic combines 60 s and 120 s panel data, plus dedicated 1 s, 5 s, 15 s and 30 s HDR exposures for the core.
Why Orion is harder than it looks
M42 is incredibly bright compared with much of the surrounding structure. That makes it an unusual target.
Long exposures help reveal the enormous clouds of gas and dust surrounding the nebula, but the brighter you expose and the harder you stretch the image, the easier it becomes to overwhelm the inner core.
Right in the centre is the Trapezium, the compact group of young stars responsible for illuminating much of the Orion Nebula.
In many M42 images, especially from small smart telescopes, this region becomes a nearly featureless white area. You get a bright, dramatic Orion Nebula, but lose one of its most interesting structures.
I specifically wanted to avoid that.
The goal was not just to expose the faint dust. I wanted the faint dust and the Trapezium in the same finished image.
That eventually turned this into an HDR astrophotography project as much as a mosaic project.
Building the three-panel mosaic
The DWARF Mini has a relatively wide field of view, but I wanted substantially more of the Orion complex than a single frame could comfortably contain.
The project became a three-panel vertical mosaic covering the main Orion Nebula, the Running Man Nebula above it, and a much larger field of surrounding dusty structure.
| Panel | Accepted frames | Exposure | Integration |
|---|---|---|---|
| Panel 1 · Lower / M42 core | 392 | 60 s | 6 h 32 m |
| Panel 2 · Running Man / NGC 1973 | 581 | 60 s | 9 h 41 m |
| Panel 3 · Upper Orion | 230 | 120 s | 7 h 40 m |
| Total mosaic | 1,203 | 23 h 53 m |
I stacked the individual panel datasets with StackingWizard using its Standard selection rather than the more aggressive Ruthless mode.
That mattered because this project was not only about sharp stars. I wanted the extremely faint extended dust around Orion. Keeping more genuinely usable frames gave the faint structures more total signal instead of throwing away integration purely to maximise individual-frame quality.
Stitching the panels in Astro Pixel Processor
Once the three panel masters were complete, I used Astro Pixel Processor to assemble the mosaic.
Registration: Mosaic mode · Projective model · Dynamic Distortion Correction on · Running Man panel used as the reference.
Normalisation: Full image · Multiply-scale · BWMV scale · Neutralise background on.
Integration: Average · Equal weights · No rejection · LNC second degree, 3 iterations · MBB 25% · Lanczos-3 · scale 1.0.
The panels stitched surprisingly cleanly. Any remaining differences across the field were mainly differences in signal-to-noise and integration depth rather than obvious geometric seams.
What the linear data looked like
The stitched mosaic initially looks nothing like the finished image. That is normal.
Deep-sky data starts with an enormous amount of information compressed into the darkest part of the histogram. Most of what eventually becomes visible is already present, but it has not yet been stretched into a range our eyes can easily see.


After stitching the three panels, I ran the linear mosaic through GraXpert for background extraction.
The objective was not to make it pretty. It was to remove large-scale gradients and establish a cleaner base before colour work, deconvolution, noise reduction and stretching.
This step requires care around Orion because faint dust occupies so much of the frame. There is very little genuinely empty sky, so aggressive background modelling can remove real nebulosity if it is treated as a gradient.
Capturing a real HDR core
At this stage I had nearly 24 hours of mosaic data, but I still had the same fundamental problem almost every Orion image faces.
Expose and stretch the faint material properly and the core becomes extremely bright. Push it far enough and the Trapezium disappears.
Instead of relying on processing to rescue an overexposed core, I captured another dedicated dataset using much shorter exposures.
| Exposure | Accepted frames | Accepted integration |
|---|---|---|
| 30 s | 18 | 9 m |
| 15 s | 36 | 9 m |
| 5 s | 119 | 9 m 55 s |
| 1 s | 249 | 4 m 09 s |
| Total HDR core | 422 | 32 m 04 s |
The raw HDR run contained 591 frames. StackingWizard retained 422 using Standard selection and automatically split the night into four independent stacks, one for each exposure length, while aligning every group to one shared reference.
The short exposures were not intended to contribute to the faint outer nebula. Their job was to preserve information in the brightest region.

Software can compress dynamic range that exists. It cannot recreate detail that was genuinely clipped during capture. The dedicated short exposures meant the Trapezium information was physically present before processing began.
Creating the HDR master in PixInsight
The short-exposure masters were aligned against the cropped long-exposure mosaic in PixInsight StarAlignment.
I then supplied five inputs to HDRComposition:
- 1 s registered master
- 5 s registered master
- 15 s registered master
- 30 s registered master
- the cropped long-exposure mosaic
Automatic exposure evaluation on · Binarising threshold 0.9000 · Mask smoothness 7 · Mask growth 5 · Replace large scales 0 · Reject black pixels on · Generate 64-bit HDR image on · Output composition masks on.
The resulting linear HDR master contained both the deep signal from the long-exposure mosaic and the protected bright-core information from the short exposures.
That became the master file for the final processing.
The processing rabbit hole
This was easily the hardest part of the project.
My deep-sky processing is still developing, and Orion exposed that quickly. There is no single default way M42 is supposed to look. Different astrophotographers produce completely different interpretations of the same object.
I experimented with Generalised Hyperbolic Stretch, range masks, hue and saturation adjustments, HOO-style colour, pseudo-SHO treatments, Narrowband Normalization, multiscale contrast, different star treatments, local colour masks and multiple core blends.
At one stage I had technically preserved the core but lost much of the natural-looking brown dust. At another, the reds had become pink and magenta. Fixing one region kept damaging another.
That was probably the point where I hit my current PixInsight processing ceiling.
Then I found the shortcut I should have been using much earlier.
The breakthrough: stretch for the dust, then recover the core
The important realisation was that because I had captured a real HDR dataset, I did not need to obsessively protect the core throughout the initial stretch.
The information was already there.
Instead of spending forever delicately stretching around the core, I used a much simpler approach. I applied an STF to the image, transferred that STF directly into HistogramTransformation, and performed the nonlinear stretch almost immediately.
That exposed the surrounding nebula and dust much faster.
Predictably, the core looked extremely bright. But visually blown out is not necessarily the same thing as mathematically clipped. The HDR information was still underneath.
Recovering the core with HDRMultiscaleTransform
After stretching for the outer nebula, I used HDRMultiscaleTransform with masks around the central M42 region.
HDRMT compresses local dynamic range. In this case it allowed me to take the extremely bright-looking core and redistribute that brightness so the internal structure became visible again.
HDRMT was not magically recreating a blown-out Trapezium. The short exposures had already captured that information. HDRMT simply allowed the dynamic range contained in the HDR master to be displayed alongside the much fainter outer regions.
Capture the dynamic range properly first. Stretch for the faint signal. Compress the bright regions afterwards.
For Orion, that was dramatically faster than trying to make a single careful stretch simultaneously satisfy both extremes.
Final processing workflow
The final route was much simpler than the hours of experimentation that came before it.
- Stack each mosaic panel independently in StackingWizard.
- Build the three-panel mosaic in Astro Pixel Processor.
- Crop the completed linear mosaic.
- Run GraXpert background extraction.
- Perform colour calibration.
- Run BlurXTerminator while the image is still linear.
- Run NoiseXTerminator.
- Use StarXTerminator where separated star processing is useful.
- Register the short-exposure masters to the long mosaic.
- Create the 1 s / 5 s / 15 s / 30 s / long-exposure HDR master with HDRComposition.
- Apply STF and transfer it directly to HistogramTransformation for the main nonlinear stretch.
- Use HDRMultiscaleTransform through masks to recover and compress the bright M42 core.
- Apply local contrast and colour refinement.
- Recombine and refine the star layer.
There was considerably more experimentation than that list suggests, but those were the steps that mattered most in the finished version.
Full integration details
The 24 h 25 m figure is the total accepted exposure collected for the completed project. It does not mean every pixel in the final mosaic received 24 hours of exposure. The three mosaic panels cover different parts of the field with different integration depths, and the short HDR exposures are concentrated on the centre.
What I would do differently next time
Quite a lot, which is probably the most useful result of the whole project.
For another very high-dynamic-range target, I would plan the short exposures from the beginning rather than treating them as an additional stage near the end.
I would also worry much less about perfectly protecting highlights during the initial nonlinear stretch when I know I have properly captured HDR data underneath.
On the processing side, colour remains one of the biggest areas I want to improve. This image took far longer to process than it should have because I was learning several PixInsight techniques while actually building the final image.
That is also why I wanted to publish the complete project rather than only the finished photograph. The workflow matters as much as the final image.
How far can the DWARF Mini actually go on Orion?
Farther than I expected.
This is still a tiny 30 mm smart telescope. It is not going to match the resolution and signal quality of a large premium refractor, cooled astronomy camera and dedicated filter set.
That was never really the point.
What interested me was finding out what happens if you stop treating the Mini like a device for quick automated snapshots and instead give it proper polar alignment, multiple clear nights, long integration, careful frame selection, mosaic planning, separate exposure lengths, calibration, dedicated astrophotography software and serious post-processing.
The answer is this image: nearly 25 hours of accepted exposure, three mosaic panels, four additional HDR exposure lengths and enough dynamic range to show both Orion's faint surrounding dust and the Trapezium in the same finished frame.
For a telescope this small, I think that is pretty remarkable.
DWARFLAB supplied my first DWARF Mini on a six-month loan. I later purchased a second Mini myself at full price and subsequently joined the DWARFLAB affiliate program. DWARFLAB did not control this project, processing workflow or conclusions. Code DYLAN gives customers a discount on qualifying DWARFLAB products, and I may receive a commission from qualifying purchases.