How to Photograph
the Milky Way
in Australia
Find it, plan it, shoot it, nail focus, and get clean files you can actually edit.
Prefer to read first? Jump to the guide ↓

- Core season in Australia: February–October. January can work but it's a short pre-dawn window.
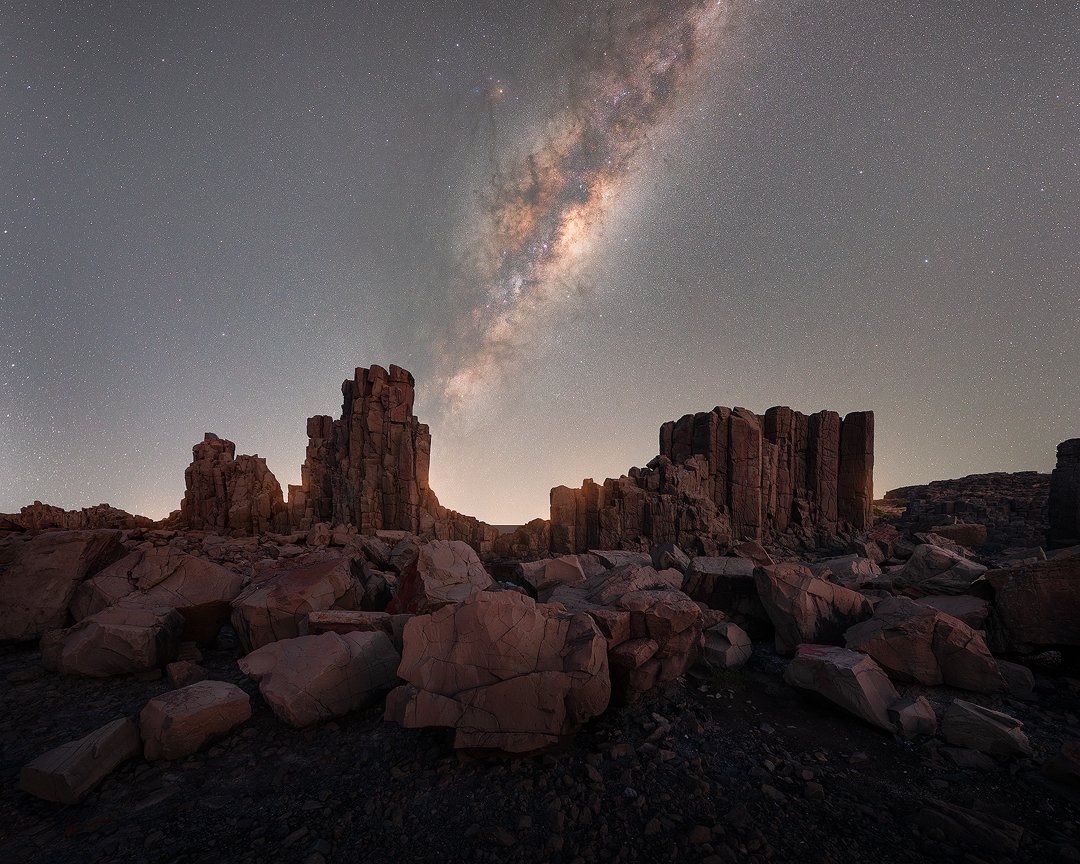
- Feb–Jun: shoot the east / southeast rising core.
- Jul–Oct: shoot the west / southwest setting core, earlier in the evening.
- Wait for astronomical twilight — Sun ~18° below horizon.
- Start untracked: 14mm · f/2.8 · 10–15s · ISO 3200–6400, then refine from there.
- Focus manually in live view on a bright star at 10× zoom. Confirm with a test shot.
- Dark skies beat gear. Move further before you buy more.
- Conditions-led always. If the sky shuts you down, you can still learn the full workflow with downloadable RAW files.
Finding the Milky Way in Australia
What "Milky Way core" actually means
The Milky Way core — technically the galactic centre region — is the bright, high-contrast band of dust lanes and star density that looks almost three-dimensional when your exposure and focus are right. It is not visible at night all year, and if you've been learning from Northern Hemisphere creators, the months and directions will not match what you see here.
The core season: February–October
The practical window for shooting the Milky Way core from Australia is roughly late January through to October. Late January is possible, but it's a short pre-dawn window with the core sitting low on the horizon. February is when the real season begins.
The single most important AU-specific rule to internalise:
Feb–Jun: the core rises in the east / southeast — ideal for low-horizon foreground compositions. Jul–Oct: the core is setting in the west / southwest, earlier in the evening. Shoot it before it gets too high or drops out of frame.
Month-by-month planner
If you want an arch or a diagonal sweep, the time of night is as important as the month. The same calendar date can produce totally different looks depending on when you show up and where you point the camera.
Apps and how to use them
PhotoPills — your planner
Use it to confirm core rise/set time, azimuth direction, elevation above the horizon, and astronomical twilight timing. If you want a more accurate trailing limit than the 500 rule, the NPF rule is built in to PhotoPills' Spot Stars calculator. Worth the few seconds to Google it if you don't have it yet.
Sky Guide — in-field sanity check
On location and unsure if that bright patch is the core or cloud haze? Sky Guide confirms it instantly in AR.
BOM + WillyWeather + Clear Outside — conditions trio
Use BOM for the big picture (weather systems moving in), WillyWeather for local wind and coastal reality, and Clear Outside for cloud layers at different altitudes. Low cloud can look clear to the eye but kills contrast at altitude. All free, all easy to find.
Coastal humidity can flatten contrast even when the sky looks clear. If it feels sticky on the Sunshine Coast or anywhere coastal, expect softer detail and more skyglow. Inland nights typically run cleaner.
Planning, Dark Skies + Moon Phase
Moon phase — the single biggest variable
Moonlight is the biggest visibility killer. Even a quarter moon can wash out the dust lane detail you're after. Simple rule: new moon ± 3 days for the best conditions; a thin crescent is acceptable if it's rising after your planned shooting window. When in doubt, check the moon's azimuth — you don't want it illuminating the same horizon your core is sitting on.
Astronomical twilight
Astronomical twilight is when the Sun reaches approximately 18° below the horizon. Before that point, residual sunlight lifts the sky background and reduces contrast — the core will look flat and your exposures will run noisy. PhotoPills gives you the exact time for your location. Don't start early just because it's dark to your eyes.
Dark sky selection
This is simple but people skip it: search for a light pollution map (there are several free ones — a quick Google will get you there) and move away from city glow in the direction the core is rising or setting. A mid-range camera in a dark sky (Bortle 3–4) will outperform a flagship body under suburban skyglow (Bortle 6–7).
The Bortle Scale is a nine-level scale for sky brightness, from class 1 (extremely dark, Milky Way casts shadows) through to class 9 (inner-city sky). You don't need to be precise about numbers — just understand that lower class = easier files and better results with less post work.
Foreground + access safety
Scout your location in daylight. Simple footing, predictable terrain, formed tracks. Don't shoot cliff edges in the dark for the shot. Don't trespass. Have a headlamp (red mode to preserve night vision) and a spare battery, because the cold kills charge faster than people expect. Conditions-led also means access-led: if weather, fatigue, or terrain makes it sketchy, you change the plan.
Plan B: when conditions block the core
Conditions-led doesn't mean driving home empty-handed. If cloud or haze kills Plan A:
- → Shoot blue hour foregrounds for future blends
- → Work on composition and exposure fundamentals
- → Download Milky Way RAW files and learn the full editing workflow — conditions can't stop that
Camera Settings (and Why)
Untracked starting point — full-frame, wide angle
This is your default baseline, and it works across most cameras:
14mm · f/2.8 · 10–15s · ISO 3200–6400
Those numbers will give you a usable file in a reasonably dark sky. Every variable below is a reason to move away from the baseline.
Settings-by-scenario table
This is the table beginners screenshot and come back to. Use it to get into the ballpark, then refine from there.
| Scenario | Focal length | Aperture | Shutter | ISO | Notes |
|---|---|---|---|---|---|
| Full-frame · dark sky (default) | 14mm | f/2.8 | 10–15s | 3200–6400 | Your go-to starting point |
| Full-frame · brighter sky (coastal / near town) | 14mm | f/2.8 | 8–12s | 1600–3200 | Reduce ISO to manage skyglow lift |
| APS-C crop equivalent | 10–11mm | f/2.8 | 8–12s | 1600–3200 | Shorter shutter — smaller sensor = more noise |
| Tracked baseline (star tracker) | any | f/4 | ~3 min | 800 | Cleaner, lower-noise files at the cost of setup time |
ISO — the brightness dial
Once aperture and shutter are set, ISO is what you reach for to lift the exposure. The solid starting range for untracked wide-angle Milky Way work is ISO 1600–6400. If you're underexposed at ISO 3200, don't jump straight to ISO 12800 — first confirm your shutter and aperture are actually doing what they should.
Aperture — why fast glass matters
Night is a photon shortage problem. A fast aperture (roughly f/1.4–f/4) is the most direct solution. f/2.8 is the practical workhorse — wide enough to gather light, without pushing into the worst of most lenses' coma and edge softness. If your lens is optically messy wide open, stop it down slightly and compensate with ISO rather than fighting ugly corners in every frame.
Shutter speed — the trailing trade-off
A longer shutter means a brighter exposure at lower ISO, but it also means more star trailing. The 500 rule (500 ÷ focal length in mm = max shutter in seconds) is a rough starting point, but modern high-resolution sensors are more revealing of trailing than older cameras. Better approach: use the 500 rule to get a ballpark, take test shots, zoom in on stars, and reduce shutter until they're tight points. The NPF rule, available in PhotoPills' Spot Stars calculator, is a more accurate alternative if you want it.
Tracked vs untracked
You don't need a tracker to get strong results. A tracker is a quality upgrade — longer exposures, lower ISO, cleaner files — at the cost of extra setup and alignment time. The tracked baseline (3 min · f/4 · ISO 800) produces noticeably better raw files. But don't let the absence of a tracker stop you shooting.
White balance + RAW
Shoot RAW — non-negotiable. For white balance, set it to Daylight or around 5500K in-camera. Daylight WB as your starting point, then fine-tune in Lightroom/Capture One from there.
Focusing in the Dark
This is where most beginners lose their night. The infinity mark on your lens almost certainly doesn't land on true infinity focus for astrophotography — particularly at wide apertures. Ignore it.
The live view method — works every time
- Switch to Manual Focus (MF) on your lens.
- Enable Live View. Find the brightest star visible — or a distant light source at least 1 km away.
- Digitally zoom in on the star at 5× or 10× using your camera's magnify button.
- Rotate the focus ring slowly until the star becomes the smallest, sharpest point of light possible.
- Take a test exposure and zoom in on the image on the rear screen to confirm.
- Don't touch the focus ring again. If you need to recheck, run through the same live view process — don't assume it's still sharp after moving locations or bumping the camera.
Common focus failure modes
| Symptom | Likely cause | Fix |
|---|---|---|
| Stars look "fat" or bloated | Focus slightly off, or high haze/cloud | Redo live view focus; check Clear Outside for thin cloud |
| Focus was sharp, now it drifted | Lens expanded/contracted as temperature dropped | Re-check focus once the lens temp stabilises (~10–15 min on location) |
| Infinity mark isn't working | Most infinity marks are not accurate for astro at wide apertures | Always use live view method — ignore the engraved mark |
| You bumped the ring | Focus shifted during lens swap, bag carry, or accidental knock | Re-run the live view focus check before shooting again |
10-Minute Field Workflow
Print this or screenshot it. Run through it every time you arrive — experienced shooters forget steps too when it's cold and dark.
Check the sky (cloud cover, humidity, moon position). Confirm the core direction lines up with your planned composition. If conditions are bad, execute Plan B.
Set up your tripod and composition before the sky is fully dark if possible. Know where the core will appear. Adjust for wind exposure and stable footing.
Find the brightest star visible. Zoom to 10× in live view. Rotate focus ring to smallest point. Take one confirmation shot and check at 100% on the rear screen.
14mm · f/2.8 · 12s · ISO 3200 as your starting point. Check histogram — you want the sky data to sit left-of-centre without clipping highlights. Look for trailing by zooming into stars.
Adjust ISO or shutter based on what the test shot shows. If trailing is visible, shorten shutter. If it's underexposed, lift ISO before shortening shutter further.
Use a remote or 2-second timer to eliminate camera shake. Shoot RAW. Review compositions periodically — small foreground adjustments make large differences.
Any time you change locations, compositions, or have moved the camera, do a quick live view focus check and verify at 100% on the test shot.
Light Pollution — Capture + Post Basics
Location is the biggest lever
Repeat this until it's instinct: driving further beats buying more gear. Post-processing can reduce gradients but cannot restore contrast and colour that simply wasn't captured because you were too close to a city.
Bortle Scale — practical use
Classes 1–4 are where most of the magic happens. Class 5 is workable with discipline. Class 6+ starts demanding significant compromise.
Light pollution filters
Filters like narrowband or broadband LP filters can reduce the impact of skyglow on exposures. They're useful if you're shooting fixed locations that sit near light-polluted horizons, but they don't replace dark skies.
Basic post-processing approach
| Step | What to do | Common mistake |
|---|---|---|
| 1. White balance + exposure | Correct these first. Everything downstream depends on them. | Editing in the wrong WB and wondering why the result looks wrong |
| 2. Gradient removal | Use a gradient tool or manual masking to reduce skyglow gradients. | Global corrections that kill the natural tonal range of the scene |
| 3. Contrast + texture | Add contrast carefully. Focus texture/clarity adjustments on the core itself. | Over-clarifying the entire sky, making it look gritty |
| 4. Noise reduction | Lightroom's AI Denoise is powerful. Apply it to the sky; don’t overdo it. | Pushing AI Denoise too far so it looks smooth/fake |
| 5. Dehaze (use last, sparingly) | A little adds punch to dust lanes. Too much destroys star colour. | Heavy dehaze making the sky look like sandpaper |
Shooting multiple frames at the same settings and stacking them in post is one of the most effective ways to reduce noise without sacrificing resolution or star colour.
Example Shots with EXIF Overlays
Six images with full settings context, what worked, and what to watch for in editing.


FAQ
Want to shoot this with me?
Small groups. Real dark skies. A workflow you can repeat anywhere in Australia.
See Upcoming Astro Workshops300+ photographers trained since 2019 · Maximum 4 participants per workshop