How to Photograph the Milky Way Australia
Milky Way Season Australia: Best Months, Direction & Camera Settings
A complete guide built for Australian conditions — when to shoot, which direction to face each month, southern hemisphere direction logic, camera settings by scenario, focusing in the dark, and practical location advice from South-East Queensland to the Red Centre.
The best time to photograph the Milky Way in Australia is April through August. The Galactic Centre is visible from around February to October, but the April to August window gives most photographers the best combination of darker skies, earlier evening timing, cleaner winter air, and stronger compositions.
February and March can work, but the core rises later and coastal humidity is often higher. October is still possible, though the evening window is shorter. The sweet spot — where everything lines up most reliably — is the five months of the Australian autumn and winter season.
Most Milky Way guides are written for the northern hemisphere. They get the direction logic backwards, gloss over Australian humidity and transparency, and rarely explain how different our seasonal windows feel in practice. This guide is built for Australian conditions — real locations, real settings, and real field experience.
Australia is outrageously well suited to astro. We occupy only a small fraction of the continent, which leaves huge inland areas in genuine dark-sky country. Whether you're shooting with a kit lens from a paddock in the Wheatbelt or building a tracked composite in the Outback, the aim here is simple: sharper files, cleaner skies, and a workflow you can actually repeat.
Season, Timing & Planning an Australian Milky Way Shoot
When is Milky Way season in Australia?
The Galactic Centre is visible from approximately February to October. In practice, the easiest and most rewarding stretch for most of Australia is April to August, when nights are longer, the core is easier to place in evening compositions, and inland winter air is often cleaner and drier.
February and March can absolutely work, but the core rises later and summer humidity is often higher, especially in Queensland and other coastal regions. By April the season becomes much more forgiving, and by winter you get a better mix of darkness, timing, and transparency.
Moon phase matters more than most people think
For a clean Milky Way core, aim for roughly new moon plus or minus four days. Beyond that, moonlight starts lifting the sky background enough to reduce contrast in the dust lanes and fainter outer structure. If the moon is up on the same side of the sky you're trying to shoot, it can ruin the shot faster than most people expect.
The main exception is when you're deliberately planning a blended foreground, a blue-hour composite, or a scene where a late-rising crescent gives you just enough foreground fill without washing out the sky earlier in the session.
Weather and transparency
Clear skies are the starting point, but transparency decides how crisp and contrasty the result feels. Thin high haze, coastal moisture, or dust in the air can kill detail even when the sky looks clear to your eyes.
My standard planning stack: PhotoPills for timing, Clear Outside for layered cloud, BOM for the broader weather picture, Windy for wind and upper atmosphere context, and Light Pollution Map for Bortle and local sky glow reality.
Coastal vs inland reality
For South-East Queensland especially, an inland drive is often the single biggest image-quality upgrade you can make. Coastal humidity softens detail, increases sky glow, and raises the chance of dew on your front element. Move inland and the difference is usually obvious in both contrast and keeper rate.

Australian Direction Logic — What Northern Hemisphere Guides Get Wrong
In Australia, the Galactic Centre starts the season low between the east and south-east. As the season progresses, it rises earlier, climbs higher, and can stand much more upright as it tracks toward the northern part of the sky. Later in the season, after rotating through that higher northerly position, it tips over and drops toward the western horizon, where the lower, more horizontal look returns.
Think in phases: east early, north mid, west late. The exact angle shifts with latitude, so use this as planning logic, not a rigid rule.
low, rises late
late evening
stronger rise
climbs higher
high, more upright
vertical / flipping
tips over west
lower, shorter
brief dusk window
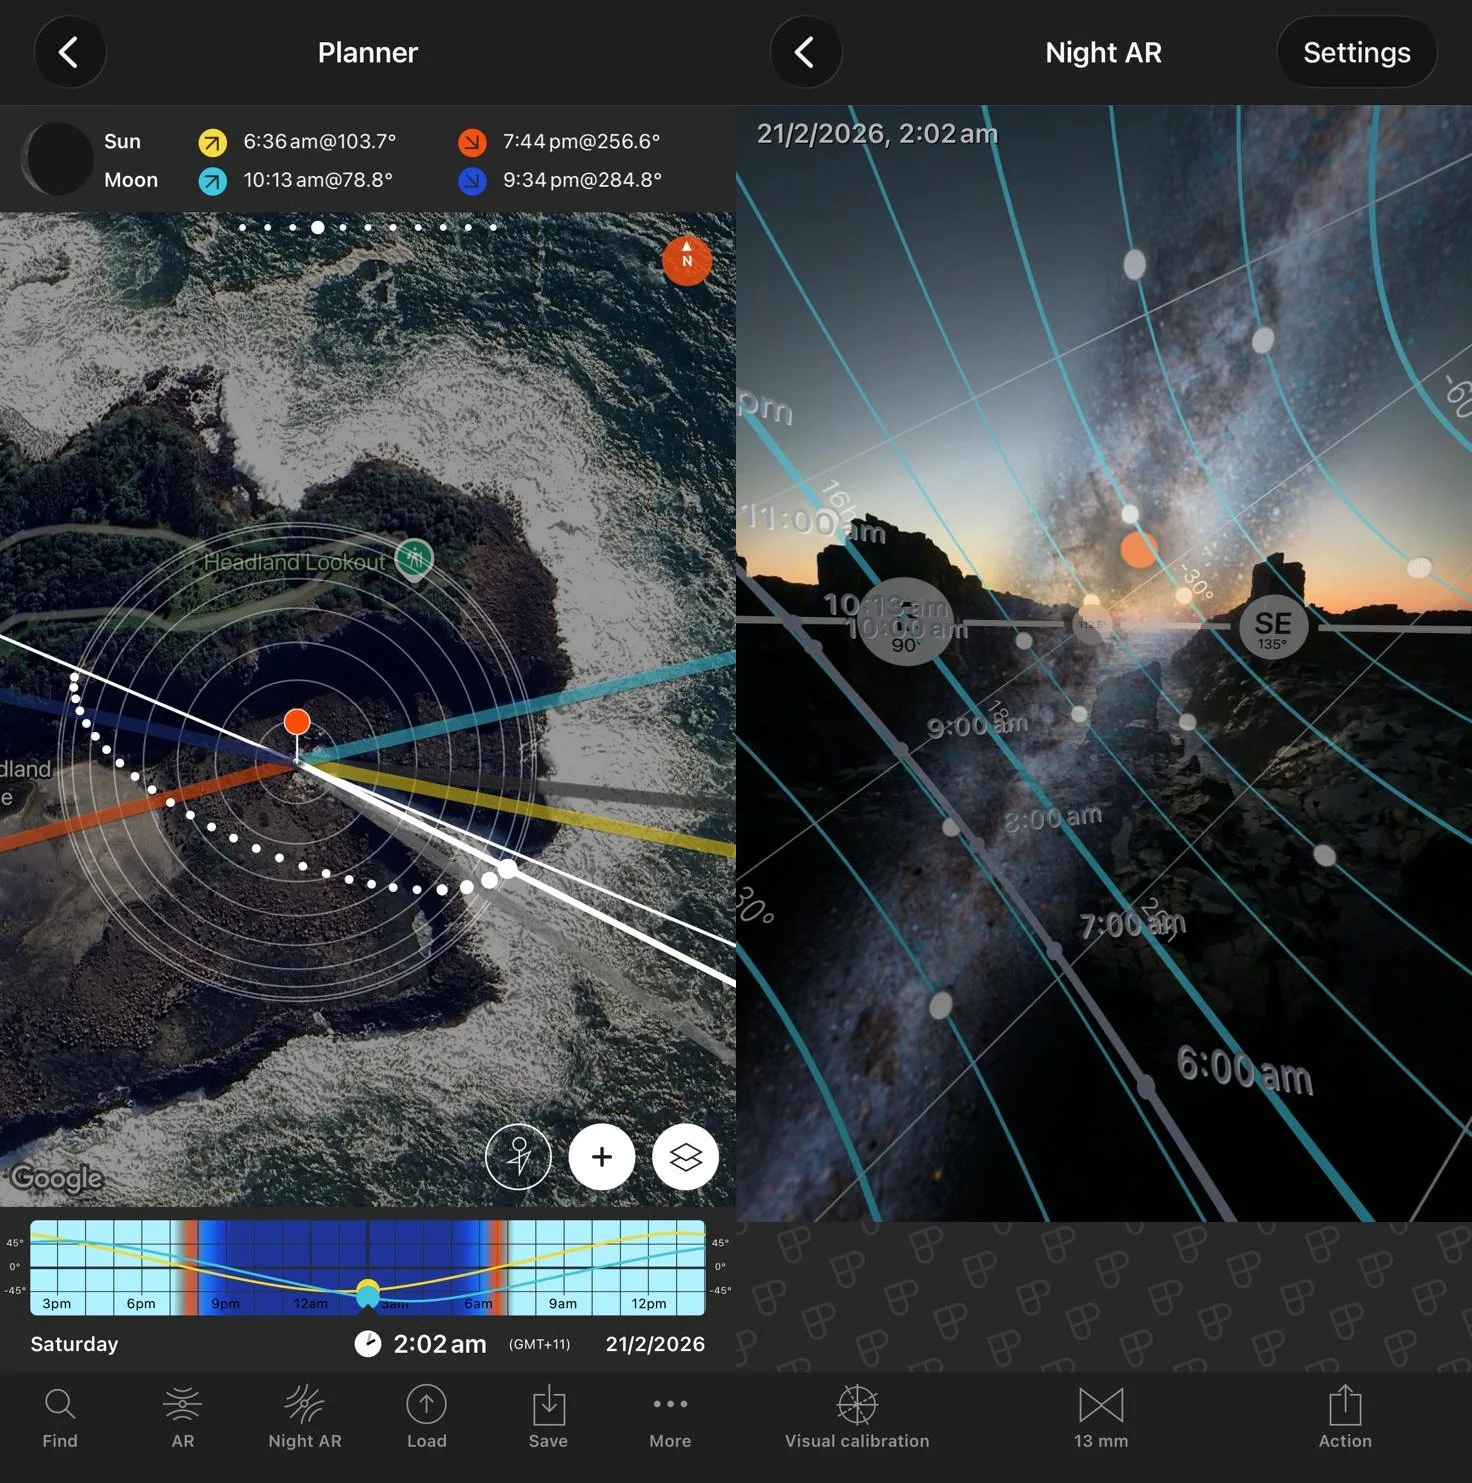
Using PhotoPills for Australian direction planning
PhotoPills is the easiest way to confirm exactly where the core will sit for your location, date, and time. The key is not just knowing whether the core is up, but what angle it will be on — whether it is still rising low in the east, standing upright toward the north, or has already tipped over toward the west. That lets you decide whether the scene suits a low sweeping composition, a vertical core, or whether you should simply wait another hour or two for the orientation you actually want.
Camera Settings by Scenario — Start Here, Then Refine
Just use ISO 3200 and f/2.8 is not wrong, but it ignores tracker use, sensor size, coastal haze, and how your particular lens behaves wide open. Use the table below as your starting point, then check the histogram and the stars at 100% before settling in.
| Scenario | Aperture | Shutter | ISO | Notes |
|---|---|---|---|---|
| Full-frame, dark sky (Bortle ≤4), no tracker | f/2–f/2.8 | 15–20s | ISO 3200 | Reliable baseline. Check 100% for trailing. 20s is often safer than pushing longer on high-resolution bodies. |
| Full-frame, coastal / suburban (Bortle 5–6) | f/2–f/2.8 | 10–15s | ISO 2000–3200 | Brighter sky means less tolerance. Do not chase exposure by blasting ISO if the sky itself is the problem. |
| APS-C, dark sky, no tracker | f/2–f/2.8 | 10–15s | ISO 3200–6400 | Crop factor makes trailing show up sooner. Use a shorter shutter and accept the ISO trade. |
| Full-frame + tracker (tracked sky, separate foreground) | f/2.8–f/4 | 60–180s | ISO 800–1600 | Run multiple tracked exposures, then stack. Separate foreground exposure keeps the workflow cleaner. |
| APS-C + tracker | f/2.8 | 60–120s | ISO 1600 | This is where APS-C benefits massively. Even a modest tracked stack is a big jump from single-shot ISO 6400. |
| Wide-angle full-frame (14–20mm), dark sky | f/2–f/2.8 | 15–20s | ISO 3200 | Use the NPF Rule in PhotoPills as your starting point, then confirm at 100% on the back of the camera. High-resolution bodies usually need a shorter shutter than older rules suggest. |
| Foreground blend / blue-hour foreground | f/8–f/11 | Varies | ISO 100–400 | Shoot the foreground separately and merge later. Cleaner than forcing everything into one compromise exposure. |
The NPF Rule — better than the old 500 Rule
The old 500 Rule is still a rough ballpark, but it is too loose for many modern high-resolution cameras. A more accurate approach is the NPF Rule, which takes into account focal length, aperture, and camera resolution to give a more realistic maximum shutter speed before stars start to trail. Open the Spot Stars calculator in PhotoPills and use the NPF result as your starting point, then take a test shot, zoom to 100%, and shorten the shutter further if your stars still look stretched.
How to Focus on Stars at Night — Exact Steps, No Guesswork
Blurry stars are the most common failure mode I see in workshop files. Not noise, not white balance, not the camera body. Focus. This is the exact method I teach in the field.
Turn autofocus off completely. You need full control and magnified live view on the rear screen.
Jupiter, Venus, or a very bright star makes the process much easier than trying to focus on a dim point.
Go to maximum zoom so the star becomes a blob you can actually refine.
Most lenses do not hit true astro infinity exactly where the barrel markings suggest. Go slowly.
When the blob gets larger again, you've passed the sharpest point. Back up until it is smallest and cleanest.
Check a centre star and then a corner. Centre sharp and corners slightly worse is normal for fast wide-angle lenses. Centre soft means refocus.
A small piece of gaffer tape across the focus ring can save you from accidental movement during reframing.

Focus failure modes — quick diagnosis
| What you see | Cause | Fix |
|---|---|---|
| Stars with tails / streaks | Shutter speed too long | Reduce shutter speed and recheck at 100%. |
| Stars uniformly soft | Missed focus | Redo the live view focus method. Ignore the infinity mark. |
| Stars sharp, foreground blurry | Normal when focused at infinity | Shoot a separate foreground if you need depth front to back. |
| Corners messy, centre sharp | Lens aberration / coma wide open | Stop down slightly and raise ISO if needed. |
| Focus shifts after reframing | Ring moved accidentally | Retest focus before the next sequence. |
Reducing Noise in Milky Way Photography
Noise is part of the job in low-light astrophotography. The aim is not to create a plastic-looking file. The aim is to get enough signal into the RAW file that your clean-up is gentle, not destructive.
Star Tracker vs No Tracker — Honest Assessment
A tracker is not required to take a good Milky Way image. But it does change what good can look like at full size. Here is the practical version, without the gear hype.
No tracker
- Fast setup and simple workflow
- Great for wide environmental compositions
- Works with any camera and tripod
- Ideal for learning focus, timing, and composition
- Stacking a short series of frames can get you surprisingly far
With tracker
- Much cleaner files at lower ISO
- Longer exposures reveal more faint structure
- Bigger payoff for larger prints and competition-level output
- Adds setup time, alignment, and another failure point
- Usually means a separate foreground workflow
Best Milky Way Locations in Australia
Australia is one of the best countries on earth for Milky Way photography: huge dark-sky regions, genuine Bortle 1–2 areas, desert foregrounds, coastal rock platforms, alpine country, and enough latitude spread to give you a lot to work with. Because the inhabited footprint of the country is relatively small, huge parts of the interior stay properly dark.
Common Mistakes I See in Workshops
These are real mistakes from the field, not theory pulled from forums.
Most lenses focus past true infinity for astro. The engraved mark is not your sharp point.
Fix: use live view every shoot, then secure the ring if needed.The rear screen can lie to you at normal review size. Soft stars often look fine until you zoom in properly.
Fix: check one centre star and one corner before committing to the set.Beautiful foreground, wrong sky. It happens constantly when people skip planning.
Fix: screenshot the PhotoPills plan before leaving home.Even a modest moon can lift the whole sky background faster than expected once it enters the scene.
Fix: plan around exact local moonrise and finish before it becomes a problem.Dark files pushed hard in post usually look worse than properly exposed high-ISO files.
Fix: expose for usable sky detail, not for fear.Especially in Queensland, the air can look clear while still flattening contrast and fogging the front element.
Fix: go inland when you can and carry dew management.Real Examples with Full EXIF
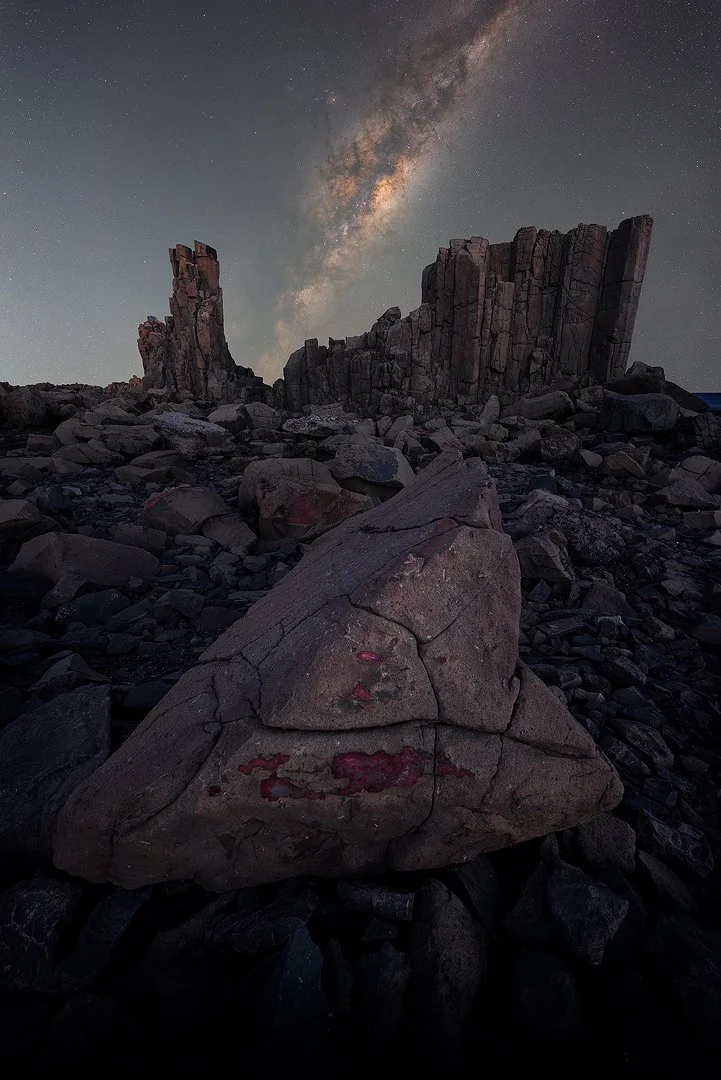
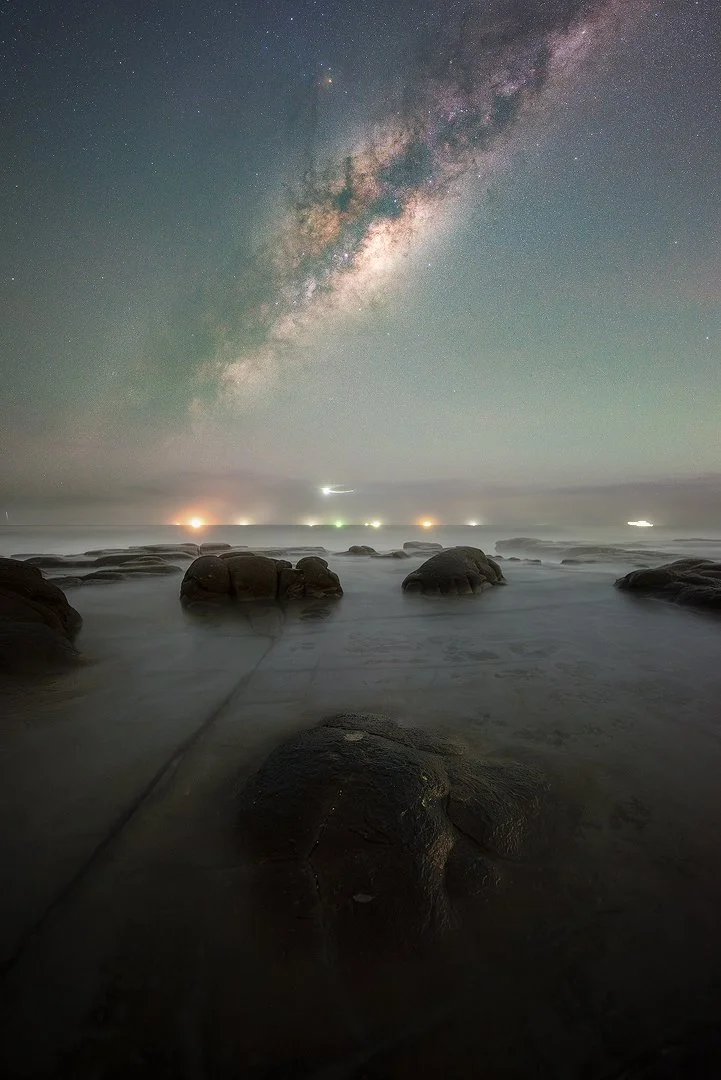
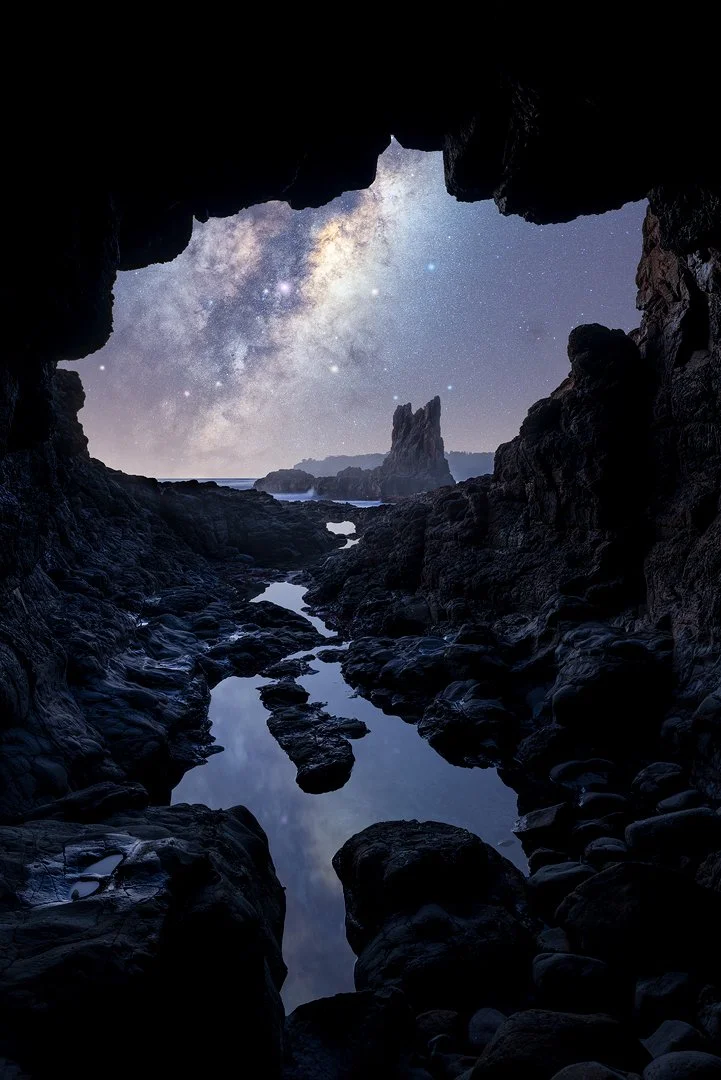
These are real Australian Milky Way images with exact capture settings for both foreground and tracked sky. They show the range of approaches — twilight blends, night blends, tracked composites, and panoramas.


Frequently Asked Questions
Take the Next Step in the Field
Download the free Australian Milky Way cheat sheet — a one-page quick reference for settings, focus steps, and a field workflow you can use in the dark.