Best Photography Locations on the Gold Coast
Best Photography Locations on the Gold Coast
From Bortle 2 dark skies at Mount Barney to rainforest waterfalls in Lamington, hexagonal basalt at Fingal Head, and tide-led seascapes at Currumbin Rock — a complete photographer's guide to one of Australia's most diverse regions.
The Gold Coast hinterland and coastline is one of the most diverse photography regions in southeast Queensland — and one of the most underrated. Most photographers think of the Gold Coast as high-rises, theme parks, and Surfers Paradise. The photographers who know it differently are shooting Bortle 2 dark skies from the Scenic Rim, rainforest waterfalls inside UNESCO World Heritage listed forest, and hexagonal basalt formations on the coast that most Australians don't even know exist.
I scouted this region with a specific brief: to prove that you could build a five-day photography trip covering mountains, rainforest, and coastline without driving more than 90 minutes between any two locations. The result was a route that now underpins a workshop I run twice a year — and this guide is built from the notes, GPS waypoints, and field lessons that came out of that scouting trip and every session since.
The four primary locations here — Mount Barney, Lamington, Currumbin Rock, and Fingal Head — each teach something completely different. That's the point. Within a single trip you move from nightscape technique to long-exposure waterfalls to tide-led seascapes to basalt geology. Few regions in Australia offer that in one compact drive.
Mount Barney — Bortle 2 Dark Skies and Volcanic Drama
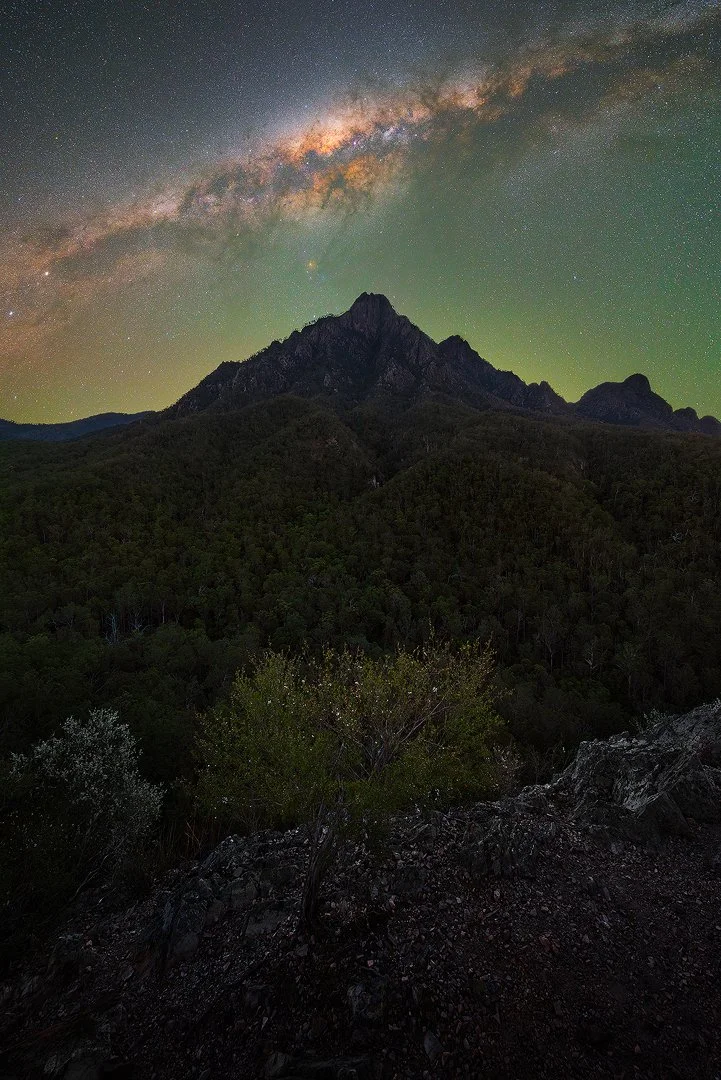
Mount Barney is Queensland's second highest peak and the anchor of the Scenic Rim — a volcanic spine rising out of the hinterland about 90 minutes southwest of Brisbane. For photographers, the main draw is simple: Bortle 2 dark sky you can drive to. SQM readings around 21.95 mag/arcsec² have been recorded at Yellow Pinch Lookout, with artificial sky brightness sitting at roughly 8.07 μcd/m². That's one of the darkest accessible locations in southeast Queensland, and it sits within view of one of the most dramatic mountain silhouettes in the state.
Yellow Pinch Lookout is the primary shooting position for astro work. It gives you clear sightlines toward the mountain's eastern face, which is where you want the Milky Way core in May when it rises out of the east and arcs across the ridgeline. The scale of Mount Barney as a foreground subject is something you don't quite appreciate from maps — standing at the lookout at night, the volcanic spine fills a significant portion of the frame even at 14mm. In August the core is higher earlier and tracks differently, giving you a second compositional option from the same location.
Sunrise at Mount Barney is a different experience. The morning light moves through the valley slowly, and the best frames often come from roadside positions rather than any formal lookout. Blue hour in the Scenic Rim is subtle — gradual tonal shifts across the ridgelines rather than explosive colour — and it rewards patience over speed. On clear winter mornings with cold air in the valleys, low mist can collect below the ridgeline and give you a completely different compositional layer.

Why May and August specifically?
The workshop timing is calculated, not arbitrary. In May, the galactic core rises in the east — perfect for compositions where the Milky Way emerges directly over Mount Barney's eastern face. In August, the core is higher earlier in the evening and has shifted its orientation, giving you a different angle over the same foreground. Temperatures in both months are manageable for night work at elevation. Summer in the Scenic Rim means heat, humidity, and a sky that never really gets dark enough early enough to shoot comfortably.
Lamington National Park — Rainforest Waterfalls and Slow Photography
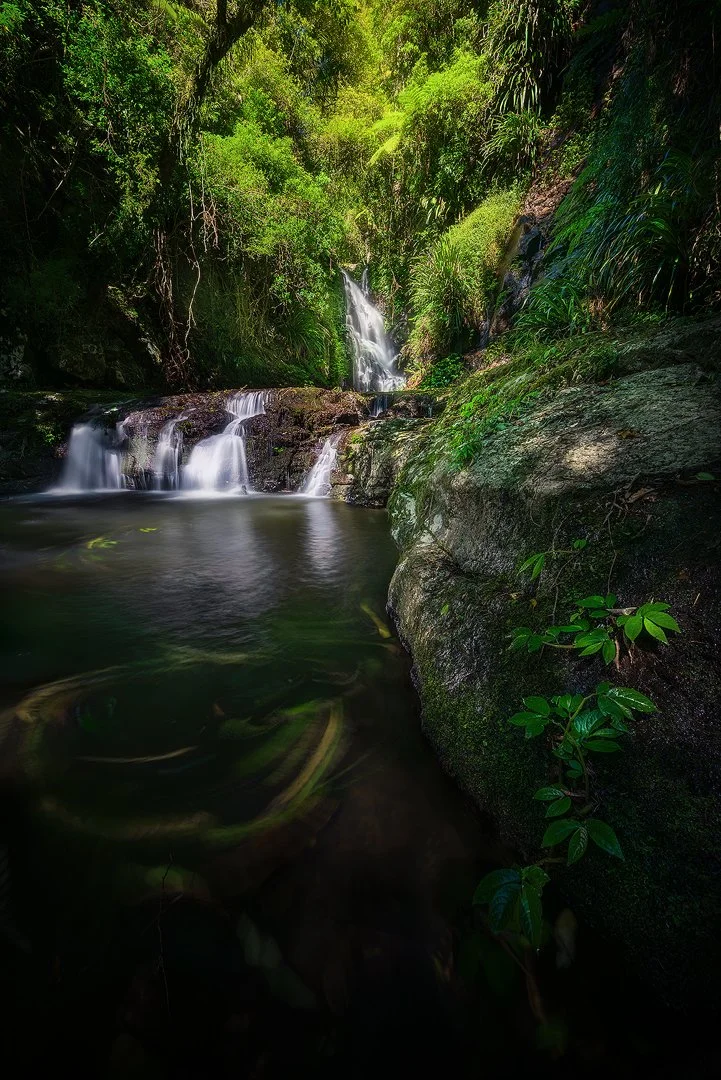
Lamington is a completely different environment to Mount Barney — dense, green, humid, and slow. It's the kind of place where rushing produces nothing useful, and patience produces something special. The Green Mountains section of the park covers subtropical and temperate rainforest on the McPherson Range at around 900–1000m elevation, and it contains some of the best waterfall photography terrain in southeast Queensland.
Elabana Falls is the standout location — a 30-metre cascade with consistent year-round flow, fern-framed foreground pools, and good compositional options at multiple distances. The Box Forest Circuit connects it to a series of smaller cascades along Canungra Creek. Toolona Creek Circuit has additional waterfall options for a longer day. The tracks are uneven, often damp underfoot, and can be physically demanding with a full camera pack — pacing matters more than coverage.
The light timing problem
Lamington's rainforest canopy is both the asset and the challenge. It diffuses and softens overhead light beautifully — but only when the light itself is diffuse. Direct overhead sunlight creates harsh shadows on wet rock, blown highlights where the sun punches through canopy gaps, and patchy dappled light that is nearly impossible to balance across a wide-angle composition. The fix is simple but firm: shoot early morning before 9am, late afternoon after 3pm, or on overcast days. All three produce dramatically better results than mid-day on a clear day.
Polariser technique — the thing people get wrong
A polariser is essential at Lamington, but most people don't use it correctly. Rotate it slowly while watching through the viewfinder in real time — you'll see the exact moment reflections cut from wet rock surfaces and the greens deepen without going unrealistically saturated. Stop there. Going further lifts the exposure requirement and starts flattening the tonal range. The sweet spot is visible, not calculated.
Shutter speed and flow
0.5 to 2 seconds gives you silky water movement with retained texture in the cascade. Push beyond 5–10 seconds and the water turns into a flat white mass with no detail. In the field, take test shots at 0.5s, 1s, and 2s, then decide which level of motion suits the scene. The right answer depends on how fast the water is moving and how much foreground rock you want to read cleanly.
Currumbin Rock — 360° Seascape and Astro Opportunity
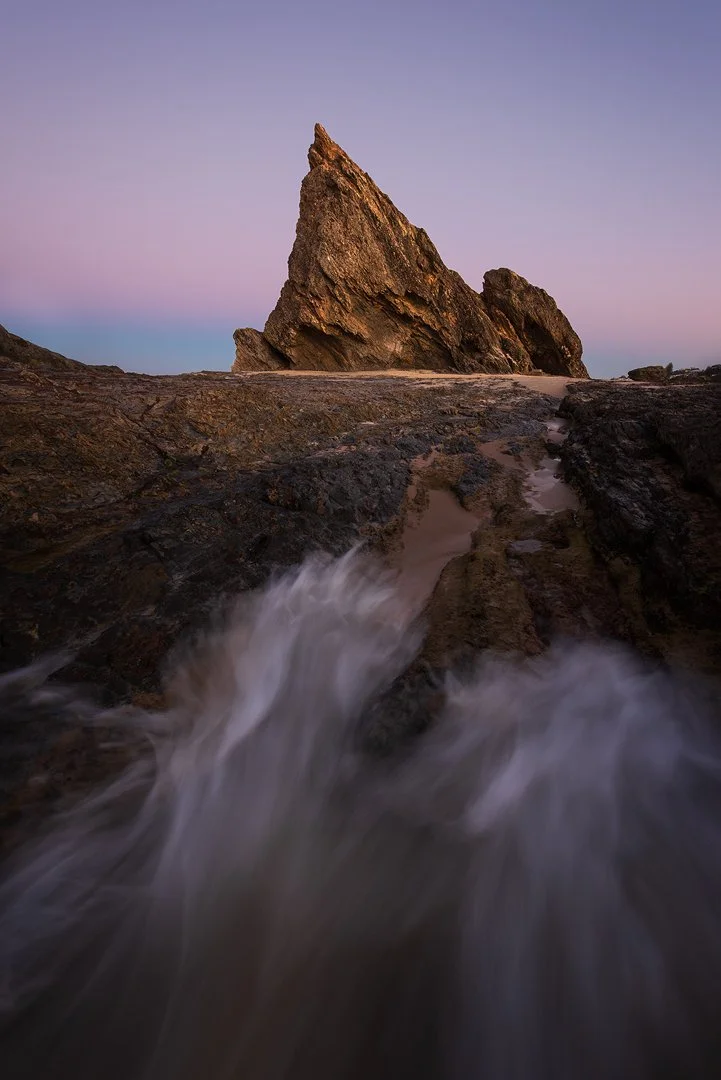
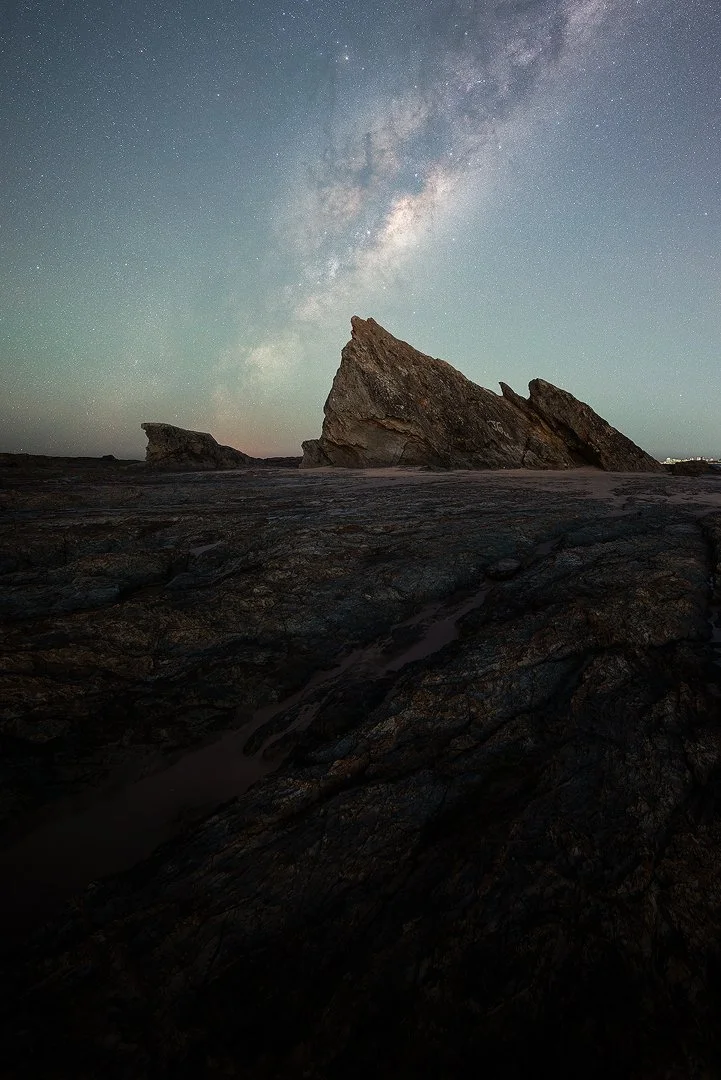
Currumbin Rock is the coastal anchor of this route and one of the most versatile photography locations on the Gold Coast. The rock shelf creates strong natural leading lines toward the horizon. Tidal channels funnel water through gaps in the platform — useful for long-exposure seascapes where the ocean smooths into motion blur between the exposed rock edges. And on clear new-moon nights from April through August, the Milky Way rises directly out of the Pacific Ocean to the east.
In May, the galactic core emerges from the ocean at dusk and arcs over Currumbin Rock as the primary foreground subject. In August, the core has shifted and sets over the western horizon instead, giving you a completely different composition from the same platform. Same location, two distinct astro seasons, two entirely different images.
Tide strategy
Low tide at 0.5m or lower exposes the full rock shelf. Tidal pools form between the rock sections and reflect sky colour — useful for foreground interest in both seascape and astro compositions. At mid to high tide the platform shrinks and wave energy increases, which suits different shutter work. Check tides on Willyweather 24 hours ahead, then adjust positioning on the day based on how the swell is interacting with the platform edge. The tidal channels are the compositional anchor — position yourself so a channel leads from foreground toward your background subject.
Wave timing
Count wave sets before committing to an exposure. The strongest waves tend to come in sets of three to five. Start your exposure on the pull — when water recedes back over the rock — and the motion blur will be smoother and more directional than if you start on the surge. For this image at Currumbin, I used 1/5s to hold a sense of water movement while keeping more texture and energy in the scene. A 6-stop ND filter handles most mid-morning and late-afternoon light levels when you want to drag the shutter further.
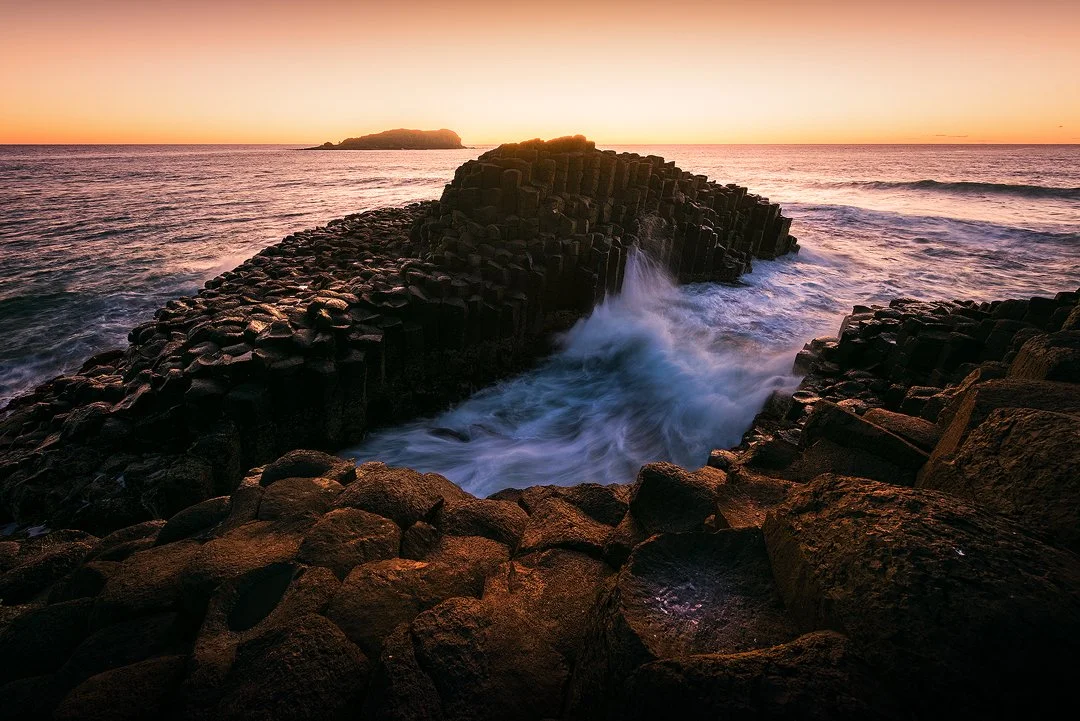
Fingal Head — Australia's Answer to the Giant's Causeway
Most Australians have heard of the Giant's Causeway in Northern Ireland — 40,000 interlocking hexagonal basalt columns formed by volcanic cooling around 50–60 million years ago. What very few Australians know is that we have our own version, just over the Queensland border in northern New South Wales. Fingal Head sits about 10 minutes south of Coolangatta, and while it's technically NSW, it's a straightforward drive from the Gold Coast that most photographers on this route treat as part of the same trip.
The basalt columns at Fingal Head formed from the Tweed Volcano around 17 million years ago. Erosion has exposed the hexagonal jointing across a dramatic low causeway that extends into the ocean. At low tide the full length of the columns is exposed, and sunrise works best when the scene is backlit — with light lifting through the water and around the basalt formations to create depth, separation, and atmosphere with the Pacific behind.
When the light works
Fingal Head is a sunrise location. The causeway faces roughly east, and the strongest compositions here are usually backlit rather than side-lit. As the sun lifts, light comes through the water and behind the basalt formations, giving the scene more glow, atmosphere, and separation than flatter front-on light. Arrive 45 minutes before sunrise, scout composition at the water's edge, and be set up before the light peaks. The best window is that early sunrise phase when the backlight is clean and the water still holds colour and translucency.
In May, if the timing aligns, the Milky Way is still above the eastern horizon in the pre-dawn window. The combination of basalt columns in the foreground and the galactic core rising over the ocean behind them is one of the most compelling astro compositions on the entire east coast.
Swell and safety
The causeway is always wet and always slippery. Swell above 2 metres means waves clear the columns and the location becomes unsafe. Check Willyweather or Swellnet the evening before — if swell is elevated, a seascape from the beach or headland above is a safe and still-worthwhile alternative. Never position yourself between the ocean and the column field when conditions are marginal.
Other Locations Worth Knowing
The Gold Coast hinterland and surrounding region has more photography territory than any single trip can cover. The four primary locations above are the ones I've scouted in depth and built workshop content around. The locations below are worth knowing — either as day-trip additions or as starting points for future visits.
Planning Your Gold Coast Photography Trip
The four primary locations here span about 130km from Mount Barney in the southwest to Fingal Head in the southeast. The logical route moves from inland to coast — start at Mount Barney for the darkest sky and mountain work, move through Lamington for the rainforest and waterfall sessions, then finish on the coast at Currumbin and Fingal. That order also matches the teaching progression from most technically demanding (astro, night work, mountain conditions) to most accessible (coastal seascape, geology, daytime light).
| Location | Best season | Best time of day | Primary discipline | Drive from BNE |
|---|---|---|---|---|
| Mount Barney | May + August | Dusk, night, pre-dawn | Astrophotography, landscape | ~90 min |
| Lamington NP | Year-round (overcast best) | Early morning, late afternoon | Waterfall, rainforest | ~100 min |
| Currumbin Rock | Apr–Aug for astro; year-round seascape | Sunrise, sunset, low tide | Seascape, astrophotography | ~75 min |
| Fingal Head | Apr–Aug for astro; year-round seascape | Sunrise — backlit basalt | Seascape, geology, astro | ~85 min |
Essential apps for this region
PhotoPills for Milky Way arc planning at Mount Barney and Currumbin — confirm the core azimuth and elevation for your exact GPS and date before committing to a composition. Willyweather for tide heights at Currumbin and Fingal — aim for 0.5m or lower. Swellnet for swell at Fingal — anything over 2m makes the causeway unsafe. BOM for broader weather before a hinterland drive. Light Pollution Map to confirm Bortle ratings and sky glow direction at each location.
Gear for the full route
For Mount Barney and Currumbin astro: fast wide lens at f/2.8 or faster, star tracker if you have one, red-mode headlamp, warm layers (12–15°C nights in May and August). For Lamington: circular polariser is essential, sturdy tripod, waterproof bag cover for humid conditions. For Fingal: microfibre cloth for spray on the front element, low-profile tripod position on wet basalt, and non-slip footwear.
Photography Workshops at These Locations
Dylan Knight Photography runs a small-group Gold Coast Hinterland Photography Workshop across these four locations twice a year — timed around May and August for optimal Milky Way alignment and comfortable working conditions. The workshop covers all four primary locations across five days, with field sessions at each site, daily editing sessions, and a conditions-led approach that adapts to weather, tide, and sky on the day.
Sessions cover astrophotography workflow at Mount Barney (including star tracker use and tracked sky blending), long-exposure waterfall technique and polariser use at Lamington, tide-led seascape work at Currumbin, and sunrise basalt composition at Fingal Head. Maximum group size is kept deliberately small — never more than four participants — to maintain a genuine instructor-to-photographer ratio and ensure the coaching is personalised rather than generic.
Participants leave with edited images from each location, a repeatable capture and post-processing workflow, and practical field notes for returning independently. If the night session at Mount Barney is weathered out, the workshop includes tracked Milky Way RAW files for workflow training in the editing sessions.
Shoot These Locations with a Guide
Small-group workshops across Mount Barney, Lamington, Currumbin, and Fingal Head. Field sessions, daily editing critique, conditions-led approach, and all permits handled. Maximum four participants.