30 vs 60 Second Exposures on the DWARF Mini: Does It Actually Matter?
30 vs 60 Second Exposures
on the DWARF Mini: Does It Matter?
I matched 176 30-second frames against 88 60-second frames of M8. Both stacks contained exactly 88 minutes of accepted integration, and the finished results were far closer than expected.
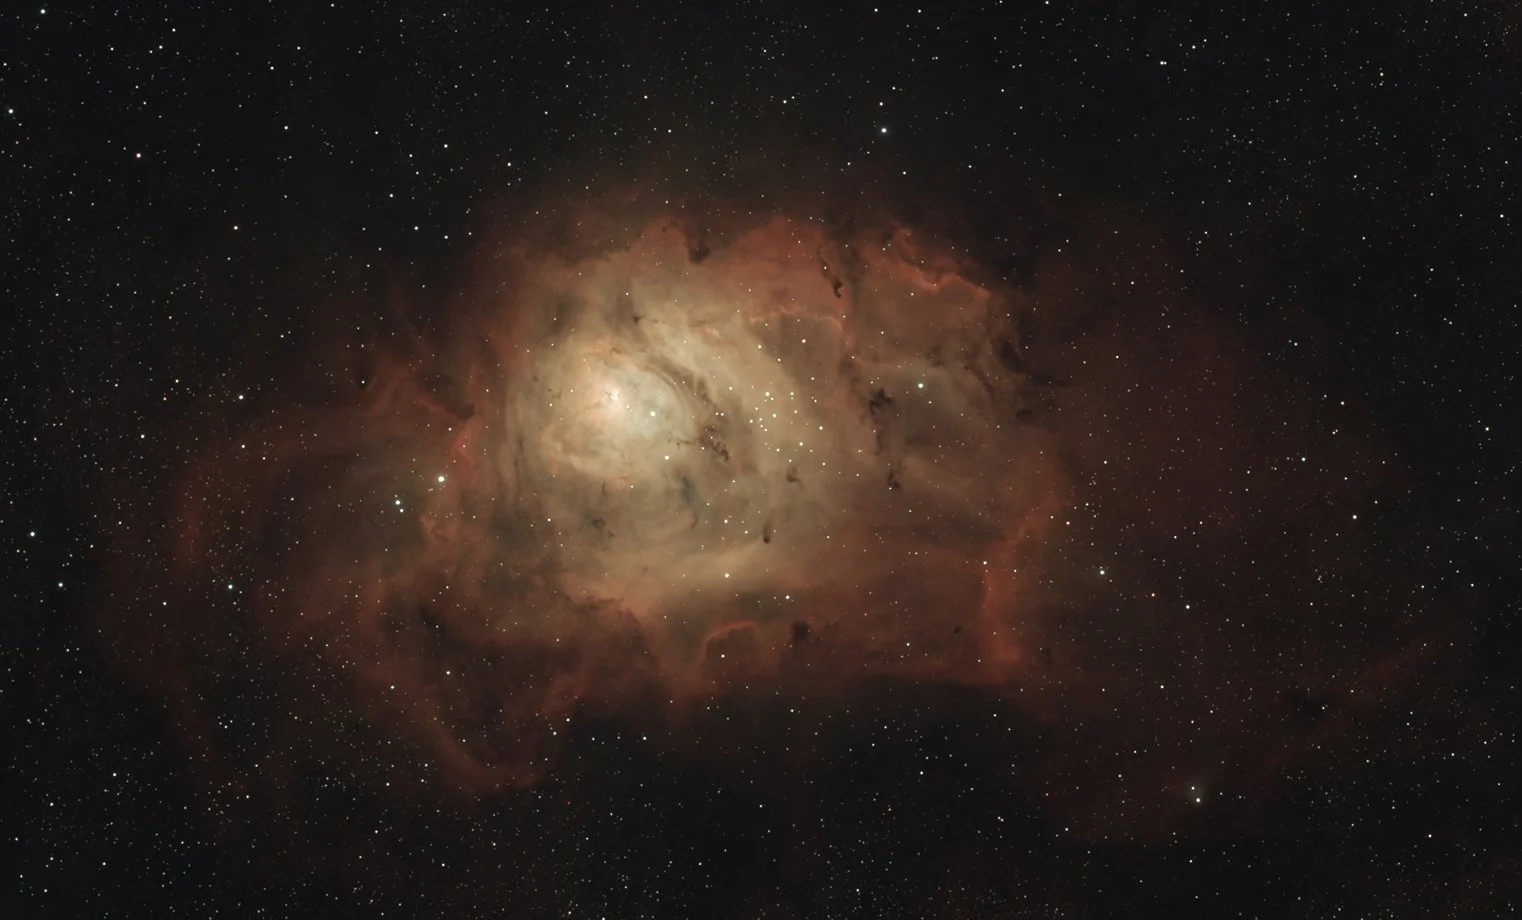
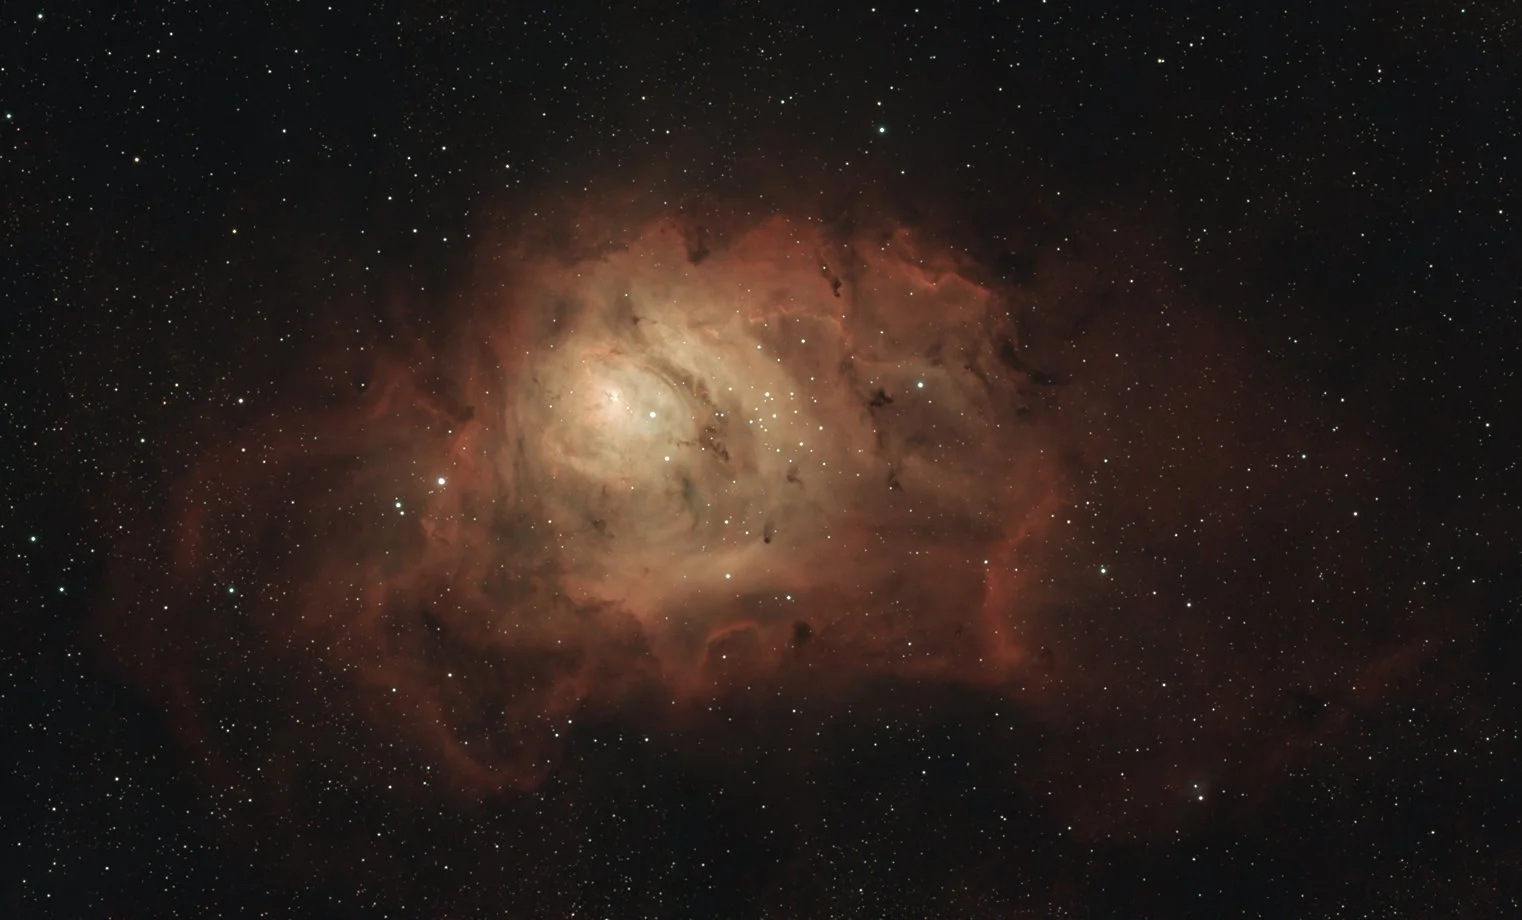
Longer exposures sound like they should produce a better image. A 60-second sub-exposure collects for twice as long as a 30-second sub-exposure, so it is easy to assume it must reveal more detail.
That is not a fair comparison unless the total integration time is also matched.
To test the practical difference, I created two DWARF Mini stacks of the Lagoon Nebula using the same gain and Duo-band filter. One used 176 exposures at 30 seconds. The other used 88 exposures at 60 seconds. Both contained exactly 88 minutes of accepted integration and both were processed through the same simple AstroWizard workflow.
At equal total integration, the finished 30- and 60-second images were effectively indistinguishable.
The 60-second result had marginally stronger microcontrast and a slightly darker background. The 30-second result appeared marginally smoother and brighter. Neither difference was large enough to call one exposure length visibly superior.
Why test exposure length?
I normally use 60-second exposures at gain 60 when my DWARF Mini is properly aligned in EQ mode. The Mini can track for that length reliably under good conditions, and the lower frame count makes large projects easier to store and process.
However, 30-second exposures have practical advantages. A poor frame costs half as much integration, tracking errors have less time to develop and bright stars have less opportunity to saturate in each individual exposure.
The real question was not whether one 60-second frame looks better than one 30-second frame. It was this:
If I spend the same total time on the same target, can I see a meaningful difference in the finished image?
Total integration and individual exposure length solve different problems. More total integration gives the stack more signal to work with. A longer individual exposure changes how that total time is divided between frames.
The matched-integration test
I used M8 because it contains bright nebulosity, faint outer structure, dense star fields and a bright core. That gives an exposure-length difference several places to become visible.
| Setting | 30-second result | 60-second result |
|---|---|---|
| Target | M8, Lagoon Nebula | M8, Lagoon Nebula |
| Telescope | DWARF Mini | DWARF Mini |
| Filter | Duo-band | Duo-band |
| Gain | 60 | 60 |
| Exposure length | 30 seconds | 60 seconds |
| Accepted frames | 176 | 88 |
| Total integration | 88 minutes | 88 minutes |
| Stacking | Stacking Wizard | Stacking Wizard |
| Processing | AstroWizard | AstroWizard |
Stacking Wizard initially marked 190 of the 30-second frames as good. I manually removed another 14 before creating the master, leaving 176 exposures and exactly the same 88-minute integration as the 60-second stack.
The generated filename retained the earlier good-frame count. The integrated master itself used the manually selected 176 frames.
The processing was kept deliberately simple
This was not intended to be a PixInsight signal-analysis exercise. I wanted to know whether a normal DWARF Mini user would see a worthwhile difference after a straightforward edit.
I processed both masters through the same AstroWizard sequence:
- Load the normal RGB/OSC master and select the OSC + dual-band filter guidance profile.
- Run GraXpert background smoothing at 0.5 and apply Background Sky Neutralisation.
- Apply BlurXTerminator at the normal setting, strength 0.6.
- Apply NoiseXTerminator at the light setting.
- Use a linked stretch at normal depth.
- Remove the stars with StarXTerminator.
- Apply masked saturation at 0.50, Make It Pop at 0.50 and Dynamic Pop.
- Apply Green-Be-Gone and lighten the background sky.
- Replace the stars using Screen, with brightness at 0.70, colour at 100 and the soft option selected.
I then aligned the two finished images in Photoshop and applied one identical crop across both layers. I did not individually optimise either result to create a larger difference.
The finished results
30 seconds
The 30-second image retained the bright core, dark internal lanes and faint outer emission cleanly. Its background appeared marginally brighter and the finished result looked fractionally smoother in some areas.
60 seconds
The 60-second image appeared marginally darker through the background and showed slightly stronger microcontrast around parts of the nebula.
Core detail and faint outer structure were extremely similar. Star size, star colour and visible saturation were also effectively indistinguishable at normal viewing size after the same star-processing workflow.
I could not point to any important structure that was present in the 60-second result and missing from the 30-second result.
What the comparison actually showed
The strongest finding was not that 30 seconds won or that 60 seconds won. It was how little changed when total integration was held constant.
- both results revealed the same major nebular structure;
- both retained similar core detail;
- neither showed an obvious advantage in faint outer emission;
- the stars looked effectively the same at normal viewing size;
- the small brightness and contrast differences were not large enough to establish a winner.
This does not prove that exposure length never matters. It shows that, for this target, telescope, gain, filter, integration length and processing workflow, moving from 30 to 60 seconds did not create a meaningful visible improvement.
Doubling the individual exposure did not double the finished detail. The amount of useful total integration mattered more.
Which exposure length should I use?
Because the finished image quality was so close, the decision becomes operational rather than aesthetic.
Use 60 seconds when
- the Mini is accurately aligned in EQ mode;
- tracking has proved reliable;
- conditions are stable;
- you want half as many files to store, inspect and stack;
- you are building a long multi-hour project.
Use 30 seconds when
- tracking or alignment is uncertain;
- wind, cloud or interruptions are likely;
- you want each rejected frame to cost less integration;
- bright cores or stars need more protection;
- you prefer a larger pool of frames for rejection.
My practical default remains 60 seconds at gain 60 when EQ tracking is reliable. It produced no obvious image-quality penalty and reduced the number of files by half.
I would switch to 30 seconds when conditions or tracking make each longer exposure less dependable. The test gives me no reason to sacrifice reliable data merely because 60 seconds sounds more advanced.
Important limitations
This was a real-world comparison, not a controlled laboratory measurement.
The 30- and 60-second data were captured on separate nights. Seeing, transparency, target altitude, sensor temperature and other conditions may therefore have influenced the small differences between the images.
The comparison also used:
- one bright emission nebula;
- one gain setting;
- the DWARF Mini Duo-band filter;
- approximately 1.5 hours of total integration;
- one stacking workflow;
- one repeatable AstroWizard edit.
I did not use linear-image measurements to calculate read noise, signal-to-noise ratio, star FWHM or clipped-pixel counts. This article answers the practical finished-image question: could I see a meaningful difference after the same normal workflow?
The answer was no.
The 180-second follow-up
The next useful test is to add the DWARF Mini's new 180-second scheduled exposure option to a matched-integration comparison. That will show whether a much larger jump in sub-exposure length creates a visible benefit, or whether tracking losses, star saturation and the cost of rejected frames outweigh it.
For a stronger test, I will capture the 30-, 60- and 180-second datasets on the same target during the same night, keep the accepted integration equal and process them through the same workflow again.
With equal 88-minute integration, 30- and 60-second DWARF Mini exposures produced virtually indistinguishable finished images.