How I Stack DWARF Mini Data in PixInsight WBPP
How I Stack DWARF Mini Data
in PixInsight WBPP
My first manual M8 stack was worse than the telescope's automatic result. This is the controlled workflow I used to rebuild it properly from the original FITS files.
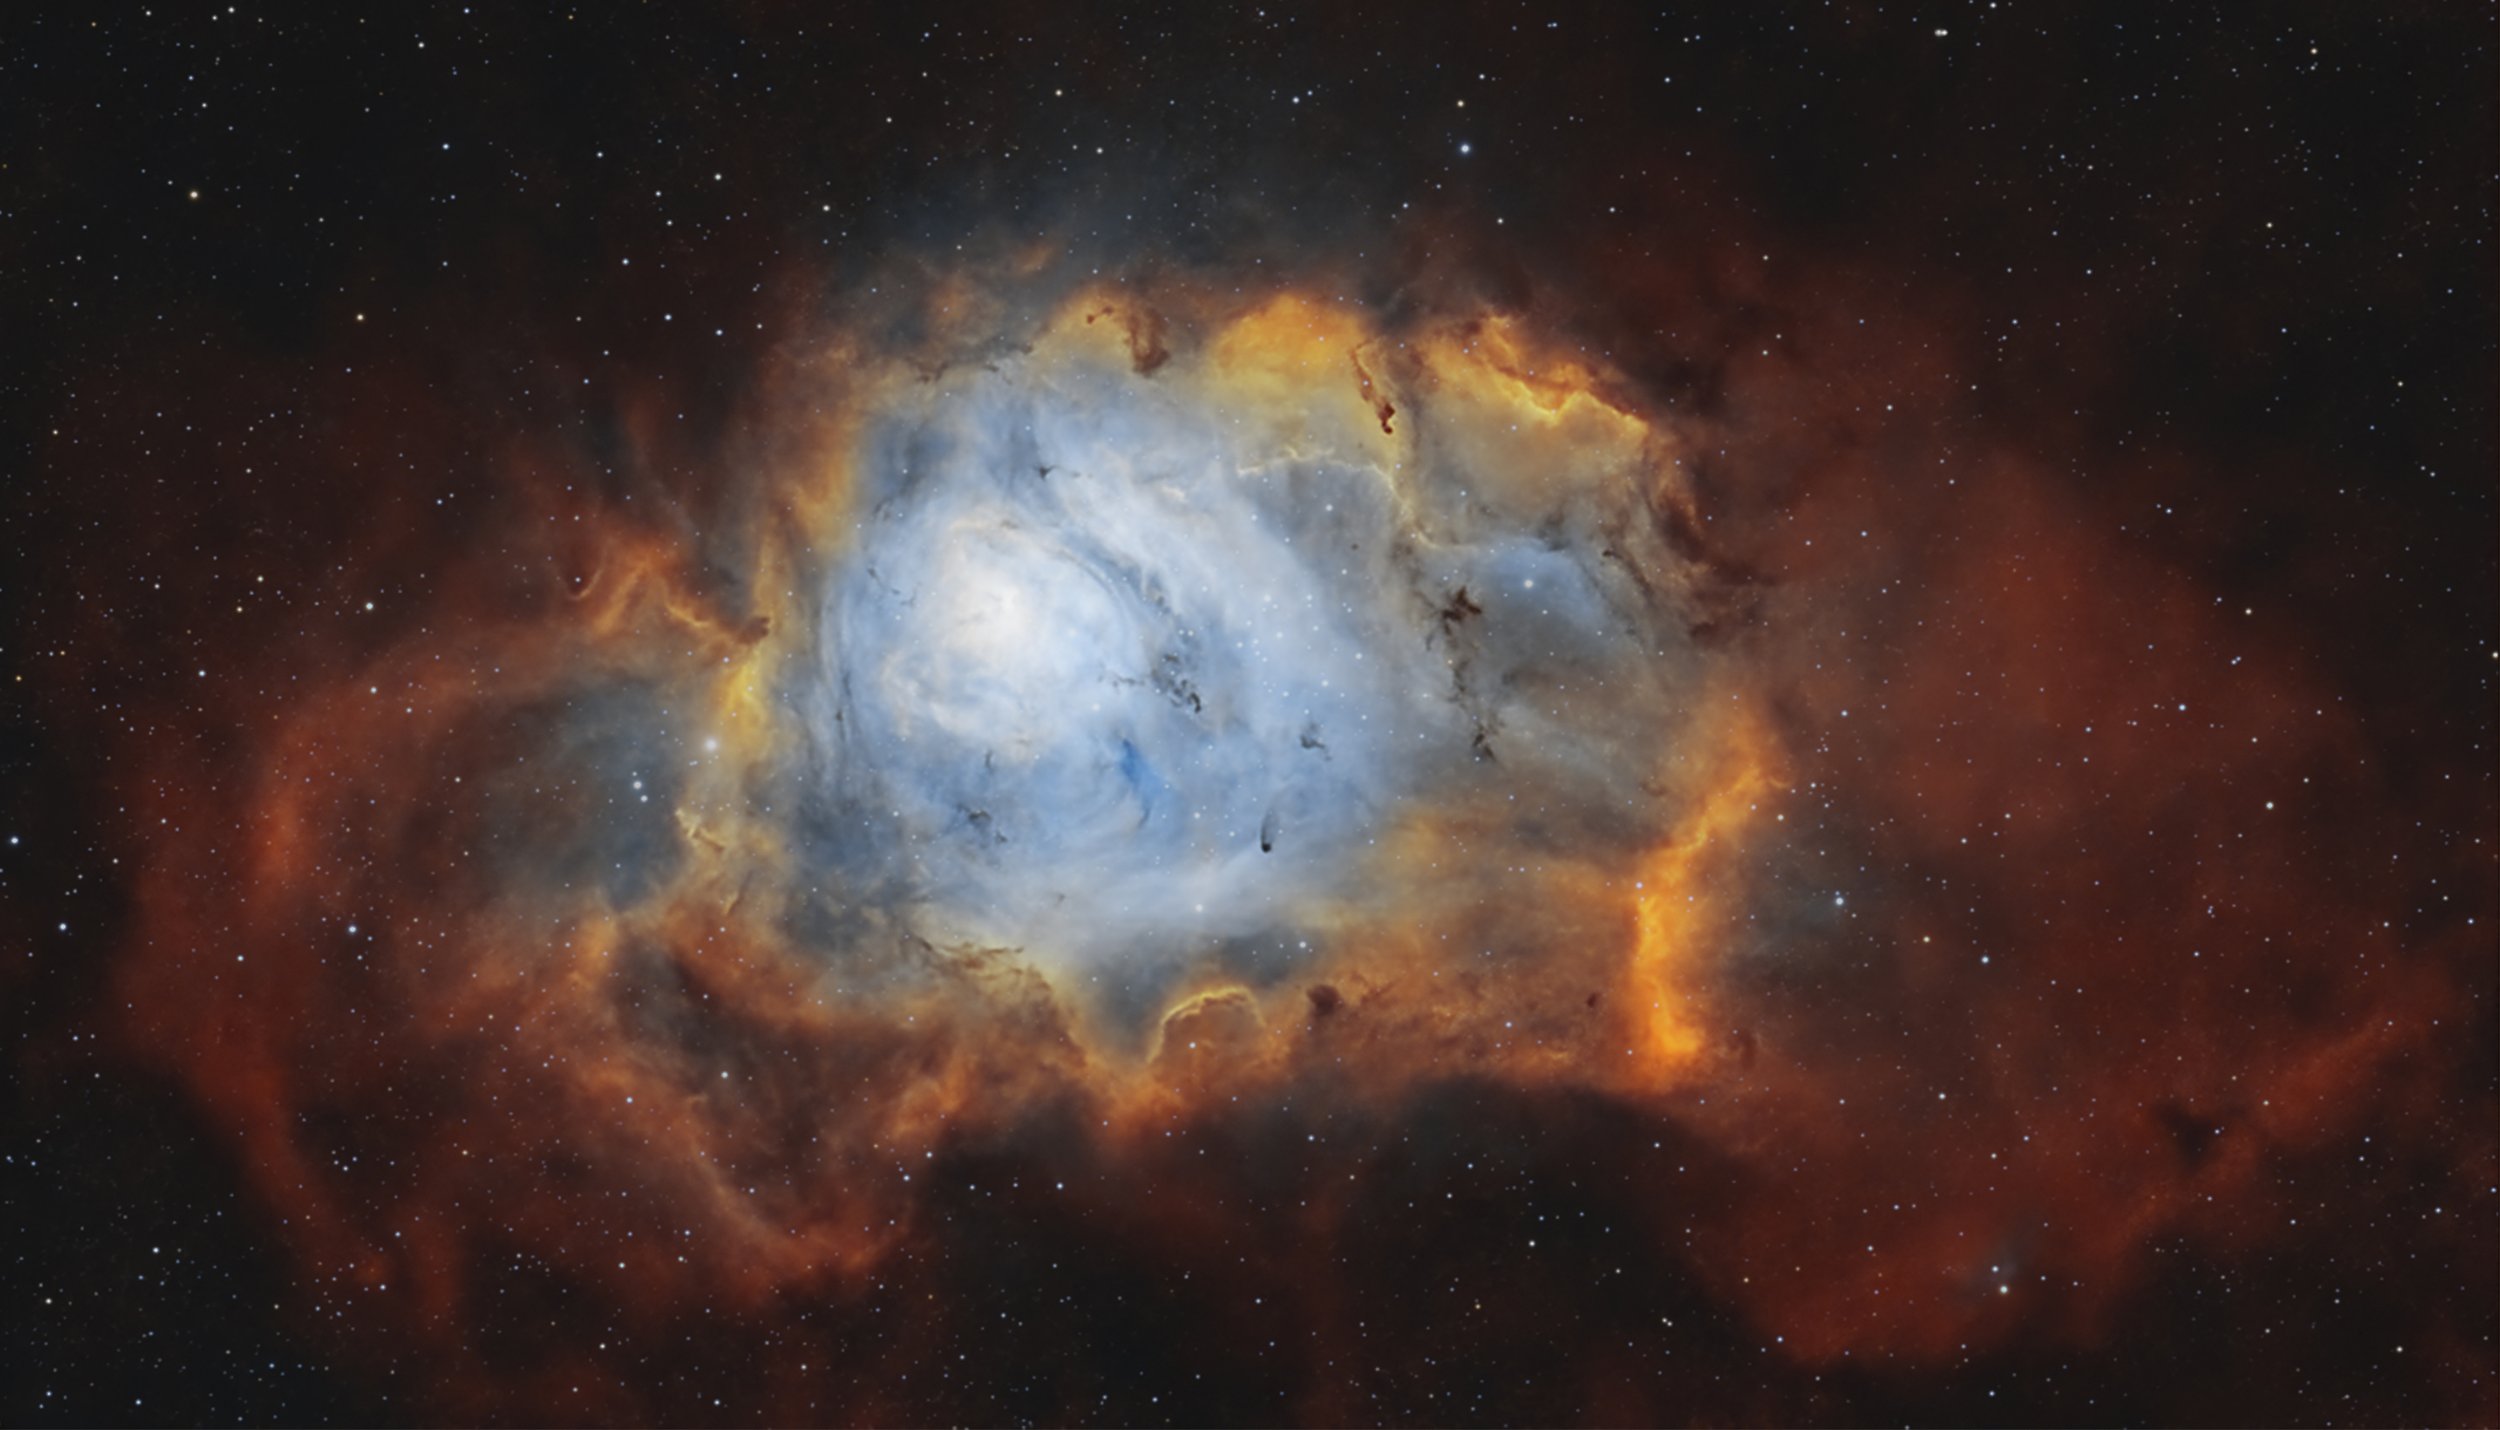
My first manual attempt at stacking the Lagoon Nebula should have been better than the file produced by the DWARF Mini. Instead, it was worse.
I changed the weighting method, rejection settings, registration approach and Local Normalization while also trying to combine data from two different capture modes. The result developed large magenta and green blotches, and I had changed so many variables that I could no longer identify which decision had caused the damage.
So I stopped trying to rescue it and started again with the original raw files in PixInsight's Weighted Batch Preprocessing script.
The clean rebuild became the master used for my finished M8 image. More importantly, it gave me a repeatable first-line workflow for DWARF Mini data: load the original FITS files, route the calibration masters correctly, reject genuine failures, produce one controlled integration and inspect it before doing anything creative.
This guide stops at the clean linear master. Ha/OIII extraction and the Foraxx-style colour process come later.
The M8 control dataset
The benchmark is the second night of my Lagoon Nebula project, captured in EQ mode from my Bortle 4 Sunshine Coast backyard. These values describe the proven dataset, not a universal prescription for every target.
| Telescope | DWARF Mini |
|---|---|
| Camera | cam_0 telephoto camera |
| Filter | Duo-Band |
| Exposure | 30 seconds |
| Gain | 60 |
| Binning | 1 × 1 |
| Raw lights | 328 |
| Rejected | 32 |
| Accepted | 296 |
| Total integration | 2 hours 28 minutes |
| WBPP version | 3.0.1 |
| Location | Bortle 4 backyard, Sunshine Coast |
The workflow can be reused, but the dark, flat, exposure group and frame-selection threshold must match the data being processed.
WBPP is now my default starting point because it keeps calibration, measurement, frame selection, registration and integration inside one controlled project. A manual process still has value when I am diagnosing a specific failure, but it is no longer where I begin.
What you need before opening WBPP
For a normal Mini integration, I prepare:
- the untouched raw FITS light frames;
- the matched factory stacked master dark for the exposure, gain and temperature;
- a prepared filter-matched master flat;
- a fresh empty output folder;
- enough storage for the WBPP cache and intermediate files;
- the DWARF-generated stack as an independent control.
The factory master dark
The M8 master dark was already a factory stack of 20 dark frames:
dark_exp_30.000000_gain_60_bin_1_24C_stack_20.fits
I did not calibrate or integrate it again. PixInsight would not classify the FITS version correctly when I first loaded it, so I opened the file, saved it as a 32-bit XISF and added that copy as a 30-second master dark. The conversion changed the file format, not the underlying calibration data.
The prepared Duo-Band flat
The Duo-Band flat had already been calibrated once using the Mini's matching gain-2 factory bias. I then loaded that prepared file as the master flat for the lights. This workflow assumes the prepared flat already exists. Creating Mini calibration masters from the factory files needs its own properly repeated and documented guide.
Matched master dark to lights. Prepared master flat to lights. No master bias applied directly to the lights.
The factory stacked dark already contains the sensor's bias signal. Applying the gain-2 bias directly to the gain-60 lights would create the wrong calibration route.
Load the files and verify the routing
I begin with a new WBPP job and load the original FITS files through Lights. Before adding anything else, I confirm that WBPP has grouped them under the correct exposure, filter and binning.
Next, I add the converted master dark through Add Custom:
| Image type | Dark frame |
|---|---|
| Exposure | 30.0 seconds |
| Binning | 1 |
The dark must appear under the 30-second group with the blue master-star icon. If WBPP still reads it as 0.00 seconds, I stop and correct the assignment.
I add the prepared flat through Add Custom using these values:
| Image type | Flat field |
|---|---|
| Filter | Duo-Band |
| Binning | 1 |
| Exposure | 0.00 seconds |
The flat must appear under Duo-Band with the blue master-star icon.
Once everything is grouped, I open Show Calibration Diagram. This is the most important pre-run check in the workflow.
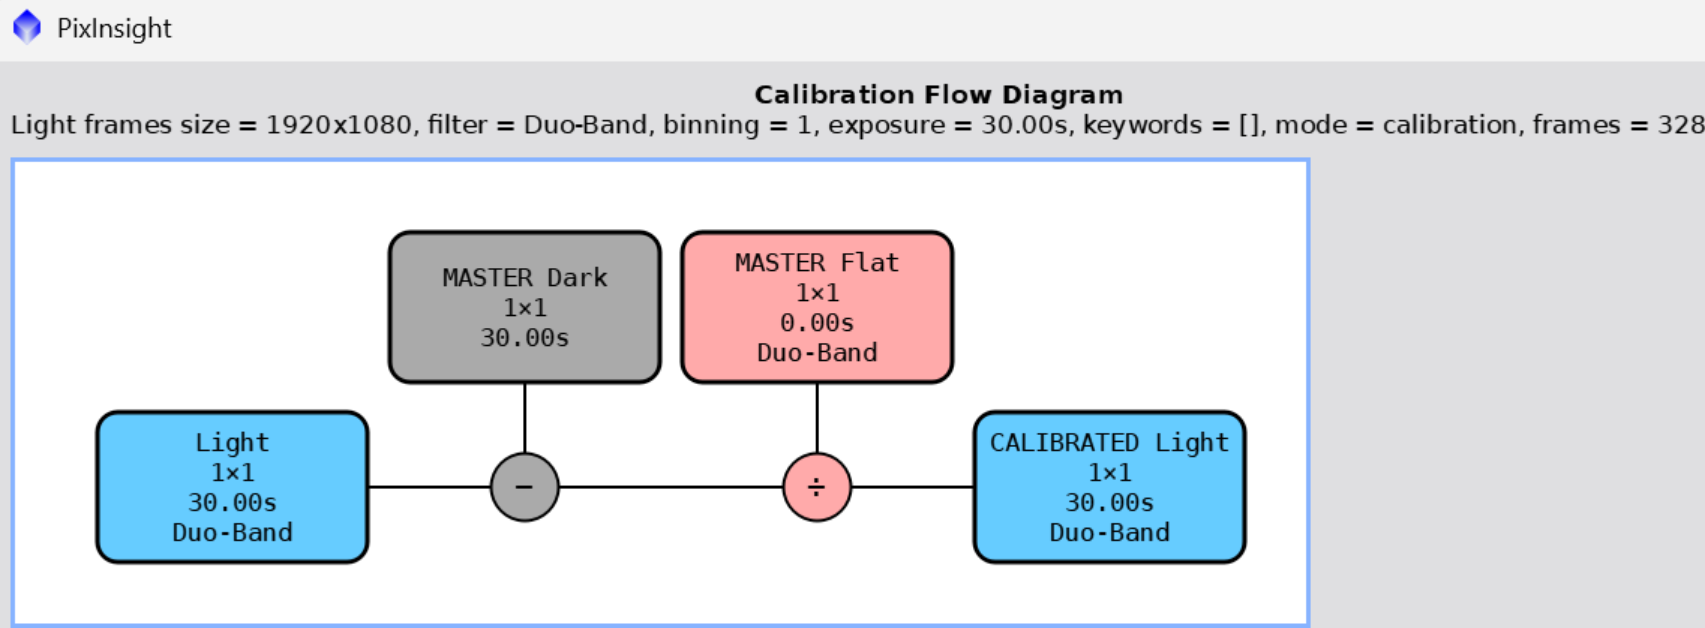
If the diagram does not show that relationship, I do not run WBPP.
The WBPP settings I use
These are the settings that materially affected the successful control. I leave advanced options off until a clean default integration demonstrates a reason to use them.
| Dark and flat | On / Auto |
|---|---|
| Optimize Master Dark | Off |
| Output Pedestal | Automatic |
| Cosmetic Correction | Off |
| CFA images | On |
| Mosaic pattern | RGGB |
| Debayer method | VNG |
| Debayer output | Combined RGB |
| Subframe weighting | PSF Signal Weight |
| Frame selection | On / Interactive |
| Image registration | On |
| Local Normalization | Off |
| Image integration | On |
| Automatic integration mode | Off |
| Fast Integration | Off |
| Drizzle | Off |
| Combination | Average |
| Minimum weight | 0.05 |
| Rejection algorithm | Auto |
Fast Integration and Automatic integration mode are separate controls. Turning off one does not guarantee the other is disabled, so I check both.
Local Normalization also stays off for the first control. It may help when combining nights with genuinely different backgrounds, but enabling it speculatively was one of the changes that made my failed M8 experiment harder to diagnose.
Show the exact M8 registration settings
| Pixel interpolation | Lanczos-3 |
|---|---|
| Clamping threshold | 0.30 |
| Maximum stars | Auto |
| Distortion correction | Off |
| Rigid transformations | Off |
| Detection scales | 5 |
| Minimum structure size | Auto |
| Hot-pixel removal | 1 |
| Noise reduction | Disabled |
| Sensitivity | 0.50 |
| Peak response | 0.50 |
| Bright threshold | 3.00 |
| Maximum distortion | 0.60 |
Before running, I select a fresh output folder and use Diagnostics. The message saying no bias frames were provided is expected for this calibration architecture. Any other routing or storage errors need to be resolved first.
Reject failures, not average frames
WBPP measures the calibrated and debayered lights before pausing at Interactive Frame Selection. I inspect:
- PSF Signal Weight;
- detected stars;
- FWHM;
- eccentricity;
- median.
The aim is not to achieve an impressive rejection percentage. I remove frames affected by cloud, obstruction, severe signal collapse, gross focus failure or elongation likely to damage registration. Merely average frames can remain and receive a lower weight.
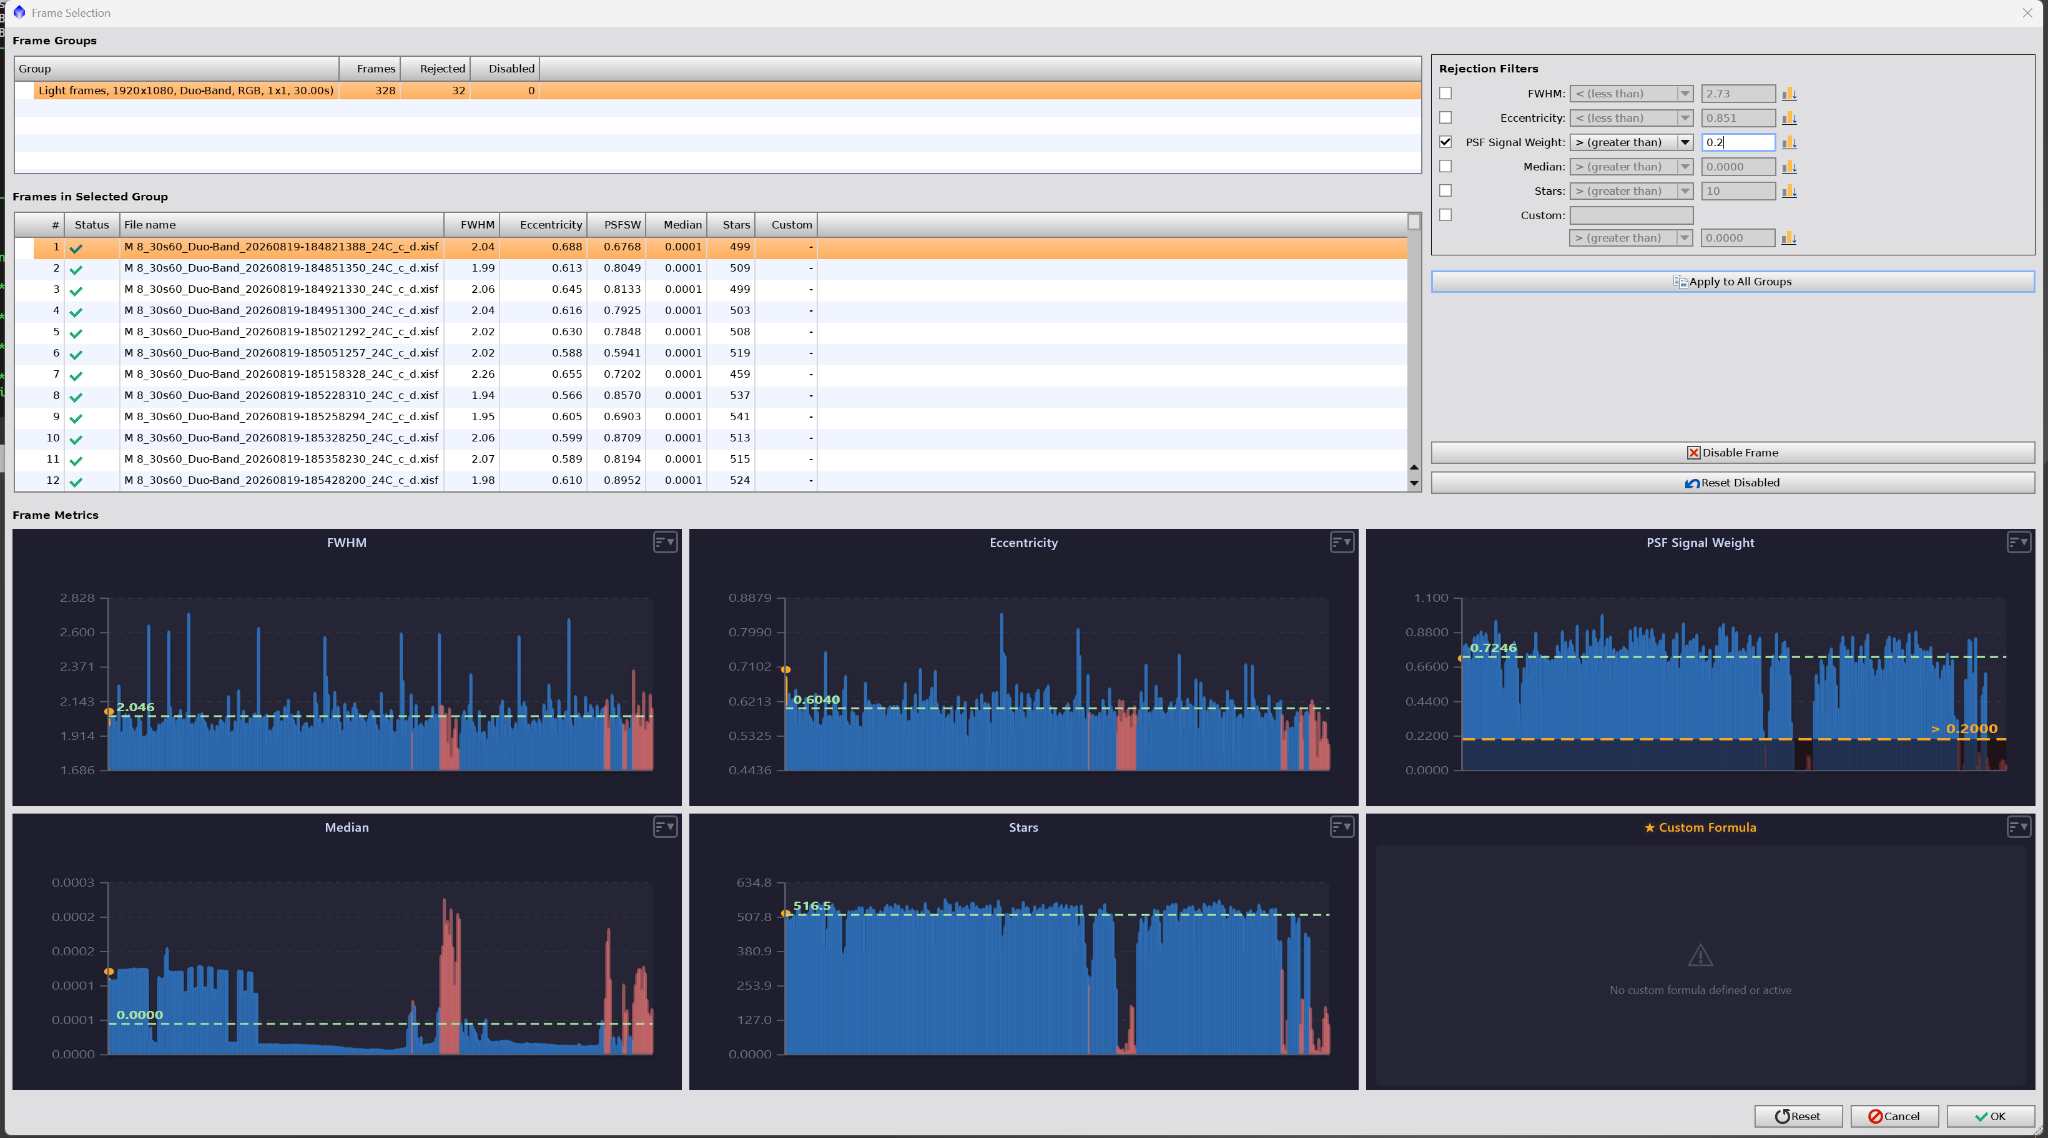
For this dataset, a PSF Signal Weight filter above 0.20 separated the obvious failures from the usable data. I chose the threshold from the shape of these plots.
The 0.20 value is not a universal DWARF Mini preset. A different target, night or exposure length will produce a different distribution. Copying the number without inspecting the measurements defeats the purpose of interactive selection.
Run WBPP and inspect the master
The completed control passed calibration, debayering, measurement, frame selection, registration, integration, autocrop and astrometric solution without an error.
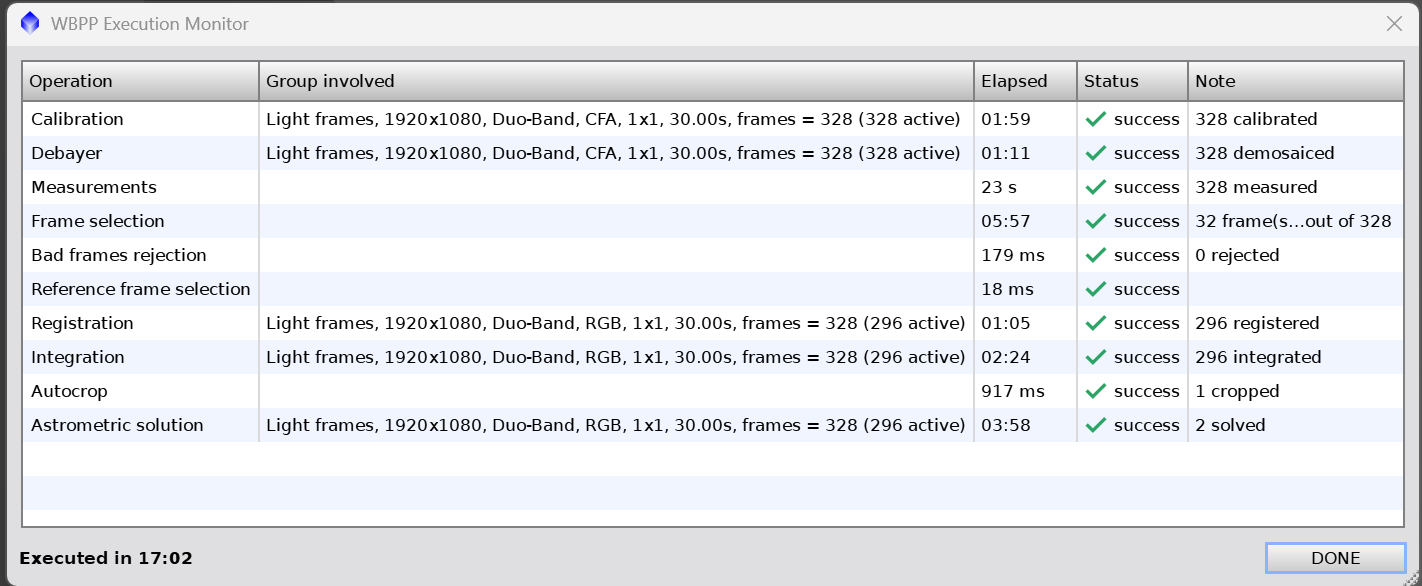
Completion is not the same as acceptance. I open the untouched linear master and inspect it under ScreenTransferFunction only. I look for:
- a coherent background and faint nebula structure;
- tight and consistently aligned stars;
- no magenta or green blotches;
- no rings, CFA checkerboard or colour-offset stars;
- no registration seams;
- no real nebula structure being removed in the rejection maps.
An unstretched Duo-Band master can have a strong green cast. That alone does not mean the stack failed. Background uniformity, structure and registration matter more at this point.
I also save the Smart Report, WBPP log, cache, rejection maps and untouched linear master. The report is the fastest way to confirm exactly what produced the file months later.
What I would not repeat
The failed manual M8 experiment taught me a simple rule: establish the control before trying to improve it.
- Do not change weighting, rejection, registration and Local Normalization together.
- Do not apply the factory gain-2 bias directly to gain-60 lights.
- Do not enable drizzle merely because the Mini files are only two megapixels.
- Do not force a remembered frame-rejection percentage onto a new dataset.
- Do not stack finished nightly masters together by default.
For matching multi-night data, I add the later raw subs to the saved WBPP project, verify the calibration routing for every light group and rerun one integration from the individual exposures. Local Normalization remains off until a clean no-LN control reveals a real background problem between nights.
Where WBPP hands off
Once the linear master passes inspection, preprocessing is finished. My normal handoff is:
Linear WBPP master → GraXpert → BlurXTerminator → NoiseXTerminator → StarXTerminator → creative colour workflow
That later processing should not be used to conceal a bad master. If I find a genuine calibration, registration or rejection problem, I return to WBPP and fix that specific fault. Otherwise, I preserve the linear master and move forward.
The complete Ha/OIII and Foraxx-style colour process behind the finished image will become a separate article. The capture history and final result are already documented in Photographing the Lagoon Nebula With the DWARF Mini.
- Original raw lights loaded
- Matched stacked master dark assigned correctly
- Prepared filter-matched master flat loaded
- Calibration Diagram verified
- No bias routed directly to the lights
- CFA on, RGGB and VNG
- PSF Signal Weight and Interactive Frame Selection on
- Local Normalization, drizzle and both fast integration controls off
- Fresh output folder and clean Diagnostics result
- Linear master and rejection maps inspected before processing
The most important principle is not any single WBPP value. It is keeping the workflow controlled enough that, when something goes wrong, I can identify the cause instead of guessing.