How I Schedule the DWARF Mini for an Entire Night
How I Schedule the DWARF Mini
for an Entire Night
I scheduled four deep-sky targets across almost ten hours, then repeated the approach with two Minis. This is how I minimise dead time and automate a clear night.
A clear night is too valuable to waste because one target set at midnight and the telescope spent the next five hours doing nothing.
That was the problem I wanted the DWARF Mini's scheduling system to solve. Instead of staying awake to change targets manually, I wanted to prepare the whole night in advance, synchronise the plan and let the telescope move from one useful observing window to the next.
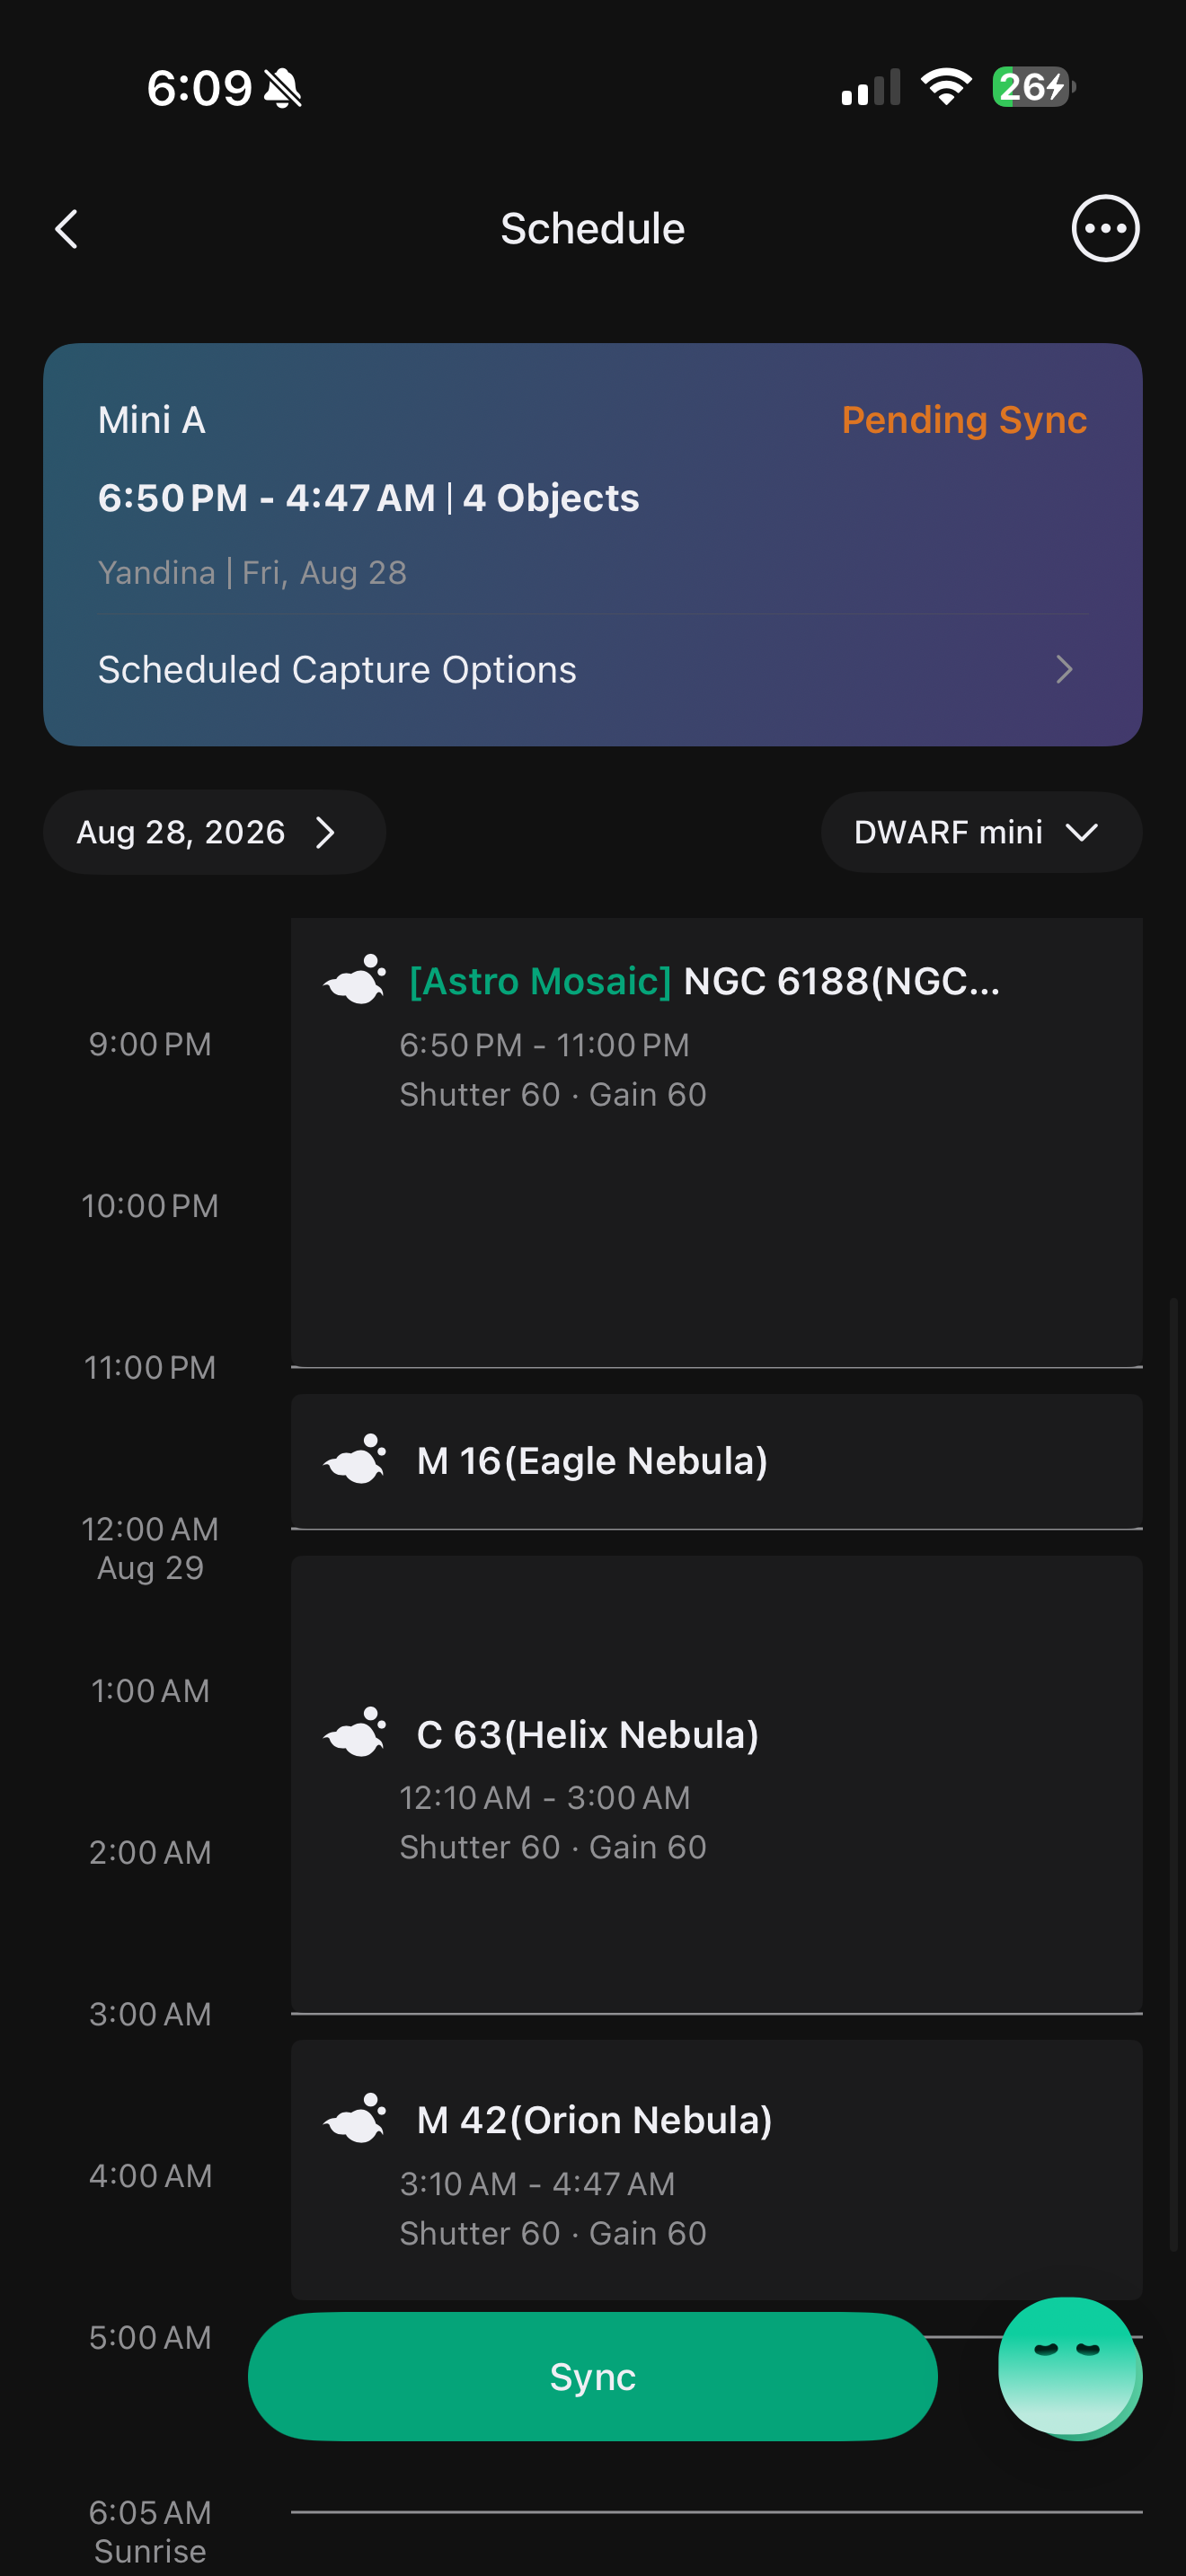
My most complete single-Mini example, scheduled on 28 August 2026, covered four objects from 6:50 pm until 4:47 am. It began with an NGC 6188 mosaic, moved through the Eagle and Helix nebulae, and finished on Orion before dawn.
A later run on 30 August applied the same idea to both Minis. The app reported four-object schedules from 6:50 pm until 4:45 am as accomplished on both units.
Four objects across 9 hours 57 minutes, using 60-second exposures at gain 60 and deliberate changeover gaps between the main blocks.
The value is not the number four. Shooting more targets does not automatically make a night more productive. The value is removing dead time while still giving each target a useful block at the right point in the night.
What an overnight schedule actually solves
The Mini can already track one target for hours. Scheduling becomes useful when no single target occupies the best part of the sky for the whole night.
An early-evening nebula may be dropping towards an obstruction. Another target may not reach a useful altitude until midnight. A late-season object might only become available shortly before dawn. Without a schedule, those transitions require me to remain awake, reconnect the phone, choose the next object and start another capture.
With a schedule, I assign each target a useful window in advance. The Mini then handles the target change, plate solving and capture sequence without the phone remaining connected all night.
For me, the practical benefits are:
- less unused time between targets;
- no alarm at midnight to start the next capture;
- better use of short seasonal observing windows;
- the ability to run different plans on Mini A and Mini B;
- a repeatable record of what each telescope was supposed to capture.
Scheduling does not create more darkness or improve poor weather. It helps the telescope use more of the clear time that already exists.
Plan the target order before opening the schedule
I do not divide the night into equal blocks or add targets in whichever order I remember them. I begin with the useful observing window for each object.
- Early-setting target: Capture it as soon as the sky is dark enough, before it reaches an obstruction or drops too low.
- Main target: Give the strongest central part of the night to the current priority project.
- Late-rising target: Start it once it reaches a useful position rather than wasting earlier time at poor altitude.
- Pre-dawn target: Use the final window before twilight for an object becoming available later in the season.
The four-object example followed that pattern:
| Order | Target | Role |
|---|---|---|
| 01 | NGC 6188, Fighting Dragons | Early-evening mosaic block |
| 02 | M16, Eagle Nebula | Transition target after NGC 6188 |
| 03 | C63, Helix Nebula | Main late-night block, 12:10 am to 3:00 am |
| 04 | M42, Orion Nebula | Pre-dawn block, 3:10 am to 4:47 am |
NGC 6188 ran from 6:50 pm until 11:00 pm. The screenshot does not expose the exact timestamps inside the shorter M16 card, so I am not reconstructing values from the visual timeline.
Four targets made sense because their useful windows were spread across the night. If one priority project is well placed for six hours, I would usually rather give it six hours than collect four shallow datasets for the sake of variety.
Build each capture block in the app
I set the Mini up and confirm the basic capture configuration before relying on a schedule:
- the telescope is stable and correctly oriented;
- EQ alignment has been completed for 60-second exposures;
- focus has been checked on stars;
- the correct filter is selected;
- matching dark frames are available;
- the first target's framing is correct;
- storage and power are sufficient for the planned run.
For each target, I then:
- Open the target in the Atlas.
- Check the target's position and useful observing window.
- Use Preview Frame to confirm the composition and orientation.
- Swipe up the lower menu and select Add to Schedule.
- Set the start time, finish time, exposure, gain, filter and capture mode.
- Save the block and repeat the process for the next target.
I used 60-second exposures at gain 60. Those settings work on my EQ-aligned Minis, but a new setup should earn longer exposures through actual tracking and star-shape tests before being trusted unattended.
Mosaics also need a time calculation. A four-panel mosaic divides the scheduled duration across its internal views. A four-hour mosaic does not provide four hours to every panel. Before adding one to a busy night, I check whether the resulting panel time is deep enough to be useful.
Leave deliberate changeover gaps
I use approximately ten minutes between major blocks. That buffer gives the Mini time to finish and save the previous session, move to the new target, plate solve, centre the frame and begin the next capture without the schedule depending on every operation completing instantly.
| Setup window | Power, connect, align, focus and verify the first target |
|---|---|
| Capture block 1 | Early-setting object |
| 10-minute gap | Save, slew, solve and centre |
| Capture block 2 | Main project or transition target |
| 10-minute gap | Save, slew, solve and centre |
| Capture block 3 | Late-rising object |
| 10-minute gap | Save, slew, solve and centre |
| Final block | Pre-dawn object, ending before twilight becomes destructive |
The gap costs a small amount of theoretical exposure time, but an overpacked schedule is more fragile. I would rather sacrifice ten minutes deliberately than lose an entire later block because the previous task overran or the target change did not settle cleanly.
Synchronise the schedule correctly
Saving a schedule in the app is not the same as arming it on the telescope.
When a plan shows Pending Sync, it has not yet been transferred to the connected Mini. I connect the correct telescope, synchronise the plan and confirm that its status changes to To Be Commenced.
This matters even more with two Minis because each unit receives its own schedule. I check the device name before synchronising Mini A, switch to Mini B and repeat the process for the second plan. The schedules can contain the same targets, different targets or different filters depending on the project.
Once the plan is armed, I do not press the Mini's power button. Powering the telescope off clears the schedule and prevents it from waking for the planned task. The Mini can enter its low-power standby state and wake for the schedule, but it must not be manually shut down.
Pending Sync is not ready. Confirm To Be Commenced on the correct Mini, then leave the telescope powered on. DWARFLAB gives the same warning in its DWARF Mini user manual.
Before leaving the system, I check:
- the correct Mini name;
- the correct date and location;
- the complete target order;
- no overlapping blocks;
- the correct filter for every target;
- the exposure and gain shown on the timeline;
- the final status after synchronisation;
- the weather risk for the entire scheduled period.
Run two Minis independently
Two Minis do not have to mirror each other. Each telescope can carry an independent schedule.
I can use that in three ways:
- send both Minis to the same target and double the gross telescope integration;
- split narrowband and broadband capture across the two units;
- assign different targets and progress two projects during the same night.
During testing, the two independently synchronised schedules began within approximately one second of each other. That made parallel capture practical without requiring the two telescopes to communicate directly or remain connected to the phone.
I explain the broader capture and buying decision behind this system in Why I Bought a Second DWARF Mini After One Night.
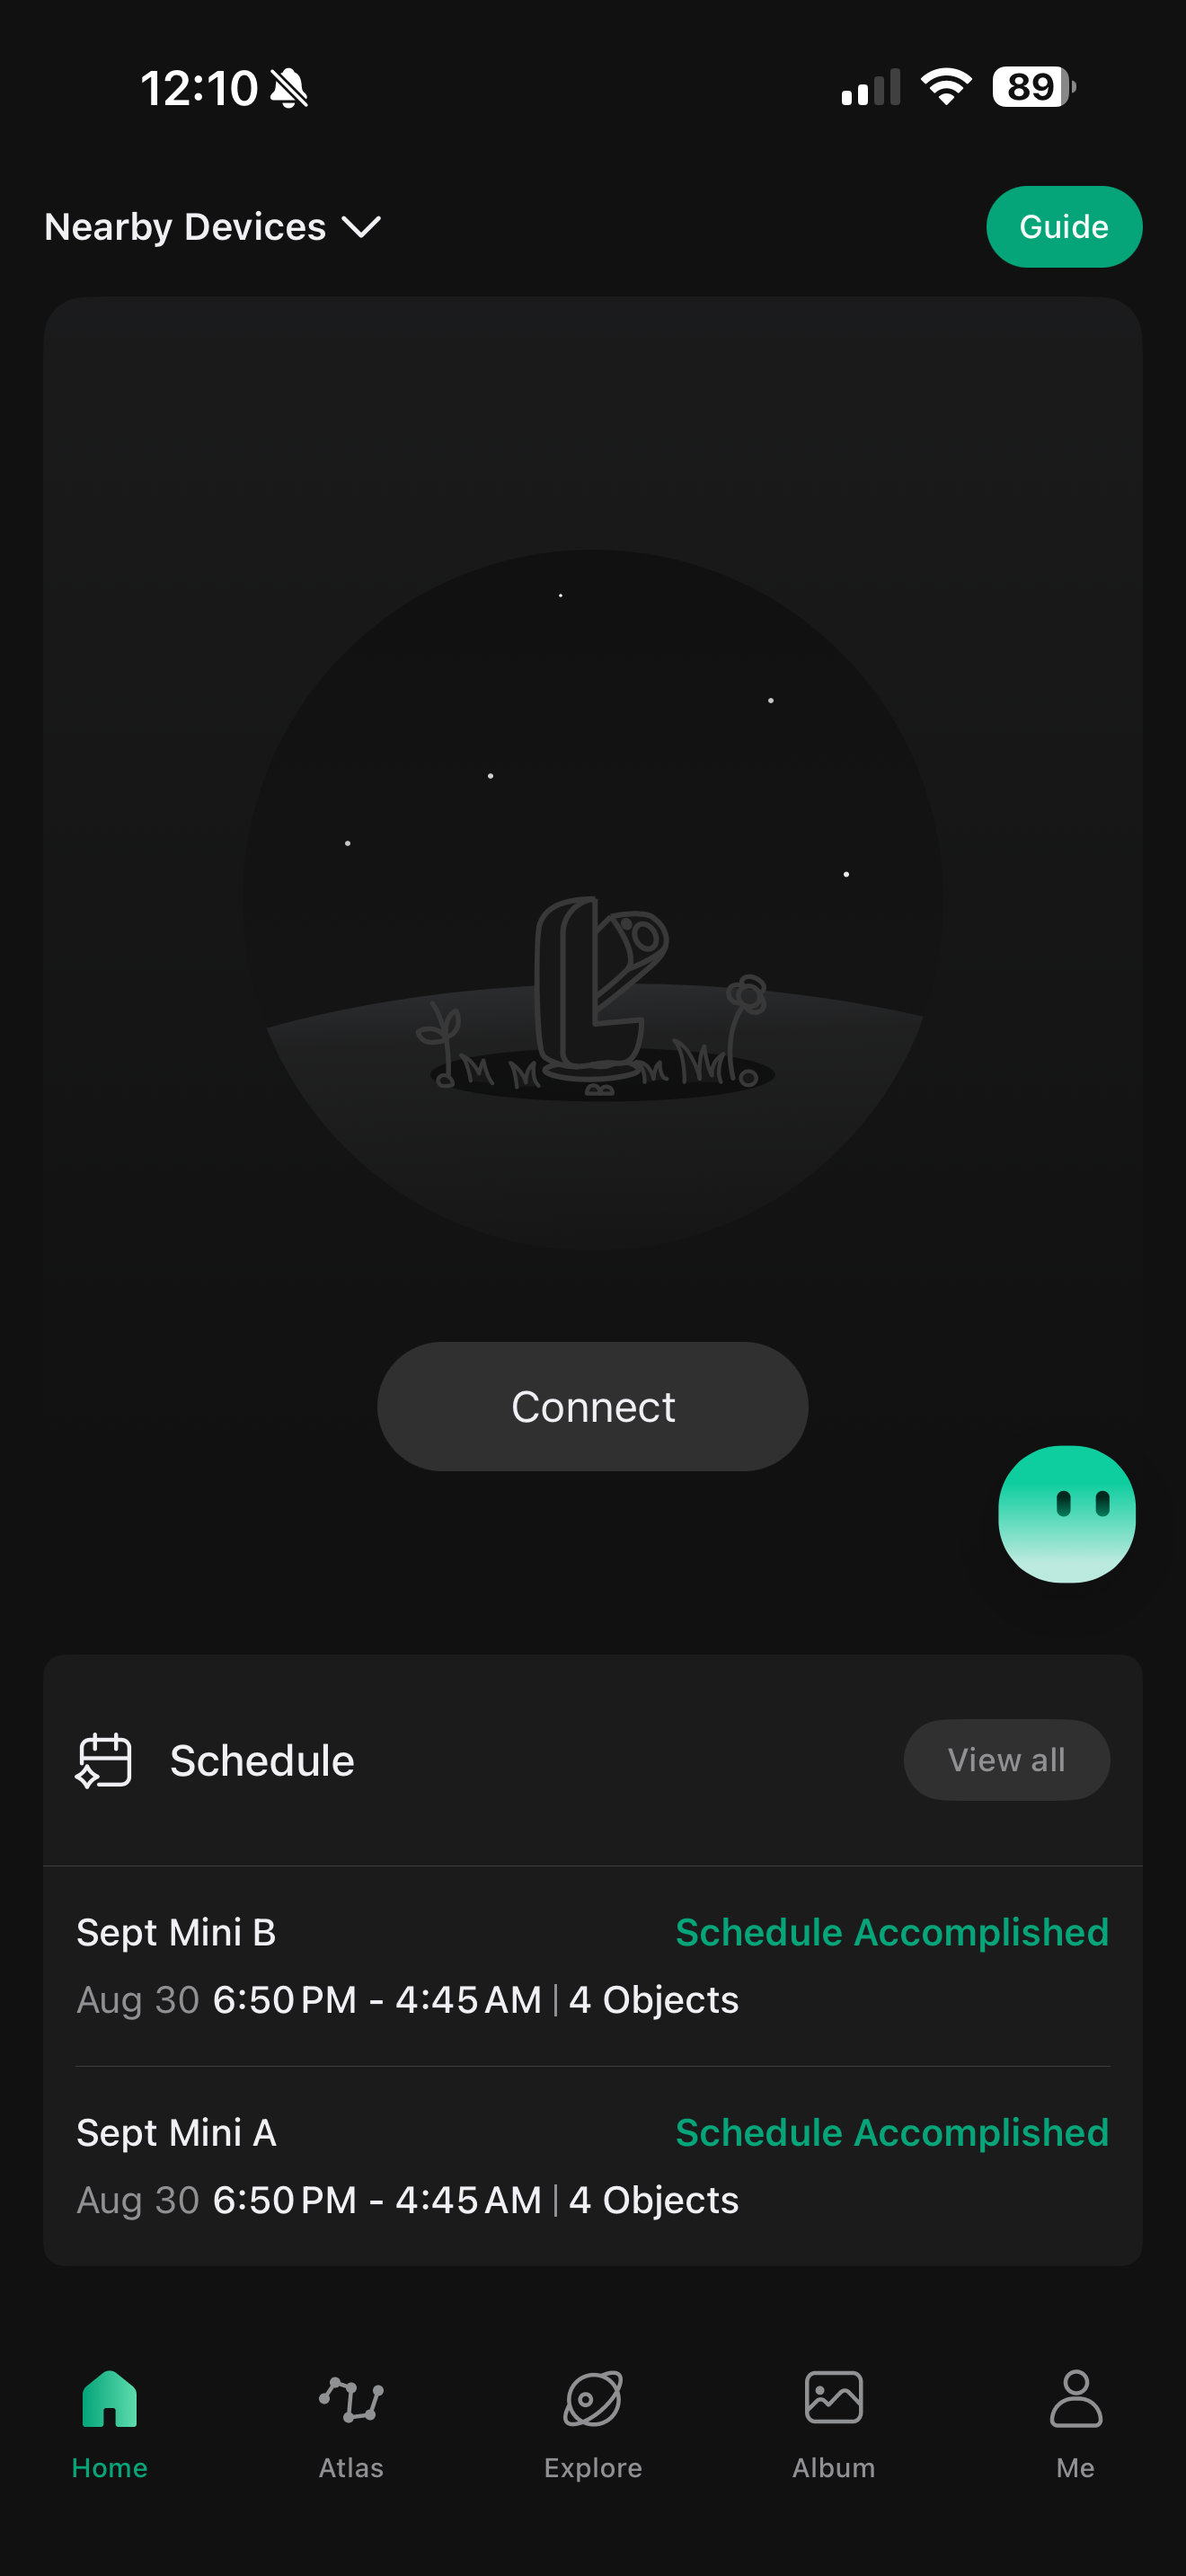
The completion screen is useful evidence that the app marked both plans as accomplished. It is not evidence that every scheduled minute produced usable data.
What “Schedule Accomplished” does not prove
The night shown in the two-Mini completion screen was affected by rain and I had to intervene. That is precisely why I do not treat Schedule Accomplished as a data-quality result.
The app status does not tell me:
- how much cloud crossed each target;
- how many frames were rejected;
- whether focus drifted during the night;
- whether every mosaic panel received equal coverage;
- how much accepted integration survived inspection;
- whether the final stack is actually clean.
After every scheduled night, I inspect the session folders, accepted and failed frames, live stacks and actual integration before updating a project total.
When I take the raw Mini files into PixInsight, I use the controlled process documented in How I Stack DWARF Mini Data in PixInsight WBPP. That inspection and preprocessing stage, not the schedule status, determines what data is genuinely worth keeping.
The Mini has no published rain-resistance rating. If rain is plausible, I do not leave it outside on the assumption that the schedule will protect it. Automation cannot replace a trustworthy forecast, active monitoring or retrieving the telescope when conditions turn.
The workflow I would repeat
The strongest version of this system is simple:
- Choose targets by their real observing windows.
- Give the priority project the longest useful block.
- Use ten-minute changeover gaps.
- Verify framing, filter, exposure and gain for every block.
- Synchronise the plan to the correct connected Mini.
- Confirm To Be Commenced before disconnecting.
- Do not press the power button after the schedule is armed.
- Monitor weather risk even when the telescope is otherwise unattended.
- Inspect the captured files before claiming the scheduled integration.
That workflow will not make every night perfect. It removes me from most of the target changes and lets a compact telescope keep collecting while I sleep.
- Both Minis stable, aligned and focused
- First target and framing verified
- Correct filter selected for every block
- Exposure and gain checked
- Changeover gaps included
- Schedule synced to the correct Mini
- Status changed from Pending Sync to To Be Commenced
- Telescope left powered on
- Storage and power checked
- Rain risk acceptable and monitoring plan active
The result is not four targets for the sake of four targets. It is a night designed around the sky instead of around the hours I am willing to remain awake.
If the Mini is collecting useful data while I am asleep instead of waiting for me to change targets, the schedule has done its job.